Page 1 of 2
Applying CPES before or after walls are up?

Posted:
Tue Sep 06, 2011 1:03 pmby Robbie
Hey guys, I've got the flooring all done and undercoated and I'm ready to put the walls up and get started on building the shell. My question is, will I be alright to get the walls up and fastened to the floor before I apply the CPES, and then just apply the CPES when I get it? I don't have the CPES yet and I probably won't for another couple of weeks. I can't really move forward until I have the walls up but I don't want to put the walls up and then have applying the CPES vertically be a PITA. What are your guys's experience with this? Any advice is apprecited! Thanks.
Robbie
Posted:
Tue Sep 06, 2011 1:40 pmby aggie79
Hi Robbie,
I used CPES and epoxy, and applied them flat and vertically. With the CPES, it really didn't matter that much one way or another. It is pretty much all solvent, so it didn't really have a chance to run. For epoxy, it definitely is easier to apply horizontally.
If you apply either vertically, you may want to throw down some drop cloths. I didn't and have several (permanent) rectangular spill patterns on my garage floor.
Take care,
Tom
Posted:
Tue Sep 06, 2011 1:55 pmby Robbie
Thanks for the heads up Tom. Is it a pretty thick consistency or is it somewhat runny? And how did you apply it? Roller, brush, etc.? I think I read somewhere that people use either to apply it. What was your preference?
Posted:
Tue Sep 06, 2011 3:01 pmby Oldragbaggers
Robbie wrote:Thanks for the heads up Tom. Is it a pretty thick consistency or is it somewhat runny? And how did you apply it? Roller, brush, etc.? I think I read somewhere that people use either to apply it. What was your preference?
CPES is very thin, about the consistency of mineral spirits. Putting it on with a roller will go a lot faster, and it will soak in as soon as it hits the wood.
If you want a real good seal, keep going back over it until it doesn't absorb any more. If you do that, you'll know you've got it waterproofed real well. As long as it is still soaking in quickly that means your wood is still open and porous and can still take in water.
Depending on how tight and dense your wood is, it can drink a lot of the stuff. I have spent hours painting it onto a dry boat bulwarks before.
Becky
Posted:
Tue Sep 06, 2011 3:05 pmby aggie79
Robbie,
CPES is really thin - much thinner than latex house paint or polyurethane.
A roller is the way to go. Just make sure that the foam-type rollers you use are solvent-resistant.
One last thing, the fumes will knock you down to your knees. I used an organic cartridge respirator - cheap one from HF - when applying the CPES. I'd certainly recommend using one, but if you apply it outdoors or somewhere with a lot of ventilation, you'll be okay.
Take care,
Tom
Posted:
Tue Sep 06, 2011 3:49 pmby planovet
I used both a brush and a roller but the roller is the way to go. Quicker and more even.

I applied mine while the walls were horizontal but you could apply it either way.

Posted:
Tue Sep 06, 2011 4:02 pmby Robbie
Sounds great. Thanks you guys for the replies! Looks like I'm ready to get the walls up then! I'm gonna look into ordering the 2 quart kit of CPES here in the next few weeks.
Posted:
Tue Sep 06, 2011 4:23 pmby planovet
I don't know how much wood you are trying to seal but a 2 quart kit won't last as long as you might think. I went through a 2 gallon kit rather quickly and had to re-order. Just a thought...
Posted:
Tue Sep 06, 2011 4:29 pmby Robbie
Hmmm. Good to know. I plan on using it on the outsides of my walls and just around the inside of the door openings only. My walls are 4x8 ply. I plan on doing a few coats of exterior primer and a few coats of paint with a automotive grade clear coat over the top. I wasn't thinking a lot of coats of CPES would be necessary but maybe just one coat to help out. The trailer will be covered while its being stored as well.
Posted:
Tue Sep 06, 2011 4:31 pmby planovet
If you are only doing one coat on the exterior then you should be fine. I used multiple coats on ALL surfaces, inside and out.
I guess I was a bit overzealous.

Posted:
Tue Sep 06, 2011 4:34 pmby aggie79
planovet wrote:I don't know how much wood you are trying to seal but a 2 quart kit won't last as long as you might think. I went through a 2 gallon kit rather quickly and had to re-order. Just a thought...
Robbie,
+1 on what Mark said.
My teardrop is a roughly 4' tall x 5' wide x 10' long. The 2-gallon kit allowed me to apply 3 coats on the bottom of the floor, and 1 coat on the sidewalls. I switched to epoxy and coated the floor and sidewalls with 1 coat of epoxy.
BTW, if you haven't already, check out Planovet's website to see how he painted his sidewalls. They look incredible!
Take care,
Tom
Posted:
Tue Sep 06, 2011 4:55 pmby Robbie
I just took a stroll through Planovet's site and specifically the section on the walls. That paint looks amazing!!! So glossy! Mark, what kind of rollers did you use there? They look like foam. And after the CPES was cured fully did you sand it to smooth it out after you put down the epoxy filler? God I can only hope my sides turn out looking like yours! What about a clear coat? What did you use? Sorry for all the ?'s. It is just perfect!
Robbie
Posted:
Tue Sep 06, 2011 5:19 pmby planovet
I don't want to hijack your thread but thank you for the kind words.
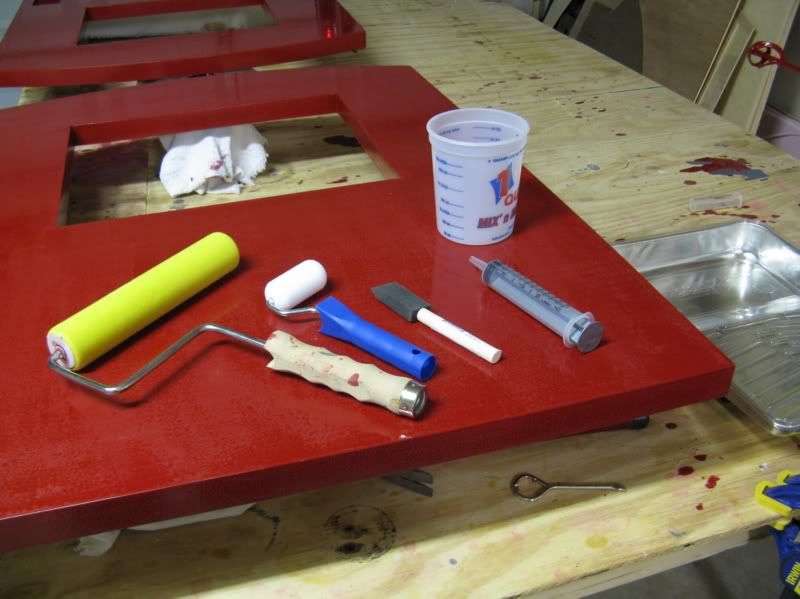
I used the thinnest foam rollers I could find. I did sand the walls smooth after I used the filler and CPES. I used Valspar Supreme Acrylic Enamel on because I wanted to match my trailer color. No clear coat, but if you use the optional hardener it comes out pretty glossy.
All I needed is in the picture below. The large syringe was used for measuring out the paint, reducer and hardener. I made sure I measured out the amounts exactly for each coat.
Posted:
Tue Sep 06, 2011 5:31 pmby Robbie
Your not high jacking, I asked you all the questions! Valspar huh? Sounds like something that should be available from Lowes. I tried to search for it online but no luck. I'm guessing the paint personnel will know what that acrylic enamel is and how to mix it. Well, it looks like I'm stopping at Lowes tonight!
Posted:
Tue Sep 06, 2011 7:42 pmby LarryJ
Here you go.
http://valsparglobal.com/val/resident/valspar_imp.jsp
This may not be the exact type of paint, but you should be able to find the data you are looking for.
For an example of what this paint looks like, check out this build, about half way down the page:
http://tnttt.com/viewto ... &start=150