Page 1 of 1
Wall Attachment Cleats

Posted:
Fri Sep 16, 2011 11:21 pmby Moho
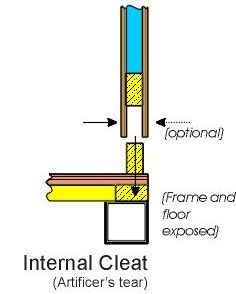
This will be my first build and ready to start building the shell for my woody tomorrow. I plan on building my walls constructed with 1/4" Baltic, 1x2's and 1/4" Baltic. I plan on using a 1x2 internal cleat tenon as in the photo below from wall attachment sticky.
After getting my first Kreg tonight

I was wondering if using it for the cleat attachment might be a better method, due to the strength of Kreg Joints. However after trying it on scrap, I am concerned with the structural integrity of the cleat. Its not using the Kreg in the way it was designed. It seems to be strong even without glue. I would probably do a joint every 12" or so if I went this route, not 2 side by side like in the photo. I also will be using premium lumber which is cut square for the cleats instead of furring strips and attaching with Titebond II to 3/4" plywood subfloor.
Any thoughts? Am I over thinking this? Photos below
Posted:
Sat Sep 17, 2011 1:59 amby tonyj
For you application, I don't think you are gaining anything but extra work using the kreg. Just run your screws in perpendicular to the floor thru the cleat, and drilling a recess for the screws depending on their length.
Don't worry, you'll find lots of places to utilize (and justify the purchase of

) your kreg jig. Just used one on making a face frame for a storage cabinet earlier this evening.
Posted:
Sat Sep 17, 2011 12:08 pmby Kharn
Instead of using a cleat, I was thinking about using the Kreg on the edges of the 3/4" plywood floor and screwing into the 3/4" plywood wall. That would let me use 5' panels for the floor, front, rear, ceiling, etc without needing a 5'2" panel for the floor. I was thinking a pair of Kregs every foot and glued the entire length, strong enough or recipe for disaster?
Posted:
Sat Sep 17, 2011 12:44 pmby Senior Ninja
That is the same system we used to build my TD.
We used lots of glue and fasteners to hold it all
together.
Steve
Posted:
Sat Sep 17, 2011 1:46 pmby CarlLaFong
Still trying to absorb all of this knowledge before I begin.
If you're using sandwich construction on the walls, why wouldn't you simply eliminate the hassle of the cleat and the pocket that it slides into, as well as all of the gluing and elaborate clamping that is needed, by building a conventional wall and leaving the outer skin off? You could then use the Kreg jig to drill angled holes, as shown. Glue and screw the walls to the floor and then skin the outside.
Just wonderin'. Seems like a lot of extra work to achieve the same result
Posted:
Sun Sep 18, 2011 9:33 pmby Wolffarmer
Carl, I built my insulated sides on the work bench so I could use gravity and lots of weights to glue things together. The wall still ended up light enough for me pick up and move around.
Moho. I did much as you have drawn there except I put the upper floor cleat flush to the side of the floor then extended the outer plywood below the floor to screw it to the under floor cleats on the outside and also screwed the inside ply to the above floor cleats. Ended up so strong I swear I could pull the trailer over with just the wall attached to the the floor. Plenty strong. Oh I also uses glue on the joints for added fastening.
Randy
Posted:
Mon Sep 19, 2011 1:04 pmby chartle
I have always heard the General Rule of Thumb is that you attach the thinner piece to the thicker piece and should have 1/3 of the fastener in the thinner and 2/3's in the thicker.
Any reason why you can't put your screws in from the bottom. 3 to 3 1/2 inch deck screws and glue should work more than fine.
It seems like you have a new tool looking for a problem that doesn't need fixing.

Posted:
Mon Sep 19, 2011 3:51 pmby chartle
Kharn wrote:Instead of using a cleat, I was thinking about using the Kreg on the edges of the 3/4" plywood floor and screwing into the 3/4" plywood wall. That would let me use 5' panels for the floor, front, rear, ceiling, etc without needing a 5'2" panel for the floor. I was thinking a pair of Kregs every foot and glued the entire length, strong enough or recipe for disaster?
I've never built a TD but I have joined a lot of wood together and either way drilling through the side to the floor or the floor to the side just doesn't sound like a good joint. Also edge gluing plywood is also a no no.
Plywood has two weaknesses screws into the edge and screws near the edge. I just don't see the screw getting a good grip on either piece of plywood.
If I was making this joint I would use a biscuit joiner and biscuits. The thing was pretty much designed for this joint.
http://www.harborfreight.com/4-inch-pla ... 38437.html
Posted:
Mon Sep 19, 2011 4:23 pmby Senior Ninja
GLUE! GLUE! GLUE!
We used glue every where we could. Our tests showed that no matter what
glue we used the wood always failed before the glue joint did. Fabricating the walls on a bench was easy. We also installed all the wiring and as mentioned about we glued the walls together "clamping" with weights. Buckets filled with water for the most part or anything else heavy we had around. Even used my telescope counter weight. I think we could remove most of the fasteners and the glue would hold everything together.
Steve
Posted:
Mon Sep 19, 2011 4:32 pmby Kharn
I actually concluded earlier today I'd need to use a biscuit joiner as I was researching using MDO plywood and read how it cannot be glued on the sides.
It seems like the biggest problem would be getting the entire thing assembled before the glue starts to set, assuming I wanted the sides outside the floor/ceiling for a true 60" width. Putting on one side, bracing, assembling the entire front/rear/ceiling, and then putting on the opposite side sounds really iffy with almost zero time to fix anything if it goes wrong. I guess going with the wall inside would be a better idea, even at the cost of 1.5" of bed width.
Since I have to use biscuits, the pocket screws would be just to dry-fit everything, and hold it together until the biscuits swell.
Posted:
Mon Sep 19, 2011 5:48 pmby CarlLaFong
I have built about a gazillion (give or take) cabinets using pocket holes and glue. Every one of them has had edge glued plywood set either in rabbets, dados or simple edge to long grain joints. I will admit that a cabinet is not subjected to the kinds of stresses that a trailer body is. The pocket screw joint is hell for strong and is ideal for plywood. The washer headed screw doesn't wedge the hole open and split the plywood like an ordinary wood screw does. I compresses the wood in a linear direction towards the joint and gets stronger the tighter it gets. Biscuits are great, but I don't really trust them alone. They are fine for alignment purposes. I've never had a biscuited joint fail, but I'm still, somewhat, leery of them. Just me, I guess. Screwing up through the bottom into the edge of the plywood is very poor practice and should be avoided at all cost.
I don't know if this has been mentioned before, but drywall screws are just that. They are very brittle and totally unsuitable for woodworking purposes, especially where there might be some movement
Posted:
Mon Sep 19, 2011 5:57 pmby canned o minimum
YES ! Drywall screws are JUST fer drywall !! Them heads SNAP OFF easily !!
Posted:
Tue Sep 20, 2011 10:38 amby chartle
canned o minimum wrote:YES ! Drywall screws are JUST fer drywall !! Them heads SNAP OFF easily !!
I found some great screws at Home Depot something like spax or spaz.
They have teeth on the points so in some circumstances you don't have to predrill and for the bigger higher torque ones they use a torx head.
I had to reinforce a banister and I had to drill through the end grain of 3 inches of wood then a 3/4 inch and then into the 2x4 underneath with a 4.5 inch #12 screw.
It was like driving a machine screw into a nut and it really really holds.