Page 1 of 1

Having a heck of a time shaping Cubby hatch gussets Help!

PostPosted: Mon Oct 03, 2011 8:36 am
by tvlawyer
I'm really struggling with shaping the galley hatch side gussets. I've pasted the specific sections in the plans where I'm having trouble. I would truly appreciate other board members' wisdom.

[i]"Cut a piece of cardboard to fit snugly on the side of the hatch opening, and trace the profile onto the cardboard, adding 3/8â€

PostPosted: Mon Oct 03, 2011 9:35 am
by CarlLaFong
If the compass is giving you fits, there's another method. Get a flat washer where the distance from the outer diameter and the inner diameter is 3/8. Place the washer on the edge of the plywood. Stick your pencil in the hole and hold it against the inner diameter. Carefully roll the washer along the edge of the plywood using the pencil as your "axle".
Another method is to wrap the end of the pencil with making tape until it is twice the width of the amount you want to add.

PostPosted: Mon Oct 03, 2011 10:18 am
by Jpageau
^ brilliant ^ love the washer idea.

PostPosted: Mon Oct 03, 2011 10:59 am
by aggie79
Larry,

Do you have a router? If so, you could make a template that matches the hatch profile, and then use the template along with the router and bushing to make the 3/8" offset.

Take care,
Tom

PostPosted: Mon Oct 03, 2011 12:50 pm
by CarlLaFong
^^^^^
What he said.
Many people aren't "power tool guys". They are uncomfortable with them, they fear the damage that they can inflict on their bodies and to their projects and avoid them, instead choosing less efficient and less accurate methods. Jigsaws are fairly non threatening so many choose them as their primary power tool. They are a good tool when properly used, but require quite a bit of skill and a good eye to achieve the results that we are satisfied with. Tools like routers scare people. They are noisy, often heavy, they can get away from you if you don't follow the rules and can wipe out a nice piece of stock in a heartbeat. Tablesaws can kick back, remove excess digits and destroy material as well.
I have, nearly, every woodworking tool that a home shop might have. The tools that I cannot live without are my tablesaw, my routers (I have 6), my cordless drill and my chopsaw
All this being said, if I was helping someone set up their first shop, after the tablesaw, I would tell them to buy a good medium sized router with a plunge and a fixed base, a set of good carbide bits and a set of guide bushings. Build a simple router table and you are ready to conquer the world. There is a program on some PBS stations called "Router Crafters" and the only tool that they use, other than a few saws and hand tools, is a router. It is an incredibly versatile tool

PostPosted: Mon Oct 03, 2011 2:41 pm
by 3822sean
CarlLaFong wrote:^^^^^
What he said.
Many people aren't "power tool guys". They are uncomfortable with them, they fear the damage that they can inflict on their bodies and to their projects and avoid them, instead choosing less efficient and less accurate methods. Jigsaws are fairly non threatening so many choose them as their primary power tool. They are a good tool when properly used, but require quite a bit of skill and a good eye to achieve the results that we are satisfied with. Tools like routers scare people. They are noisy, often heavy, they can get away from you if you don't follow the rules and can wipe out a nice piece of stock in a heartbeat. Tablesaws can kick back, remove excess digits and destroy material as well.
I have, nearly, every woodworking tool that a home shop might have. The tools that I cannot live without are my tablesaw, my routers (I have 6), my cordless drill and my chopsaw
All this being said, if I was helping someone set up their first shop, after the tablesaw, I would tell them to buy a good medium sized router with a plunge and a fixed base, a set of good carbide bits and a set of guide bushings. Build a simple router table and you are ready to conquer the world. There is a program on some PBS stations called "Router Crafters" and the only tool that they use, other than a few saws and hand tools, is a router. It is an incredibly versatile tool
and a drill press :thumbsup:

PostPosted: Mon Oct 03, 2011 3:46 pm
by CarlLaFong
[/quote] and a drill press :thumbsup:[/quote]

I only have two drill presses ;)

PostPosted: Mon Oct 03, 2011 9:03 pm
by wagondude
Another low-tech option: Lay the wide side of a carpenter's pencil against your profile and just follow the curve. If you need a wider scribe, turn it up on the narrow side. But you will get the best results with the router methode already mentioned.

PostPosted: Mon Oct 03, 2011 9:17 pm
by Steve_Cox
I too read the Cubby Plans one time.... when it came time to build a hatch I cut a piece of 3/4" plywood that would fit in the hatch opening, clamped it to the side wall, got out the Sharpie marked a line for the hatch curve, took the plywood piece out, put dots with the Sharpie 1-1/2" away from the curved line every few inches connected the dots, cut it all out with a jig saw making sure I stayed on the outside of the lines. Then used a belt sander to smooth the jagged jig saw cut down to the lines. This became the template for all the other hatch ribs. When they are all jig sawed out, you can clamp them together to belt sand them to perfection all at one time.

Has anyone mentioned "springback" :D

Sorry about the run on sentence.

PostPosted: Wed Oct 05, 2011 8:40 am
by tvlawyer
Steve_Cox wrote:I too read the Cubby Plans one time.... when it came time to build a hatch I cut a piece of 3/4" plywood that would fit in the hatch opening, clamped it to the side wall, got out the Sharpie marked a line for the hatch curve, took the plywood piece out, put dots with the Sharpie 1-1/2" away from the curved line every few inches connected the dots, cut it all out with a jig saw making sure I stayed on the outside of the lines.


I don't understand the instruction to "trace the profile onto the cardboard, adding 3/8"." Where and why am I to add 3/8" It seems to me I can draw along the edge of the sidewall and then just draw the second line 1-1/4" below that.

I have read about "spring back", but I think it should not be a problem for me since I am using 3/4" birch ply, a rather hard wood, for my gussets. Do you think I should make a third gusset for the center of the hatch?

PostPosted: Wed Oct 05, 2011 2:54 pm
by aggie79
tvlawyer,

While I didn't think my hatch was that hard to build, trying to figure out how to build it was perplexing. I think I have an idea of what you are wrestling with but please note that I have not seen the cubby plans.

The first thing to discuss is what type of hinge you are using. I believe the cubby plans call for a hurricane hinge that is offset. By offset, I mean that one side of the hinge is higher than another causing the roof/bulkhead to be on a different plane than the hatch. It is my thought that the reason the plans call for adding the 3/8" is to accomodate the offset hinge. In this situation, the top of the hatch would sit 3/8" higher than the top of the roof and the sidewall profile. The offset would leave room for weatherstripping underneath the hatch and sidewall profile.

You can also get a hurricane hinge that is not offset. That is the type I used. It looks like my chicken-scrattching sketch below.

Image

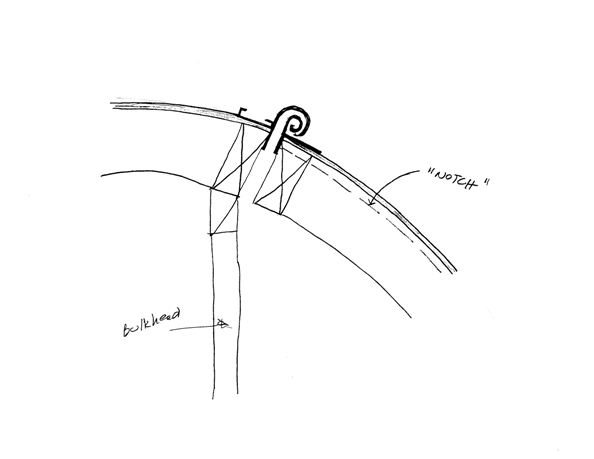
If you use a hinge that is not offset, there is no need to add the 3/8" to gussets or hatch framing. The area for the weaterstripping is accomodated by notching the sidewalls. I believe you said that you already did that. The gussets or hatch framing would then follow the profile of the sidewalls before notching.

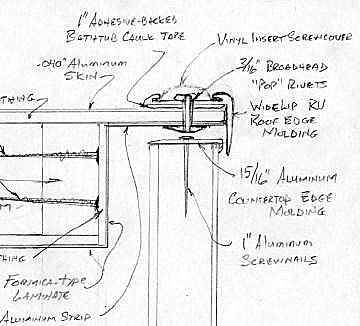
With either type of hinge, the hatch framing sits higher than the sidewall. It looks something like this in cross-section:

Image

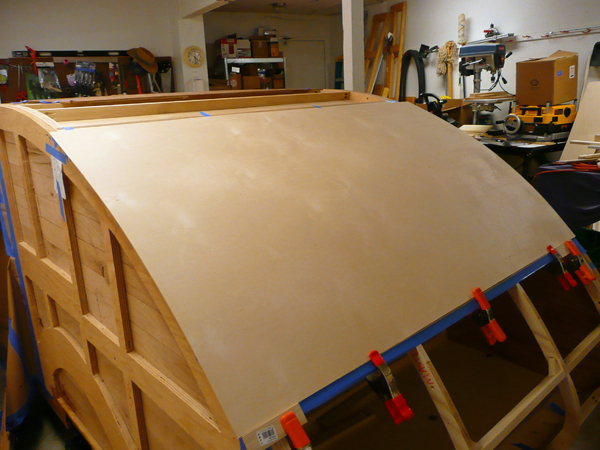
As far as how deep to make the gussets or hatch framing, I think 1-1/4" is a little light. I made my hatch framing 1-1/2" deep out of 3/4" ply. The outer two were doubled with two additional singular-width gussets in the middle.

Image

As it turned out, everything was okay and I did not have springback, but there is a little more flex or twist than I like.

I do think that it is important to frame your hatch in place. Even with careful layout and installation of the sidewalls, floor and bulkhead, I ended with some "variances" in dimensions and being square. Framing in place allowed (using spacers) allowed me to cut my hatch framing to fit the opening.

Image

Image

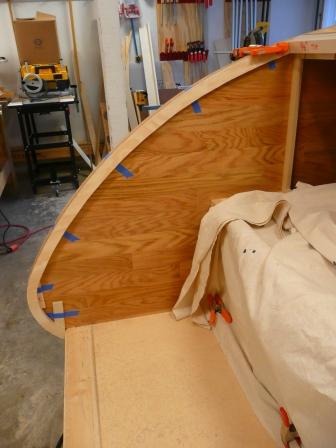
Also, if possible, I think it is better to skin the hatch with the hatch framing in place.

Image

My bulkhead was not solid at this point in construction, so I just ran some temporary screws through the hatch framing into the sidewalls. I then attached the plywood skin. The plywood was "run wild" past the sidewalls. Later, after the glue was set, I trimmed the plywood to the sidewalls. I left the hatch in place and didn't remove the temporary screws until I was ready to attach the hinge. Please note that up until this point I had not notched my sidewalls. I did this when I had the hatch off to install the hinge.

Hope this helps,
Tom

PostPosted: Wed Oct 05, 2011 4:06 pm
by tvlawyer
Tom,

It suddenly all makes sense. Thank you!

And thanks to everyone else for your comments.

Larry

PostPosted: Wed Oct 05, 2011 5:35 pm
by CliffinGA
Larry you need to post some pics so the rest of us can see your build especially the rest of us in GA :lol:.

Cliff :thumbsup: