Page 1 of 2
Oops! A little slip of the router

Posted:
Fri Jan 27, 2012 7:56 pmby PSBreen
Well now I've done it. I had a momentary lapse in concentration and let the router wiggle while trimming the door spacers. It left about a 2" x 1/8" gouge on the back edge (latch side) of the door frame. Sadly it's on the outside wall so it's very visible to me. We are hoping to stain and seal the outside of our trailer with epoxy so I'll need a way to hide this. Does anyone have any suggestions? At the moment I can only of a few things to try.
1. Use wood fill/patch and hope it accepts the stain like the plywood.
2. Fill it and install aluminum trim with a 1/8" lip in the door frame. This may be a problem as the corners are not square, they have a 1" radius.
3. Fill it and paint the outside of the trailer. Consider it a learning experience, live with it and pay closer attention on the next one.
Here's a picture of the gouge.
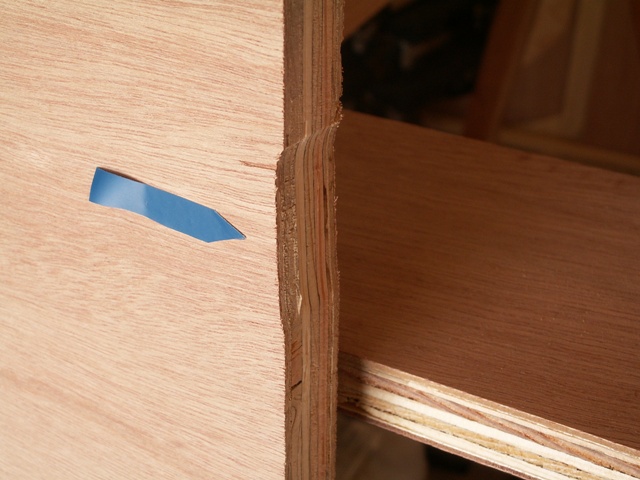
The gouge is located along the back edge (not the hinge side) of the door opening about 3" below the corner. Look for the small blue piece of tape.
Posted:
Fri Jan 27, 2012 8:12 pmby LWW
Is that on the hinge side of your door, I hope?Larry
Posted:
Fri Jan 27, 2012 8:42 pmby PSBreen
Nope it's the back edge. The latch side opposite the hinge. I wouldn't be worrying about it if it was the hinge side cause the pin would cover it.
Posted:
Fri Jan 27, 2012 8:43 pmby bdosborn
How do you plan to finish the outside?
Bruce
Posted:
Fri Jan 27, 2012 8:53 pmby CarlLaFong
You can fix it with a "Dutchman". Mark off a triangle, using your goof as the base of the triangle. Like this, >. Make the other two side at least twice the length of the base. The "taller" the triangle, the easier it is to match. Cut out the triangle with a chisel to the depth of the goof. Find another piece of wood with a matching grain pattern and cut a patch or "Dutchman" to fit snugly in the recess. You may have to make two or three to get a match that satisfies you. Once you're happy, glue it in and sand it down to level. You can put some CA glue in any small voids and sand over it before it cures. The sanding dust and the CA make a nice filler. You can, sometimes, use a pencil to add some grain lines to make it match a bit better before stain and final finish
Posted:
Fri Jan 27, 2012 8:54 pmby PSBreen
We are still hoping to use stain and then seal the outside of our trailer with epoxy.
Posted:
Fri Jan 27, 2012 9:11 pmby S. Heisley
Fill it or patch it and then trim that outside edge of your door with (a) wood strip(s). Make it a design feature of your build. With the wood trim on the doors and possibly around windows (or whatever), you can still have a woody; and, if the trim boards are a slightly different color, it'll look like you meant for it to be that way.
If you don't want to put trim all the way around your doors and windows, don't. You can simply put a design-style piece of wood on the one side of each door.
Or, you can patch your doors with an inserted piece in a design of a contrasting shaded plywood that looks like you meant to do that.
Yet another idea is to get some sort of decorative metal piece to attach over that area. If it is where the latch goes, get a fancy metal plate to put under the latch so that spot is well hidden and becomes a design feature.
If you have enough plywood, you might be able to carefully lift off the old plywood and completely replace the outside piece of plywood on the door
You'll figure out what works for you. Then, you'll do it well!
Posted:
Sat Jan 28, 2012 8:34 amby 48Rob
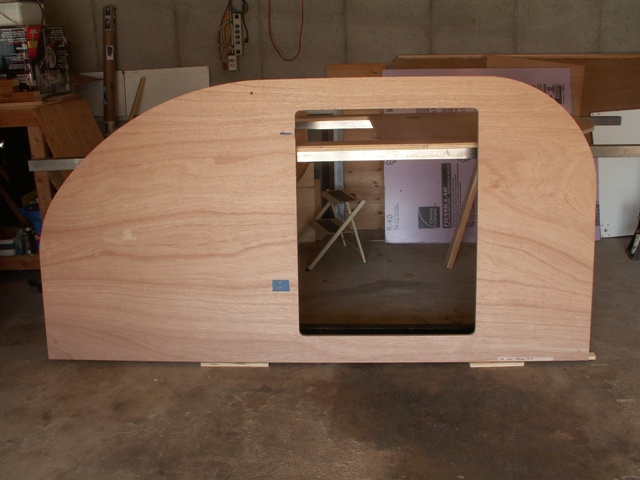
Can you show a larger picture, one that shows the entire door or side of the trailer?
It sounds like you plan to stain and use a clear finish, but you have two different types of plywood...
If we can see the "whole" picture, maybe one of us can come up with a creative fix to make it look as if it was planned.
Rob
Posted:
Sat Jan 28, 2012 11:02 amby PSBreen
Rob,
Updated pictures in post# 1
There are two types of ply in our walls, they are 3/4" ACX with 1/8" luan skins. We are still hoping to use stain and epoxy on the outside of the trailer.
The gouge is on the back edge (not the hinge side) of the door opening, about 3" below the top corner. So far it's looking like the "Dutchman" patch may be a good place to start. It would at least get the edge of the opening straightened out. Not quite sure what to try after that. Aluminum trim with a 1/8" lip is a possibility, but I'm not sure I can form it around the 1" radius corners.
Posted:
Sat Jan 28, 2012 5:20 pmby PSBreen
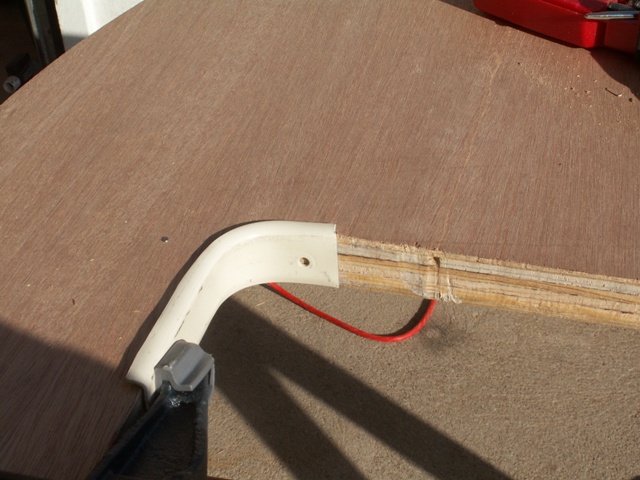
I have a Dutchman style patch in place. Waiting on the glue to dry so we can sand it and see how it looks. I'm kind of at a stand still for the moment. So I figured I'd see if it's possible to bend a piece of trim around a corner. I took a small piece of edge trim and cut the lip down to 1/4". It formed pretty well. I just had to go slow and keep flattening the lip. This may be a possible solution to cover up the gouge.
Posted:
Sat Jan 28, 2012 6:18 pmby chartle
How about take another 1/4" or 1/2" all around and apply a strip of wood trim flush with the sides all around.
How were you planning on finishing that edge?
Posted:
Sat Jan 28, 2012 6:32 pmby 48Rob
I think Chartle's idea is good.
Are you building your own door?
If so, use a router (with template) to shave a little off one or both sides to even things up.
If you're using a manufactured door, you can apply a thin strip of wood to "finish" the ege and bring the tolerance back to original.
Rob
Posted:
Sat Jan 28, 2012 6:33 pmby halfdome, Danny
Dutchman's are great for fixing mistakes  .
.
You also have another option, but it involves more work.
Redo your door template to your gouge thickness wider all around and use it to clean up the goof.
Then either band the opening plywood or the door plywood with solid wood to bring you back to your original tolerances.
The banding will seal the plywood edge and look nice when finished.
Doing both door's or openings would look best.
Using a rabbet bit through half the thickness and finishing off with a straight bottom bearing bit will make your template opening wider.
Anyway that's what I'd do.  Danny
Danny
Posted:
Sat Jan 28, 2012 7:30 pmby PSBreen
We gave the "Dutchman" patch a try. It really doesn't look half bad, considering it hasn't been sanded yet.
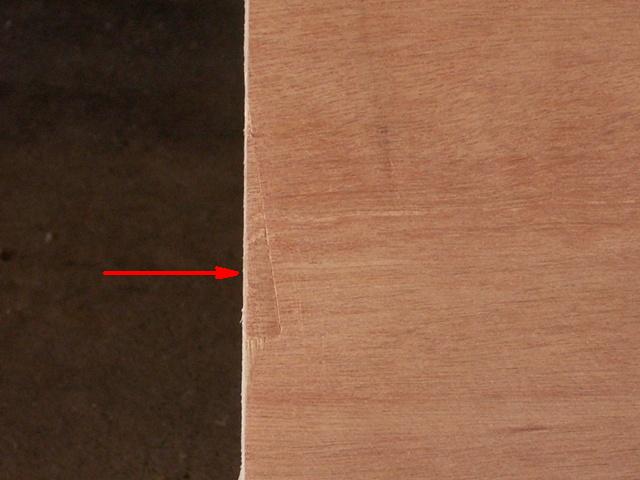
We are using Steve Frederick's door seal method and were planning to coat the edges of the door and it's opening with epoxy. There are several ideas on here that are looking real interesting. I know one thing for sure, I will not use 1" radius corners on the door on our next build. They really throw a kink into repairs. The next one will have square corners or a gentle curved edge.
Posted:
Sat Jan 28, 2012 7:50 pmby halfdome, Danny
PSBreen wrote:We gave the "Dutchman" patch a try. It really doesn't look half bad, considering it hasn't been sanded yet.
We are using Steve Frederick's door seal method and were planning to coat the edges of the door and it's opening with epoxy. There are several ideas on here that are looking real interesting. I know one thing for sure, I will not use 1" radius corners on the door on our next build. They really throw a kink into repairs. The next one will have square corners or a gentle curved edge.
That looks great .
If you stain the patch and surrounding area you can do a little creative graining with an almost dry stain brush or wood tone felt pens between your protective coatings.
I've made patches disappear using this method.
Danny