Page 1 of 2
Cutting Symmetrical Side Walls

Posted:
Mon Jul 02, 2012 6:11 pmby shootr
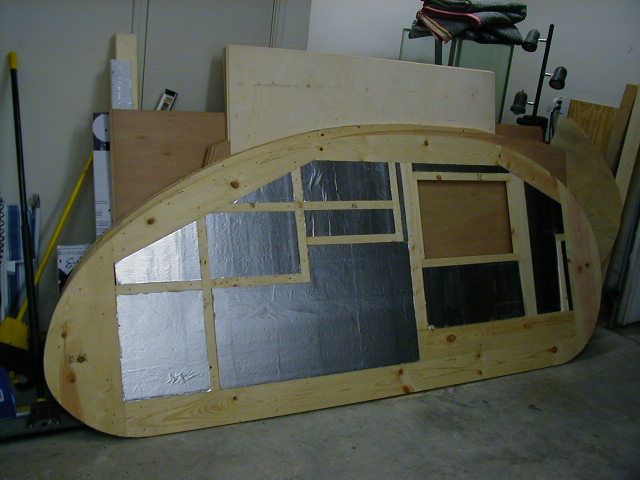
As I plan my 4' x 8' Benroy-style trailer build on a Harbor Freight frame, I'm taking into account my limitations in skills for fabricating things. Currently I'm preparing to create the sidewalls out of 1/4" ply/1" rigid foam/1/4" ply sandwich/composite construction, with solid wood framing inside for structural support.
I know for a fact I will never cut 4 sheets of plywood separately and maintain the same profile on all of them. I haven't seen it mentioned anywhere so far, but is it feasible to expect I can clamp/screw all 4 sheets of 1/4" plywood together, draw out the profile, and cut them all at once? Or was it a given that is how it is done anyways.
Thank you.
Re: Cutting Symmetrical Side Walls
Posted:
Mon Jul 02, 2012 7:25 pmby Woodbutcher
I would suggest making the inner frame work first. Match both to each other. Then attach your skins and trim off the excess with a flush bit (with bearing) in your router. It is easier to use 3/4" plywood for the sides. Much less work and after you make 1 piece to your profile you can match the other using the flush bit. Just a thought.
Re: Cutting Symmetrical Side Walls
Posted:
Mon Jul 02, 2012 8:10 pmby Loader
That is exactly what I did, stacked all four pieces ensuring proper orientation (interior face vs exterior face) and cut! A bit scary at first, but slow and steady with a sharp blade. I cut a little proud of my mark, and then sanded them flush to the line. I have used that technique on two builds with decent results.
Some people have made templates a have had great results. Trim bits and a router also can be your friend!
Good luck in what ever method you choose.
Re: Cutting Symmetrical Side Walls
Posted:
Mon Jul 02, 2012 10:11 pmby Lgboro
I just bent a piece of 1/4 inch molding to the shape I wanted and traced it. I stick built out of cedar for weight savings. Also cedar stripped the inside with sub 1/8" cedar strips and no outside wood just floated aluminum. Haven't installed my pet cool so I haven't weighed yet but it is really light to have TV,radio, solar, etc. and other goods installed. A lot of work but I tow with a Jetta so to me it was worth the extra time and work.
Re: Cutting Symmetrical Side Walls
Posted:
Mon Jul 02, 2012 10:57 pmby asianflava
I made a template out of 1/4in ply and used router to cut my "stud walls" and the faces. I think 1/2in for the template would be better since it gives the router bearing more surface to ride on, but it will be heavier and harder to handle. IMHO 1/4in with 1in foam is pretty thick, especially for a 4x8. I used 1/8in luan for the faces and 3/4in foam in the walls.
Re: Cutting Symmetrical Side Walls
Posted:
Tue Jul 03, 2012 9:52 amby aggie79
asianflava wrote:I made a template out of 1/4in ply and used router to cut my "stud walls" and the faces. I think 1/2in for the template would be better since it gives the router bearing more surface to ride on, but it will be heavier and harder to handle. IMHO 1/4in with 1in foam is pretty thick, especially for a 4x8. I used 1/8in luan for the faces and 3/4in foam in the walls.
If possible purchase or borrow a router and template bit.
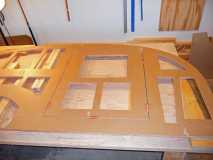
Like others, I made a template out of 1/4" MDF. (In the picture I had not yet cut the door opening in the template.)

For "framing" I used 3/4" plywood. Lay the template on top of the plywood and trace the outline of the framing onto the plywood.

Then remove the template and rough cut the plywood framing with a jig saw.

I don't have a picture of it, but place the template back on the plywood, and use a router with a template bit to finish cutting the plywood framing. (I purposely did not cut the doors all of the way through at this time. I left the door framing in place so that the grain of my interior finishes would be continous.)
As others have said, 1/4" plywood will work as exterior and interior skins but 1/8" plywood will be strong enough and will save some weight.
Re: Cutting Symmetrical Side Walls
Posted:
Wed Jul 04, 2012 1:08 pmby markhusbands
couldn't you do the routed plywood frame concept and just skip the MDF template, using the first plywood frame as the template for the other frame and the four skins?
Re: Cutting Symmetrical Side Walls
Posted:
Wed Jul 04, 2012 4:47 pmby Verna
markhusbands wrote:couldn't you do the routed plywood frame concept and just skip the MDF template, using the first plywood frame as the template for the other frame and the four skins?
The MDF is less expensive than the plywood. So many of those building the tear drops see "things" they want to change after making the template. Since MDF is cheaper, it's not as great a loss if the changes are so great that another MDF template needs to be made.
Re: Cutting Symmetrical Side Walls
Posted:
Wed Jul 04, 2012 5:54 pmby aggie79
Verna wrote:markhusbands wrote:couldn't you do the routed plywood frame concept and just skip the MDF template, using the first plywood frame as the template for the other frame and the four skins?
The MDF is less expensive than the plywood. So many of those building the tear drops see "things" they want to change after making the template. Since MDF is cheaper, it's not as great a loss if the changes are so great that another MDF template needs to be made.
The 4' x 10' x 1/4" was $11 so if I messed it up I wouldn't be out much money. Another reason to use a template rather than just cutting the plywood is that I re-used the template many times to cut my roof framing, hatch framing; align the dado joints for my front cabinet and bulkhead face frames; cutting the aluminum for my sidewalls, etc.
Re: Cutting Symmetrical Side Walls
Posted:
Thu Jul 05, 2012 11:43 amby markhusbands
I'm convinced. The MDF template seems really useful.
Here's another question. Let's say you want to build somewhat taller walls - perhaps a bit over 5'. Would you consider it crazy to build the wall cores in front and back halves (using the routed foam-filled approach) and then skinning with thin ply in top/bottom halves?
And would you skin them flat (easier to manage glues) then erect, or upright (smaller, lighter pieces to pick up) and then skin?
Re: Cutting Symmetrical Side Walls
Posted:
Thu Jul 05, 2012 11:56 amby Fishingtomatoseed
Woodbutcher wrote:I would suggest making the inner frame work first. Match both to each other. Then attach your skins and trim off the excess with a flush bit (with bearing) in your router. It is easier to use 3/4" plywood for the sides. Much less work and after you make 1 piece to your profile you can match the other using the flush bit. Just a thought.
What woodbutcher said.
Worked good for me.
Re: Cutting Symmetrical Side Walls
Posted:
Thu Jul 05, 2012 4:18 pmby NathanL
Lot of good techniques but I will say even if you don't get it quite the same you won't notice unless you make one side 6" shorter than the other, or nearly that much.
Go measure car doors on a cars made in the 50's and earlier, even on a car like the '55 Chevy the door lenghts aren't the same with one side being 1/2 longer than the other because the tooling was made from a handmade model.
It's amazing the stuff I have measured that looked "dead on" that was so far out of square and plumb it wasn't funny.
Re: Cutting Symmetrical Side Walls
Posted:
Thu Jul 05, 2012 4:56 pmby shootr
Couple things:
If I'm using composite construction (thin ply/foam/thin ply with solid wood inserts at key points), I'm not seeing how the flush bit thing works. I want to build insulated because of the temp extremes I intend to use it in - +100degrees summertime and freezing temps in the fall/spring. Is it the consensus that insulated isn't necc.? (I'm not installing heat or AC, our tents never had them and I don't want the hassle/noise/etc. - I'm supposed to be camping!

When people are saying they are using 3/4" ply and skinning it - do you mean 3/4" "ugly" plywood, and a "beauty" skin of luan for looks, with no insulation?
I really appreciate everybody's input - this forum is the most enjoyable I've been on (in any topic)! Thank you all for taking the time to write back.

Re: Cutting Symmetrical Side Walls
Posted:
Thu Jul 05, 2012 4:59 pmby shootr
NathanL wrote:Lot of good techniques but I will say even if you don't get it quite the same you won't notice unless you make one side 6" shorter than the other, or nearly that much.
Go measure car doors on a cars made in the 50's and earlier, even on a car like the '55 Chevy the door lenghts aren't the same with one side being 1/2 longer than the other because the tooling was made from a handmade model.
It's amazing the stuff I have measured that looked "dead on" that was so far out of square and plumb it wasn't funny.
I'm pretty OCD, so I've been figuring on fairly tight tolerances. My nightmare is trying to sheet the roof, but because the sides aren't plumb to each other, the roof sheet won't lay flat and show ripples or buckles or whatever...
Re: Cutting Symmetrical Side Walls
Posted:
Thu Jul 05, 2012 7:37 pmby asianflava
shootr wrote:Couple things:
If I'm using composite construction (thin ply/foam/thin ply with solid wood inserts at key points), I'm not seeing how the flush bit thing works. I want to build insulated because of the temp extremes I intend to use it in - +100degrees summertime and freezing temps in the fall/spring. Is it the consensus that insulated isn't necc.? (I'm not installing heat or AC, our tents never had them and I don't want the hassle/noise/etc. - I'm supposed to be camping!
When people are saying they are using 3/4" ply and skinning it - do you mean 3/4" "ugly" plywood, and a "beauty" skin of luan for looks, with no insulation?
I really appreciate everybody's input - this forum is the most enjoyable I've been on (in any topic)! Thank you all for taking the time to write back.
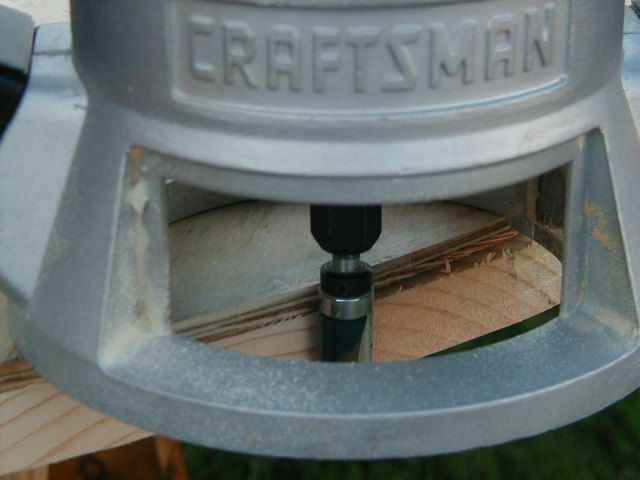
Like this?
Like I said, you don't need walls that thick, 1/8in luan is all you need for the faces. The whole reason to put the "studs" in the walls is the same for a house, so you can screw things to solid wood.
In this picture the template is on top, screwed down to the frame. The router bearing rides on the template and the flush bit cuts the wood underneath.