Page 1 of 2
Devil's Putty - A.K.A. Bondo

Posted:
Wed Sep 26, 2012 12:38 pmby WesGrimes
I have been stalled for the last year over my hate affair with Bondo.
It is always too cold of a batch and never sets, or too hot of a batch and sets imediatly. Then I just end up with endless waves.
Anyone have any good advice for working with this stuff?
Re: Devil's Putty - A.K.A. Bondo
Posted:
Wed Sep 26, 2012 3:48 pmby CarlLaFong
The best advise, with plastic fillers, is to follow the directions on the can. Temperature is a big factor, as far as it kicking off too fast. In the dead of summer, it can be a real PITA. You can decrease the amount of hardener a little to slow it down, but you do have to add enough to get the chemical reaction to fully set. If the temps are in the mid 70s, you shouldn't be having any problems. I always mix according to color. A light pink, like salmon, is about right. Get it mixed real well, but as quickly as possible. Use a plastic spreader. Putty knives aren't the best for bondo. Spread it as smooth as you can, but don't sweat it too much. When it starts to set, grab your cheese grater (Surform file) and shape it. After it fully cures, sand it smooth. Don't mix more than you can spread in a few minutes and when it starts getting stiff on the mixing board, it is too late. Toss it out.
Re: Devil's Putty - A.K.A. Bondo
Posted:
Thu Sep 27, 2012 10:01 amby jstrubberg
I guess it depends on heh paint that you are putting over it, but I wouldn't use Bondo unless I had to.
I've had good luck filling the grain of wood and smoothing it out with good old drywall mud. Much thinner than Bondo, a lot easier to apply, and the result is so thin it's pretty well irrelevant as far as durability is concerned.
Re: Devil's Putty - A.K.A. Bondo
Posted:
Thu Sep 27, 2012 9:31 pmby WesGrimes
Thanks Carl, I am going to try smaller batches by color and see if it helps...
I wrapped the whole teardrop with three layers of fiberglass, so it is more than just grain to fill. It would be some pretty thick drywall mud.
Re: Devil's Putty - A.K.A. Bondo
Posted:
Thu Sep 27, 2012 9:43 pmby Oldragbaggers
If you used fiberglass already why not fill it with epoxy mixed with West #407 fairing filler. The working properties of the epoxy will be the same as what you're used to (unless you used polyester) and the 407 filler makes it pretty easy to sand. Just be aware this filler is a dark red color so unless you're planning on painting.....
Re: Devil's Putty - A.K.A. Bondo
Posted:
Fri Sep 28, 2012 6:07 amby WesGrimes
I used CSM and Poly Resin. I don't know if you can use epoxy over poly. Do you think that would cause problems?
I am going to do a base coat clear coat paint job if I ever get it smooth enough...
Re: Devil's Putty - A.K.A. Bondo
Posted:
Fri Sep 28, 2012 7:13 amby Oldragbaggers
WesGrimes wrote:I used CSM and Poly Resin. I don't know if you can use epoxy over poly. Do you think that would cause problems?
I am going to do a base coat clear coat paint job if I ever get it smooth enough...
I have no experience at all with using polyester resin. I know we filled osmotic blisters on a sailboat years ago that was built with polyester resin and we used epoxy to fill the blisters. That's the normal practice and it worked fine. But I still would be hesitant to advise you on this one. I would do more research, or perhaps someone more knowledgeable on this subject can chime in. I wonder if the 407 filler can be mixed with polyester resin???

Re: Devil's Putty - A.K.A. Bondo
Posted:
Sun Sep 30, 2012 8:20 amby CARS
As a body man, I understand the issues with temp and mixing ratios of body filler. While in my restoration shop, I try to use as little as possible, it is still used.
With practice, I have gotten good at mixing but if anyone struggles with the proper amount of hardener to add, Evercoat makes a nifty little tube of filler.
http://www.evercoat.com/productCategory.aspx?cat=47It does require a special gun though. Maybe a local body shop or supplier would rent that out to you. I think the gun sells for around $175.00

More info:
http://www.evercoat.com/imgs/salesflyer ... 0Sheet.pdf
Re: Devil's Putty - A.K.A. Bondo
Posted:
Sun Sep 30, 2012 8:40 amby eamarquardt
You can use epoxy over polyester but if you put polyester resin over epoxy the styrene may attack the polyester resin.
Cheers,
Gus
Re: Devil's Putty - A.K.A. Bondo
Posted:
Sun Sep 30, 2012 2:25 pmby WesGrimes
Thanks guys.
What I need is a buddy with a body shop that I can exploit

MN is too far, or I would buy you a beer Chris

Re: Devil's Putty - A.K.A. Bondo
Posted:
Sun Sep 30, 2012 6:42 pmby doug hodder
If you are going to do any work with epoxy....just get some microballoons or a fairing type filler for it. You can mix it as thick as you like and it will give you a lot more working time. It also cuts about the same as a bondo for working it after it cures. Gives a much better bond and if you already are going to use the epoxy...why not? It won't matter whose you use as far as epoxy systems. It's just basically a thickening agent. Microballoons for thicker applications, fairing filler for more of a thin top coating type application. Doug
Re: Devil's Putty - A.K.A. Bondo
Posted:
Tue Oct 09, 2012 10:35 amby TRP
WesGrimes wrote:Thanks Carl, I am going to try smaller batches by color and see if it helps...
I wrapped the whole teardrop with three layers of fiberglass, so it is more than just grain to fill. It would be some pretty thick drywall mud.
*edit*
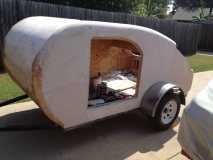
I just clicked the image of your trailer. I'm not sure you're going to like what I have to say... but I'm going to say it anyway. I think you've got a great start on that trailer. It has a lot of potential to be a nice trailer. You've clearly put a lot into it. If I were in your shoes, before adding more material to it - I would start by getting some 60 grit or 80 grit and knock down as much of the excess material as you can. You've got a lot of bondo around the front bend there. It's pretty lumpy. My guess is that it's more than a 1/4" of bondo. No sense in building up more material. Bondo is heavy. Get a long straight bar or even a DA and knock off all the high spots. Work on getting a uniform surface before adding more material. Try not to dig into the glass weave.
I think you can salvage what you have there with a couple of hours of work with some 60 grit and a sander. You will be a lot happier with the results if you make that sacrifice now.
Best of luck,
Ted
Re: Devil's Putty - A.K.A. Bondo
Posted:
Tue Oct 09, 2012 12:36 pmby WesGrimes
Thanks Ted,
Yeah, I am using 60 grit DA and then block sanding with 80 grit.
Some of that build up you are seeing is a batch that I spread, but had not yet sanded.
Don't get me wrong, there is way too much bondo on it...
I have tried to keep to the 1/8th inch max rule as much as possible.
I have had a little more luck the last couple of batches by letting it dry for 3 days before hitting it with the DA.
Here's to hopping there is not a loud crack and a bondo shower after the first pothole I nail!
Re: Devil's Putty - A.K.A. Bondo
Posted:
Tue Oct 09, 2012 1:21 pmby TRP
Good to hear you r still at it. After you apply the bondo, and it's still 'soft' are you hitting it with the cheese grater / rasp? Once the bondo hardens, the rasp is useless, but it's great when it's still thumbnail soft.
Are you using a guide coat to identify the high spots?
T
Re: Devil's Putty - A.K.A. Bondo
Posted:
Tue Oct 09, 2012 2:24 pmby WesGrimes
I have not used guide coats up to this point. More like I block sand until the glass starts to show, and then fill the low spots where they obviously did not get sanded.
I put a coat on over the weekend that I think should be pretty close to correct. I will spray a guide coat this time after I do an initial pass with the DA and longboard.