Page 1 of 1
Interior trim

Posted:
Mon Dec 10, 2012 4:08 pmby suckerpunched
Has anyone used vinyl upholstery piping as trim to fill the small gap between the ceiling and walls???I saw this used in a restored canned ham last summer at a show , it looked good and seemed alot easier than trying to trim with wood. I"m still trying(not very hard) to finish my tear and the finishing touch is trimwork.
TC
Re: Interior trim
Posted:
Mon Dec 10, 2012 4:33 pmby CarlLaFong
The piping, or gimp, is industry standard on new stuff. I haven't been in a new RV for a while, but I'm sure they still use it. We used miles of it when I worked at Santa Fe, back in the 70s
Re: Interior trim
Posted:
Mon Dec 10, 2012 5:54 pmby suckerpunched
That's interesting,,,,thanks
Re: Interior trim
Posted:
Mon Dec 10, 2012 6:40 pmby prohandyman
I made my own on the last build then I found some marketed as "nail-on foam weather stripping" at a local home center. Installed it just today. Looks great.
Here is a pic of what I made...in this pic I am crimping it tight with pliers after glueing the vinyl around a piece of plastic tubing.

If you closely in this pic you can see it in the corner

Re: Interior trim
Posted:
Mon Dec 10, 2012 7:05 pmby aggie79
prohandyman wrote:I made my own on the last build then I found some marketed as "nail-on foam weather stripping" at a local home center. Installed it just today. Looks great.
Here is a pic of what I made...in this pic I am crimping it tight with pliers after glueing the vinyl around a piece of plastic tubing.
If you closely in this pic you can see it in the corner
Very nice Dan!
I've seen something similar to what you constructed - fender welting. It was available in different colors of weather-resistant naugahydes. A little pricey though -
http://www.julianos.com/fender_welt.html.
Re: Interior trim
Posted:
Mon Dec 10, 2012 9:06 pmby suckerpunched
I think I'll try it,,,,found some on ebay for $12 for 20 yards,,,plus $8 shipping...don't need hardly that much so will look at some local sources...got plenty of time till next camping season....
thanks,,,,,TC
Re: Interior trim
Posted:
Tue Dec 11, 2012 5:07 amby Irmo Atomics
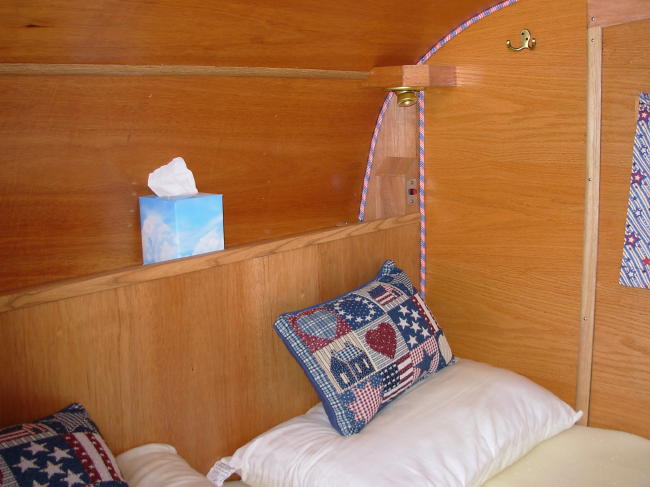
A lot of the vinyl trim on campers is put on before the two walls/joints are put together. The trim is stapled through a tab onto one wall and the other wall/ceiling is butted up against it. It might depend on how far along in the build you are as to whether or not it'll work for you.

- gimp.jpg (1.91 KiB) Viewed 1124 times
Re: Interior trim
Posted:
Tue Dec 11, 2012 8:34 amby droid_ca
another name for it is called welting cord they use it in sewing as well
Re: Interior trim
Posted:
Tue Dec 11, 2012 12:03 pmby Nobody
I don't have any really good pix but I encountered the same problem when I was building my TD. I'd planned to use the 'welting' or flexible molding for trim but the way my walls & ceiling were joined I didn't have any really good support to nail/screw the trim to. I found a 100' roll of 3/8" decorative, braided poly rope at TSC for a 'giveaway' price. It was 'stars 'n stripes' motif which matched our planned theme. I used a hot-melt glue gun & industrial strength glue sticks to install the rope. Worked like a charm & has held up thru more'n 6yrs &15K+ miles in all kinds of weather, terrain, road conditions, etc. The beauty of this is the ease of installation. You can cut pikeces to fit anywhere, seal the ends with a lighter or hot iron, then glue in place without having to worry about making complex or difficult cuts. Have not had even 1 inch come off or loosen in that time. You can probably find about any design or type of round rope, beading, or similar material that will work & match whatever theme you have in mind...
Re: Interior trim
Posted:
Tue Dec 11, 2012 1:32 pmby PSBreen
I sure wish I had asked that question. I ended up making my own 1/4" quarter round out of soft pine. Lots of work with the table saw and router. Oh well we learned a new skill and had some fun doing it.
Re: Interior trim
Posted:
Tue Dec 11, 2012 4:03 pmby prohandyman
Yes actually as big as you want. Here is a pic of the tubing already covered. You could also use foam backer rod.

Here is a pic after stapling it onto the walls

After mounting the walls I set the ceiling panels onto the bead, attach the spars, the screw the ceiling panels to the spars.
Re: Interior trim
Posted:
Tue Dec 11, 2012 10:29 pmby doug hodder
I've done all my trailers using wood trim as I glue up the ceilings to the walls. I know that this vinyl material was used extensively in the past and currently, but somehow, I can't get past the fact that if the ceiling were glued to the sides that it might be stronger box rather that a bunch of staples and screws. The older ones that I've torn apart seem to flex and fold up easily at that joint....anyone else think this? Not wanting to cause any big deal....just wondering if it was a more cost effective method of hiding the joint. I didn't bother to do anything for trim on the last standy....Doug
Re: Interior trim
Posted:
Tue Dec 11, 2012 10:42 pmby NathanL
Ran some 5/4 white oak I had thru the router table to make my own profile. Sort of a cross between 1/4 round and base shoe.
Stuck it in the steam box and it made a 19" radius no problem.