Page 1 of 2
Rear Hatch Rib Direction *fixed, many thanks*

Posted:
Mon Dec 31, 2012 12:36 pmby webbaldo
Hi Guys, im about to start building my hatch, but I cant decide on which of the two below designs as im not sure of each other's merits or pitfalls?
There is this one with horizotal 2x1's with 2x3/4 ribs at each end

or this design, with 4 evenly spaced 3/4 ribs and the odd 2x1 noggin in between each one

images blatantly borrowed off google images.
Which is stronger? if either? At first glance, the top one with a few corner glue blocks here and there would be better and more meat on edges for hinge trim?
Ill be fitting 1/8 ply inside it and 1/8 ply and 1mm alu outside.
Re: Rear Hatch Rib Direction
Posted:
Mon Dec 31, 2012 12:42 pmby eamarquardt
Given that you're skinning it on both sides I doubt that it would make much difference as most of the strength will be from the skins. The more you have the two skins connected to each other with ribs or cross members the better. More (and they can be thinner) ribs/cross members with both skins fastened to them will provide more strength than fewer (wider) ones.
Cheers,
Gus
Re: Rear Hatch Rib Direction
Posted:
Tue Jan 01, 2013 6:08 amby Kody
I will be building my hatch the same as in the second photo. I think more ribs will greatly assist any twisting or warping. I know that the ribs are a pain to make but I think they would be far stronger and there will be cross members also. I will be laminating the ribs from 1/4" ply and six layers in each rib. Yeah, it's a lot of work but it's the way I want to do it. It's also far cheaper and infinitely stronger than trying to cut the ribs from a plank or from a sheet of thick ply. The ribs could also be made in a mould using fiberglass or if you're a glutton for self inflicted punishment, you could make them from aluminium. I only have to decide how many ribs to use, six would be ideal and I could make one a day.A former is needed to produce the shape of the curve (already drawn up for shape) and would be made from three pieces of 6"x2" dressed timber. I am looking forward to building it. Constructing the hatch is no real "biggie" for me to do.
Kody
Re: Rear Hatch Rib Direction
Posted:
Tue Jan 01, 2013 6:44 amby webbaldo
Hi thanks for the replies. The top design I may have not been clear on, The two end pieces are actually 3/4 ply glued together, not cut from solid planks
Re: Rear Hatch Rib Direction
Posted:
Tue Jan 01, 2013 10:08 amby angib
Ditto what Kody said - having lots of curved ribs (second photo) will maintain the curved shape and avoid the dreaded 'spring-back' much better.
I don't think either method is stronger than the other - for things like resisting knocks - but the many-curved-ribs type will keep its shape better.
Re: Rear Hatch Rib Direction
Posted:
Tue Jan 01, 2013 11:14 amby halfdome, Danny
I agree with more ribs, but in my opinion, the second photo is inadequate in the amount of ribs.
I use to make my hatch with 3/4" plywood ribs ( 8 in total for a 5' wide hatch) from a template on the router table.
Now I use 1/2" Baltic/Russian Birch plywood for my ribs spaced evenly at 6" with 1/2" x 6" x 6" blocking at each corner to keep everything square.
My tail lights mount on them too. I double up on the ribs at the two ends for strength and to provide enough meat to attach the gas struts.
When everything is assembled and before the skins go on, check for square with the belly down, by placing a tape measure from corner to corner much like you would do if it was flat.
 Danny
Danny
Re: Rear Hatch Rib Direction
Posted:
Tue Jan 01, 2013 12:12 pmby eamarquardt
Here are two pictures of a test rib that I made out of strips of 1/8 BB. I glued it up all one time. The form was pieces of 2X2 angle iron screwed to a piece of 3/4 plywood. It is very stiff and there was absolutely no springback when I removed it from the form. It was not difficult at all to make and the only "waste" was a 1/8" saw kerf for each strip. I got, as I recall, about .015 inches variation in thickness along the length of the rib. Mostly at the very end. A couple more clamps would take care of this. I also bought a bunch of spring clamps but found that vice grip clamps and c-clamps worked better.
Cheers,
Gus


Re: Rear Hatch Rib Direction
Posted:
Wed Jan 02, 2013 9:38 amby aggie79
Because of the length of my hatch, and with the lower portion of the my hatch profile having a fairly tight radius, I was concerned about spring back.
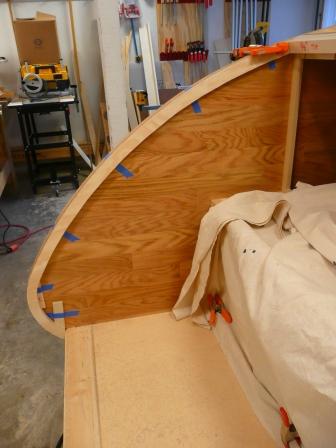
The hathc ribs are cut from 3/4" plywood. (I used a "better quality" Arauca plywood.) The two exterior ribs are doubled. The two interior ribs are single thickness. The cross pieces are 1x2 poplar. (The middle cross piece was doubled because I had a plywood and aluminum seam in that area.) The hatch was framed in place.
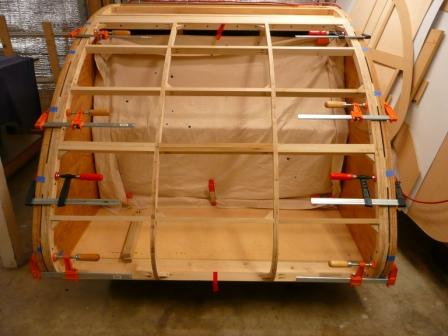
I added blocking to maintain the shape and "squareness" of the hatch.
So far, everything has remained square and no springback.
Re: Rear Hatch Rib Direction
Posted:
Thu Jan 03, 2013 11:32 amby webbaldo
Thanks for the advice everyone, I went for 4 vertical ribs in the end. Will skin it over e weekend so hoping no springback
Re: Rear Hatch Rib Direction
Posted:
Thu Jan 03, 2013 3:44 pmby aggie79
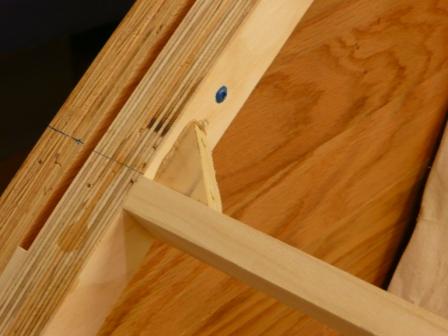
One trick I used to keep everything aligned was to skin the hatch with the framing in place. After I fitted the hatch framing, I placed tempory screws through the framing into the hatch sidewall. In the last picture above, the blue screw is a temporary screw. After the hatch was skinned the temporary screws were removed. (I was able to do this because my bulkhead was framed but not skinned, so I could crawl into the galley area and remove the screws.)
Re: Rear Hatch Rib Direction
Posted:
Sun Jan 06, 2013 9:13 pmby BrwBier
I'm not saying I'm right or you are wrong but I have found a way to build with no ribs in the hatch or a minimum number of spars in the body. See my album page six. My hatch has no spring back, it is light and does not warp. It's been that way for about six years and 10,000 miles. The curve is where you get the strength from not more wood.
Brwbier
Re: Rear Hatch Rib Direction
Posted:
Sun Jan 06, 2013 10:16 pmby halfdome, Danny
BrwBier wrote: I have found a way to build with no ribs in the hatch. See my album page six. My hatch has no spring back, it is light and does not warp. It's been that way for about six years and 10,000 miles. The curve is where you get the strength from not more wood.
Brwbier
Interesting, but couldn't find a photo of your hatch construction on pages 1 thru 9.
Maybe you could post a picture.
Danny
Re: Rear Hatch Rib Direction
Posted:
Mon Jan 07, 2013 10:26 pmby BrwBier
http://www.tnttt.com/gallery/image_page.php?album_id=1947&image_id=14749 This is the closest I can get to posting a picture, sorry. (how do you post a picture from your album?)
This picture is the hatch. I put the aluminum on and then cut open the hatch. The dark strip you see is the plastic hinge. There are two layers of pink foam glued to the back of the 1/8 baltic birch that is the inside of my hatch. At this point the hatch is fully opperational without the aluminum covering. I just layed the aluminum on front to back in one piece and at the end cut open the hatch. No ribs or spars .
Brwbier
Re: Rear Hatch Rib Direction
Posted:
Tue Jan 08, 2013 8:18 amby 48Rob
The photo shows aluminum on the outside of the hatch, and it is indicated that there is 1/8" ply on the inside.
Reason says it would not have any problem with spring back.
The reason many have problems with the hatch pulling itself out of shape is not so much the ribs, or rib design, but the plywood skin.
A hatch frame unsheathed, will stay just the way you built it.
Once you bend a layer of plywood to fit the outside of the hatch, the plywood naturally wants to straighten itself out.
If you also skin the interior, it will tend to correct itself.
Build the hatch frame extra heavy duty, and you can force it into submission, even if one force is greater than the other.
If you have only aluminum on the outside, and ply on the inside, it will always be pulling toward the body, conforming.
If you skin inside and out with aluminum, or other material that isn't trying to return to an original shape, the hatch will be forever relaxed.
Rob
Re: Rear Hatch Rib Direction
Posted:
Tue Jan 08, 2013 4:10 pmby KCStudly
One of the reasons I decided to go the "submission" route using deeper section ribs is due to my build sequence using the foamie method.
The rib frame with hinge header and sill spars will be fit and assembled to the cabin; then the inner skin will go on the outside of the ribs; then the foam layers (2 x 3/4) go on and get faired; then I will have to remove the incomplete hatch assembly and finally apply the canvas, wrapping it under the seal lip up to the first rib.
So the outer skin wrapping, the desire to get a first time good result without spring back during the multistage process, and the fact that my ribs will be an exposed "decorative feature" kind of drove me to stray from convention on rib depth.
Hopefully by using the foamie method and fewer but stronger ribs I will be able to have both a rigid and light weight hatch.


