Page 1 of 2
Rounded Corners - Epoxy-Painted Finish

Posted:
Tue Jun 04, 2013 6:22 pmby Strop
Hi all,
After reading this build thread from Gary I became very interested in rounded corners on a Teardrop. Gary has indicated that he planned and sanded the radius he wanted to achieve. He has obviously got a lot of experience in this area. It is obviously covered in fibreglass to achieve waterproof status.
http://teardropbygary.blogspot.com.au/2012/06/rounding-it-off.html Now being TOTALLY NEW to this sort of stuff I was wondering if there is a router bit that could be used to achieve this effect or if there is anyone out there with experience in trying this on a build. I just love the way the roof colour scheme comes down onto the side.
Thanks
Laurie
Re: Rounded Corners - Epoxy-Painted Finish
Posted:
Tue Jun 04, 2013 7:08 pmby Wolfgang92025
Laurie,
Yes, they make router bit to a 1"+ corner. But you really, I mean really must know how and what you are doing.
A bit that size can ruin your trailer and your life in a heart beat.
It has a lot of mass and momentum and if it get away from you, flesh and bones won't stop it for a while.
Not trying to scare you, just inform you.
Sanding and checking the profile with a gauge would be slower, but also safer.
Just my 2 cents....
Re: Rounded Corners - Epoxy-Painted Finish
Posted:
Tue Jun 04, 2013 8:00 pmby Strop
Wolfgang,
Yes the biggest profile I have found is 1 1/2 inches radius on a 3 inch bit, and as you say, as well as the comments I have read, bits that big are potentially dangerous. Lots of advice to use it on slow speeds and to really work your way down to the final rounding shape. Also to have a large plate on the router for a safer cut. Finally advice on having the job between you and the cut which would be a bit hard doing the roof side join on a teardrop. All things that make me reconsider using a router as well as the fact that Gary in his build states he is a professional boat builder and he did it by hand.
Still interested in if anyone has further advice on doing this though, even if it is the gauge and sander methodology.
Laurie
Re: Rounded Corners - Epoxy-Painted Finish
Posted:
Tue Jun 04, 2013 8:58 pmby Oldragbaggers
I think the roundover bit I used was either a 1/2" or 3/4". That really just got it started. After I ran over the edge with that I used my belt sander and went over the edges until I had them rounded the way I wanted them. My edges are not extremely rounded, but the fiberglass cloth laid over them nicely and I am pleased with my very waterproof edges.
Re: Rounded Corners - Epoxy-Painted Finish
Posted:
Tue Jun 04, 2013 10:57 pmby Strop
Hi Becky,
Thank you. Yes a small router to start with and then sanding. I was thinking with Fibreglassing it would make it so much easer. From your other posts I know 6oz is enough.
I can see you have done it for the main body but did you do anything for the hatch?
thanks
Laurie
Re: Rounded Corners - Epoxy-Painted Finish
Posted:
Tue Jun 04, 2013 11:08 pmby CarlLaFong
Bits that size are intended for router table use. Trying to run a 3 inch diameter bit in a hand held router is not recommended by any manufacturer. I have never seen a router with a large enough hole in the base to accept a bit that size. All that being said, I have run a 1 1/2 inch roundover bit, free hand in a hand held router. It was a big ol' PC router we had at work. A real brute of a machine. I made a custom base for it so the bit would work. I just set it at the lowest speed and snuck up on the depth of cut. It wasn't all that dramatic but the concentration factor is high. You have to be sure the surface that the baseplate rides on is nice and smooth so it doesn't hang up as you progress. To avoid getting a wonky cut, it would be best to rout horizontally with the base of the machine on the flat side of the trailer. One thing is certain, most of the routers we have in our arsenal will not cut it. You would have to rent a biggun from the local yard.
Re: Rounded Corners - Epoxy-Painted Finish
Posted:
Tue Jun 04, 2013 11:10 pmby danlott
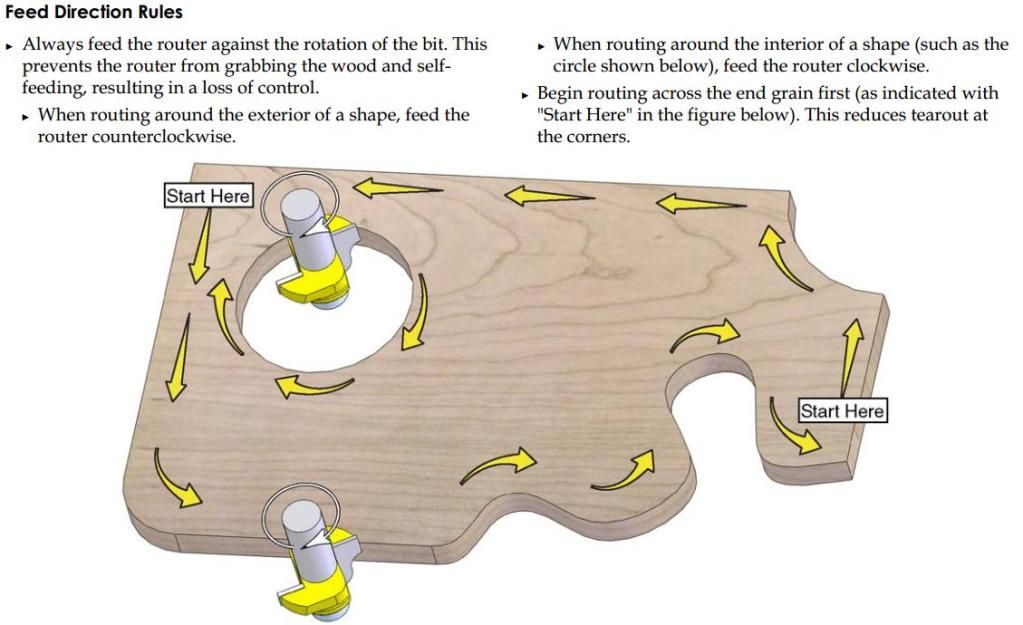
If you do go the router bit direction I would use various size bits. Start with 1/4 inch and work your way up to the 1 1/2. If you use the larger base plate and use various size bits it will reduce your hazards. I would do 1/8 inch steps. Also you can do 2 passes with the larger router bits to reduce the amount of material being removed each time. The first pass you can raise the bit 1/16 above your final cut, then on the second pass adjust the bit for the full round over. Also make sure to go counter clockwise with the router.
Dan
Re: Rounded Corners - Epoxy-Painted Finish
Posted:
Wed Jun 05, 2013 12:06 amby CarlLaFong
Starting with small bits and working up is fine if you want to invest several hundred dollars in bits that you may or may not ever use again. Starting with the large bit and making a series of light cuts until the final depth has been achieved serves the same purpose and is lighter on the wallet
Re: Rounded Corners - Epoxy-Painted Finish
Posted:
Wed Jun 05, 2013 12:59 amby danlott
CarlLaFong wrote:Starting with small bits and working up is fine if you want to invest several hundred dollars in bits that you may or may not ever use again. Starting with the large bit and making a series of light cuts until the final depth has been achieved serves the same purpose and is lighter on the wallet
Very true.

Dan
Re: Rounded Corners - Epoxy-Painted Finish
Posted:
Wed Jun 05, 2013 2:28 amby Strop
Ok Dan, why counterclockwise?

and what happens if you are in the Southern Hemisphere? Is it like the water in a toilet?

Re: Rounded Corners - Epoxy-Painted Finish
Posted:
Wed Jun 05, 2013 5:42 amby Oldragbaggers
Strop wrote:Hi Becky,
Thank you. Yes a small router to start with and then sanding. I was thinking with Fibreglassing it would make it so much easer. From your other posts I know 6oz is enough.
I can see you have done it for the main body but did you do anything for the hatch?
thanks
Laurie
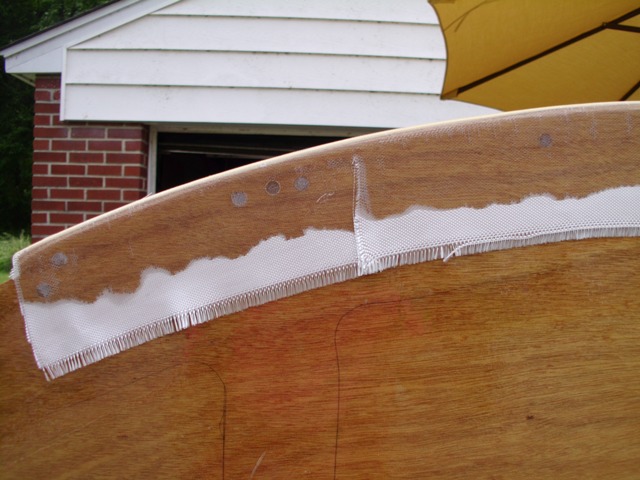
My hatch is fiberglassed inside and out also (1 layer, 6 oz. cloth each side). (Overkill, I know) But there was no rounding over involved as I have aluminum trim on the edges. The inside edge of my outer 1/8" ply has a strip of fiberglass tape to strengthen it for the rivets that hold on the aluminum trim. Then the edges have many coats of epoxy. Every time I had the epoxy out I hit any edges I could get at.
Re: Rounded Corners - Epoxy-Painted Finish
Posted:
Wed Jun 05, 2013 9:12 amby doug hodder
I did mine with a 1.5" roundover bit in a hand held router. Yes, I had to make a special base for it and it took 8 passes to get it down to the complete roundover. It was a 3.5hp PC soft start router and it is indeed a handful, always keep the bit pointed away from you. You will end up with Popeye arms when it's done. If you go that route make sure that you put some extra material into the joint so that when the top and sides get routed down, there is still a core filler and not a gap. I chose this method as planing end grains on plywood is much more of a hassle and I got a nice even roundover. Doug
Norm came by and gave me some tips on doing it.
Re: Rounded Corners - Epoxy-Painted Finish
Posted:
Wed Jun 05, 2013 12:17 pmby danlott
Strop wrote:Ok Dan, why counterclockwise?
and what happens if you are in the Southern Hemisphere? Is it like the water in a toilet?
That is how bits and routers are design to cut. If you go the wrong direction the bit will grab and jump. You will end up with a rougher cut. Also with a bit that large it could cause more damage, both to the wood and possibly yourself.
Here is some information from the web about router direction.
Router Direction 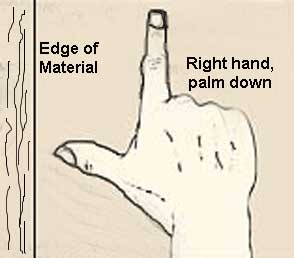
A router must travel in the right direction sothe bit cuts properly. An easy guide is to lay your right hand palm down with your thumb touching the edge of the material, your index finger will point in the direction to move the router.
Dan
Re: Rounded Corners - Epoxy-Painted Finish
Posted:
Fri Jun 14, 2013 7:28 amby Strop
Ok I understand the router direction. I was thinking that you could step it down and nibble at it rather than gouge it out.
Thinking about it raises a further two questions in my planning though.
1. how do you handle the hatch hinges with rounded edges? I am thinking it can't go all the way to the edge, just to where the rounding begins.
2. Do you need to do anything different for the hatch seal?
Laurie
Re: Rounded Corners - Epoxy-Painted Finish
Posted:
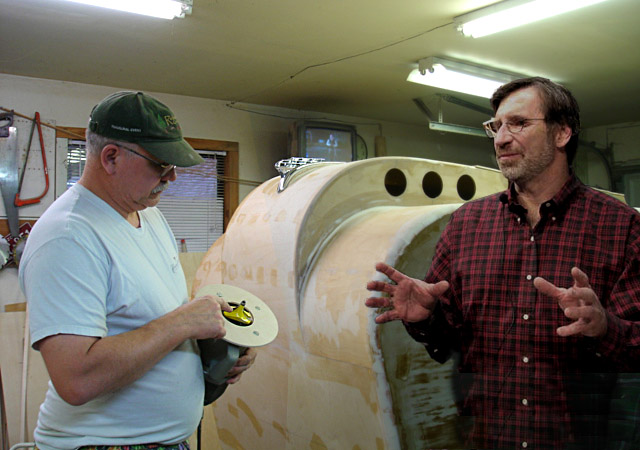
Fri Jun 14, 2013 7:32 amby Strop
Doug,
Is that the size plate you used on the router (shown in picture of your post). Having no experience I was thinking of something bigger.
Laurie