Any input welcome.

Anything to do with mechanical, construction etc

Any input welcome.

Postby Red in Texas » Thu Nov 10, 2005 7:17 pm

O'tay....I just brought the HF 40"x48" trailer into my shed. I'll be bolting it together tomorrow and then assembling the required materials to create the motorcycle teardrop I plan on sleeping in one or two nights a week until Baton Rouge gets hotel rooms again.

I plan on keeping it simple so my clueless mind doesn't get too overheated. :)

As of now I'm thinking 3/8th's plywood on the sides, masonite on top and epoxy paint all the way around to keep the thing watertight. However, I have a few questions for anyone interested in keeping me on the straight and narrow.

The trailer platform isn't as long as I'd like it to be as it is only 4 ft long. Since I'm 6'1" and plan on sleeping in this thing, I guess the floor ought to be at least 72 to 78 inches. If I bolt the plywood on the side of the trailer, ala the Cowper design, can I leave 15 inches of overhang front and rear to create my extra floor space? I don't reckon my feet are so heavy as to bust the connecting dowels on the rear of the trailer, but wondered if my sleeping on on the front portion, which will be hanging unsupported from the trailer frame might cause problems up there. Maybe I ought to stick extra dowels there to keep my punkin' head off the masonite?

Also, how watertight are these things? The unhappiest times I ever had in the military were sleeping in wet conditions. I'll be pulling this thing in the rain and likely sleeping in it in the rain and would like to stay relatively dry. :) What keeps rain out of the galley area, and does a bit still manage to seep in? Looks like the rain would get under the hatch edge and make its way in.

Also, has anyone ever used tongue and groove planking for walls? I checked out some cedar in 12 inch planks that was uber light and wondered if that might be a viable option. I made use toungue and groove for the 40"x48" HF deck and then try to cut my sides in a fashion to create the other 24"-30" inches of sleeping space I'm looking for.

Lastly...can I frame in the rear shelf now, enclose it with masonite and then come back later and cut my hatch lid in? I need to get it built QUICK. Staying in Baton Rouge last week I was lucky to find a motel that looks like it normally rents by the hour, but I didn't sleep too well because of all the crackhead noise coming through those carboard thin walls all night long. I'm hoping this trailer can be done fairly quickly and I plan on keeping it simple to help that objective along.

My wifes aunt is a far better carpenter than I am and she is coming down to help me build it as soon as I get the materials together. I may skip windows for now and just put a vent on top for the moment.

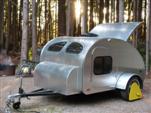
Any ideas? I'll try to take pics along the way. I'm hoping to end up with something similar to this, just not metal clad at the moment.
http://thundermax.tripod.com/Trailer.htm
Red in Texas
Teardrop Inspector
 
Posts: 13
Joined: Wed Nov 09, 2005 12:01 pm

Postby madjack » Thu Nov 10, 2005 7:49 pm

first thoughts...contact Roly thru his email or pm on board.
He used a 40" wide hollow core door for his floor cut down to what ever length u want. I used 1"x1/16 Aluminum angle as cleats to mount the sides to the floor...makes for an easy mounting system. Cut 1x2's 40" long to use as roof spars(think rafters). Skip the masonite...if it gets wet it;ll turn to mush. Get 1/8" luan if you can find it or 1/4 if not. It will bend better side to side than end to end so cut it into 2 40" pieces and use it to skin the tear...I wouldn't worry about the hatch right now since you are inna a hurry I also would skip the Al skin and use Uniflex and CPES to seal/coat the tear, available at www.rotdoctor.com. CPES is an epoxy based sealer and the Uniflex is the paint that is compatible with it. It is used by several members here and is a dependable sealing system....this is all a quick and dirty rundown to give you an idea of a direction to go in...here is alink to Roly's profile http://tnttt.com/profil ... file&u=580
or just fly with what I have given you plus whateverother advice/input you come up with...good luck

madjack 8)

p.s. build the whole thing independent of the trailer and do the CPES/Uniflex thing to the entire tear...botom include so as to waterproof the bottom as well...there are plenty of other ways to do this...this is just an off the top of my head way to get'er done
Last edited by madjack on Thu Nov 10, 2005 7:53 pm, edited 2 times in total.
...I have come to believe that, conflict resolution, through violence, is never acceptable.....................mj
User avatar
madjack
Site Admin
 
Posts: 15128
Images: 177
Joined: Thu Dec 02, 2004 5:27 pm
Location: Central Louisiana

Postby Steve_Cox » Thu Nov 10, 2005 7:49 pm

Hey Red,

I have absolutely no ideas :lol: :lol:

But the link to the tiny trailers was really cool. Looked like you have a lot to work with right there in those pictures. Good luck with the build and after your auntie is finished with your trailer do think she would like to come to Florida and work on my Tear Drop... I could use a little help too.

Steve
Steve
User avatar
Steve_Cox
4000 Club
4000 Club
 
Posts: 4903
Images: 196
Joined: Sun Apr 03, 2005 8:46 am
Location: Albuquerque New Mexico
Top

Postby madjack » Thu Nov 10, 2005 8:00 pm

Red this all I could dig up on the 1/4 nelson
http://tnttt.com/viewto ... =spamboree
madjack 8)
...I have come to believe that, conflict resolution, through violence, is never acceptable.....................mj
User avatar
madjack
Site Admin
 
Posts: 15128
Images: 177
Joined: Thu Dec 02, 2004 5:27 pm
Location: Central Louisiana
Top

Postby Red in Texas » Thu Nov 10, 2005 8:26 pm

madjack...thanks. I saw that earlier but since the pics were posted by someone else I didn't realize that this was the trailer we were talking about. I think my aunt could build that. :)

Steve....noooooo, you may not borrow auntie. After the trailer is done I'll need her to help rebuild the picket fence so I can install an electric gate opener and drive my new trailer into the shed without having to dismount the bike. :) She really is an amazing woman. Has all the woodworking and power tools and the knowledge in using them. She cuts a very imposing figure in her carpenters toolbelt. :)
Red in Texas
Teardrop Inspector
 
Posts: 13
Joined: Wed Nov 09, 2005 12:01 pm
Top

Postby madjack » Thu Nov 10, 2005 9:11 pm

Red in Texas wrote:She really is an amazing woman. Has all the woodworking and power tools and the knowledge in using them. She cuts a very imposing figure in her carpenters toolbelt. :)


Man I am in love allready.... :shhh: :whistle: just don't tell the wife(aka the poor girl)...I'll be sleepin' in an unfinished tear in an unheated shop for a loooooong time :( :lol: ;)
madjack 8)

p.s. it is a real simple build, show her the pics and the basic desription and goforrit
...I have come to believe that, conflict resolution, through violence, is never acceptable.....................mj
User avatar
madjack
Site Admin
 
Posts: 15128
Images: 177
Joined: Thu Dec 02, 2004 5:27 pm
Location: Central Louisiana
Top

Postby Red in Texas » Sat Nov 12, 2005 5:20 pm

Hey madjack....
I reckon there's about a million ways to skin this cat, but your comment about using angle alum to screw your floor to your sides has me curious.......

I was gonna just cut my flooring so that when I screwed/glued my walls against the trailer frame they'd all snug up. Since I'm using the ubiquitous red framed HF/NT C-channel trailer, I figured I could screw the floor to the top of the frame, and the side walls to the sides of the frame. It's only a 2 inch frame, so I don't think the possibility for wall floor seperation is very high. What do you think?

The only design issue that I have some trepidation about is the fact that I want 72"-84" in length on my walls, while my trailer frame is only 48 in length. I figured I'd just run stringers along the bottom of the walls that hang out over the front and rear of the trailer frame, roughly 18 inches to the front, 18 inches to the rear, and count on the four foot of trailer frame in the middle as being stiff enough to support the walls. Big ol' bolts through the plywood and the frame with nuts on the back side was my idea.

I'm thinking that 1/2 inch luan at 42" in height and 84" length cut to a tear drop shape, shouldn't be but about 50 pounds per wall, wouldn't you say? Even with stringers and 1/4 inch roof skin I shouldn't be adding but maye 30-40 more pounds to each wall. I'm not gonna skin the interior with much more than thin carpet panets cut and glued between the stringers. I'd think that 4 or 5 bolts per side screwed into the lower wall and into the frame ought to hold the bottoms of the walls tight all together.

Can I ask you why you screwed your walls to the floor?

BTW...you got any horror stories about people on motorcycles being killed when their teardrop self destructed at 70 mph on the freeway? :)
Red in Texas
Teardrop Inspector
 
Posts: 13
Joined: Wed Nov 09, 2005 12:01 pm
Top

Postby GeorgeTelford » Sat Nov 12, 2005 5:31 pm

Hi

Something for the weekend sir?

weekender? seems an ideal time to mention a unit that can be built over the weekend......................

http://www.mikenchell.com/weekender/mockup.html

http://www.tnttt.com/viewtopic.php?t=683&start=0

http://www.tnttt.com/viewtopic.php?t=571&start=0
User avatar
GeorgeTelford
500 Club
 
Posts: 677
Joined: Mon Jul 11, 2005 2:10 pm
Top

Postby madjack » Sat Nov 12, 2005 6:44 pm

Red there is no subframe under our floor, so we needed a method of attaching the walls to the floor.
The unit is built completely independent of the frame and with no subframe, a cleat has to be used to attach the walls to the floor.
The cleat could have been made outta anything but after experimenting with various wood and not being satisfied with any of the results, we tried the al angle and Viola...it did exactly what we wanted without giving up any real estae to the edges of a 2x2.
We borrowed a few ideas from the Camp-Inn unit and modified to meet our wants.
One was the front tongue box, that is intergral to the unit. We made up the box as a single bench built unit and used it as the front bulkhead.
This "boxed bulkhead" was attached with the al cleat as was the rear bulhead and galley shelf.
We had prefinished all wood parts so when we attached them we used gorilla glue and screws...the resulting box was super strong and virtually impossible to "rack", and this was before the installation of any roof spars.
I believe that using 7'X3/4 ply for the floor and this method of building the box, you could set it directly on the frame and the ends would be plenty stiff.
If the sides where allowed to come down to cover the frame like we did you add a cleat to the bottom side of the overhang as well.
If you felt you needed additional stiffening you could always add a couple of pieces of the angle to the bottom of the floor in the overhag portion.
I know this running long so I'll finish up
As I stated the unit is built independent of the frame.
the wall are going to come down past the floor 2" to cover the frame,
when mounted to the frame the unit will be SCREWED thru the floor into the frame and the walls will also be SCREWED to the frame so that your attachment is on 2 different planes.
Most all of this is documented with pics, either in my personal galllery or on my Yahoo photo site
Hope I havent confused you too much.
madjack 8)
...I have come to believe that, conflict resolution, through violence, is never acceptable.....................mj
User avatar
madjack
Site Admin
 
Posts: 15128
Images: 177
Joined: Thu Dec 02, 2004 5:27 pm
Location: Central Louisiana
Top

Postby Chip » Sat Nov 12, 2005 8:28 pm

Weekender??????? I have seen a couple built on here or should I say in the process of being built,,, and the weekender turned into month then months,,,, Frank how is that weekender coming along,,,, :lol: :D :applause:

okok,, I am just poking fun at the weekenders,,, I have seen Franks and its gonna be a class act when he is finished,,, some mighty fine work and all fine work takes time,,,

I would like to see one built for speed and funtionability though,, just to see what time it does take

chipepr
Living large,,,travling small !!!
54"x9'4" tear
4'x8' tear
Serro Scotty rebuild(in progress)
User avatar
Chip
2000 Club
2000 Club
 
Posts: 2534
Images: 49
Joined: Sat Apr 17, 2004 7:33 pm
Location: Greenville, S.C.
Top

Postby greasywheats » Mon Nov 14, 2005 2:39 pm

Madjack- I like your idea for attaching the walls to the floor with the aluminum cleats :applause: ... You mentioned that Camp-Inn also does it this way? or was that just the front storage box?
Thanks!
User avatar
greasywheats
Teardrop Master
 
Posts: 176
Images: 25
Joined: Mon Jul 11, 2005 3:31 pm
Location: Portland, OR
Top

Postby madjack » Mon Nov 14, 2005 2:47 pm

greasywheats wrote:Madjack- I like your idea for attaching the walls to the floor with the aluminum cleats :applause: ... You mentioned that Camp-Inn also does it this way? or was that just the front storage box?
Thanks!


...Camp-In attaches their walls to floor with the cleat system. their front box is attached to the front bulkhead...our tongue box is bench built and the whole unit becomes the front bulkhead...the same but different :D
madjack 8)

p.s. we used the Al angle after experiminting with different woods...soft woods split and hard woods required too much predrilling...the Al angle worked out best for us. Using the Al added about 50 bucks to the cost but saved us more than that in headache, hassle and labor
...I have come to believe that, conflict resolution, through violence, is never acceptable.....................mj
User avatar
madjack
Site Admin
 
Posts: 15128
Images: 177
Joined: Thu Dec 02, 2004 5:27 pm
Location: Central Louisiana
Top

Postby TRAIL-OF-TEARS » Mon Nov 14, 2005 2:59 pm

wheats, Madjack
Camp-inn does use a "cleat" system but I think they use a 1" square dowel. This gives them more surface area to apply glue to, allows them to avoid screwing into the end grain of the ply, and hides the screws in the process. I would think, however, the alum. angle would work just fine.
Steve J.

Image
Home built Camp-Inn clone.
GO SPURS GO
User avatar
TRAIL-OF-TEARS
Donating Member
 
Posts: 854
Images: 41
Joined: Tue Sep 21, 2004 11:09 am
Location: Spring Branch, Texas (north of San Antonio)
Top

Postby madjack » Mon Nov 14, 2005 3:09 pm

ToT...CI uses a 2x2(?) split at a 45...here's a pic, and yes it is to avoid screwing into the edge of the ply...which we didn't wanna do either and to give a largere glue surface
madjack 8)

Image

p.s. Cary...if I shouldn't have posted that pic let me know and I will pull it.....MJ
...I have come to believe that, conflict resolution, through violence, is never acceptable.....................mj
User avatar
madjack
Site Admin
 
Posts: 15128
Images: 177
Joined: Thu Dec 02, 2004 5:27 pm
Location: Central Louisiana
Top

Postby greasywheats » Mon Nov 14, 2005 6:45 pm

Madjack- thanks for the info...wondering what size/thickness aluminum angle you are using? :thinking: Did you just get it at one of the big bix stores?
Thanks!
User avatar
greasywheats
Teardrop Master
 
Posts: 176
Images: 25
Joined: Mon Jul 11, 2005 3:31 pm
Location: Portland, OR
Top

Next

Return to Teardrop Construction Tips & Techniques

Who is online

Users browsing this forum: No registered users and 1 guest