Page 1 of 2
Skinning Hatch and attaching edge trim

Posted:
Tue May 05, 2015 8:50 amby andy2
Skinning the hatch is giving me a headache! Ive made the hatch sit inside the main body walls and the hatch outer skin would obviosuly be the same width as the rest of the main body. The lip of the hatch skin which is about 12mm over hangon either side would sit on top of the main body edge making it all flush.
But now I realsie that the hatch egde trim will have nothing to screw into except the outer ply skin and aluminium skin which will only be about 6mm.
Is it best to cut a notch in the main body side walls where the hatch opens and closes onto and add the notch cut out to the over hanging hatch skin edge for the trim to screw into?
Does that make any sence!!?
Re: Skinning Hatch and attaching edge trim
Posted:
Tue May 05, 2015 9:17 pmby KCStudly
Aggie79/Tom did something similar on his Silver Beatle build. He laminated a thin strip of the aluminum skin under the flange of the hatch ply, applied the outer aluminum skin, then used trim molding to provide an overlapping lip along the edge. He used aluminum rivets up thru all four layers and capped the proud end of the rivets with the molding trim insert.
Follow this portion of his build to see how he did it.
Re: Skinning Hatch and attaching edge trim
Posted:
Wed May 06, 2015 6:33 amby andy2
Good idea.
What if I put the hatch in place then screwed it onto the ply edge as I have the main body so effectivly the hatch is now screwed shut. Then with a jig saw cut out the side section that has the screws in it.
The cut out is now fixed to the hatch edge moulding and it will close and fit the main body.
Would that work!?
Re: Skinning Hatch and attaching edge trim
Posted:
Wed May 06, 2015 10:05 amby KCStudly
Maybe for a while, but screwing into the edge of plywood isn't a good idea IMO. The screws will tend to spread and splinter the plys, especially once you turn it into a sliver by cutting it off.
If you have room between your ribs and inside of wall you could add an arc of white wood matching the profile, screw and glue it thru the hatch skin and wall both like a cleat, then cut that off with the top of the wall (or just cut the top of the wall ply and add the white wood to the edge of the hatch to make up for it).
Maybe others will chime in.
How were you planning to run a hatch gasket along the edge of the wall ply?
Re: Skinning Hatch and attaching edge trim
Posted:
Wed May 06, 2015 11:32 amby andy2
Thanks for the idea but I dont really understand what you mean!
I was planning on running a seal along the ply end where the hatch would sit on top
Re: Skinning Hatch and attaching edge trim
Posted:
Wed May 06, 2015 1:00 pmby KCStudly
Do it like tom did, with rivets, that way the fasteners (the rivets) are clamping the ply with a washer like material on either side, and there is no (extremely little) chance of having a blow out. Even if you don't use the RV edge trim, you could find some rubber edge trim, or even use
trim lock seals to cap the edge and form the hatch seal (two birds, one stone).
You may have to sand or shave the edge of your walls to accommodate the slight extra thickness and provide room not to over crush the seal, but it will reinforce the delicate edge of the thin hatch ply.
Re: Skinning Hatch and attaching edge trim
Posted:
Wed May 06, 2015 6:24 pmby dales133
You could glass the edge of the hatch overhang and sand and shape it then to as KC suggest and that way the end grains protected, waterproof and neat plus stronger and the aluminium protects it.
I'll probably end up doing similar I just havnt got there yet
Re: Skinning Hatch and attaching edge trim
Posted:
Thu May 07, 2015 2:58 amby andy2
thanks for the replys, got some thinking to do!! will let you know how it turns out
Re: Skinning Hatch and attaching edge trim
Posted:
Thu May 07, 2015 3:36 amby dales133
andy2 wrote:thanks for the replys, got some thinking to do!! will let you know how it turns out
Please do I'll be very interested to see how you attack it
Re: Skinning Hatch and attaching edge trim
Posted:
Sat May 09, 2015 4:32 pmby andy2
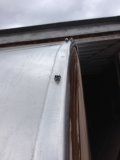
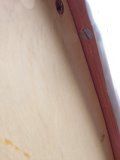
ok this is how i have got round my little problem. I have used a slotted flat head counter sunk machine head screw on the under side which sits flat and then a domed nut on the top which looks better than a normal nut.
Re: Skinning Hatch and attaching edge trim
Posted:
Sat May 09, 2015 5:07 pmby dales133
Nice way to attack it.90% of building these things seems to be problem solving and you've done it well
Re: Skinning Hatch and attaching edge trim
Posted:
Wed May 13, 2015 9:57 pmby kitecop
andy2 wrote:Skinning the hatch is giving me a headache! Ive made the hatch sit inside the main body walls and the hatch outer skin would obviosuly be the same width as the rest of the main body. The lip of the hatch skin which is about 12mm over hangon either side would sit on top of the main body edge making it all flush.
But now I realsie that the hatch egde trim will have nothing to screw into except the outer ply skin and aluminium skin which will only be about 6mm.
Is it best to cut a notch in the main body side walls where the hatch opens and closes onto and add the notch cut out to the over hanging hatch skin edge for the trim to screw into?
Does that make any sence!!?
Ive been thinking about this same issue as i build. I think i have made a decision on how i am going to attempt it now though. My hatch will sit between the walls just like yours. However i will not have my hatch skin overhang. Instead, im going to screw a 1/8x3" piece of aluminum on top of the hatch along the seam, this will provide the overhang and surface for the seal to contact. By doing it this way i will be able to screw the sealing lip to the frame of the hatch and not have to rely just on thin plywood.
Re: Skinning Hatch and attaching edge trim
Posted:
Sat May 16, 2015 5:09 pmby ctstaas
Hi Andy2, Kitecop is close with using the Al. trim. I used 2" x 1/8" for my edge but I ran the plywood all the way to the edge of the opening. The trim will support the plywood overhang and give you something to screw your edge into. If the skinned hatch fits onto the opening you might have hinge alignment issues. Click on the camera icon under my name for pics.
Enjoy,Chris
Re: Skinning Hatch and attaching edge trim
Posted:
Sat May 16, 2015 5:10 pmby ctstaas
Hi Andy2, Kitecop is close with using the Al. trim. I used 2" x 1/8" for my edge but I ran the plywood all the way to the edge of the opening. The trim will support the plywood overhang and give you something to screw your edge into. If the skinned hatch fits onto the opening you might have hinge alignment issues. Click on the camera icon under my name for pics.
Enjoy,Chris
Re: Skinning Hatch and attaching edge trim
Posted:
Mon May 18, 2015 10:21 pmby kitecop
ctstaas wrote:Hi Andy2, Kitecop is close with using the Al. trim. I used 2" x 1/8" for my edge but I ran the plywood all the way to the edge of the opening. The trim will support the plywood overhang and give you something to screw your edge into. If the skinned hatch fits onto the opening you might have hinge alignment issues. Click on the camera icon under my name for pics.
Enjoy,Chris
If u trim the plywood and just allow the aluminum to hang over the u dont need edge trim. All the wood will b behind the seal.

