pull out drawer question

Anything to do with mechanical, construction etc

pull out drawer question

Postby Ron Dickey » Thu May 14, 2015 12:48 am

I have heard that many folks make the galley outside the trailer rather then build it inside the trailer back area.

https://www.youtube.com/watch?v=Xy72BfqSX4I
This video shows how to install a slider

I at this point am building the galley as I go inside the trailer.

as I watch the video, reality struck how do you install a slider against a wall? :? Answer you do not you build that part outside the trailer and insert it inside the trailer with the drawer and slider already attached.

I like to be 3 to 5 steps ahead before I get there so it is thought out first. I am designing as I go. This can be exhausting and frustrating at times.

The sliders I will install will be for pull out cooler. there will be another pull out that will have pull outs top and bottom. And there I can attach the pull out units to base and cabinet outside the trailer then, slide the entire unit in the slot and attach the top and bottom outside wall to the cabinet next to it by drill screws in through the cabinet wall into the top and bottom outside walls of the vertical standing slide unit.
something like this Image
this is not exactly it but close.

I have seen hundreds of galleys with pull out coolers but never asked how they got the pull out unit on the wall side in.

Ron
173882......173887
Inside almost done--Trolly top has opening windows & roof.doors need assembling--pictured above waley windows..galley 1/3 done
Cross Bow in Build Journals....http://www.tnttt.com/viewtopic.php?f=50&t=54108
User avatar
Ron Dickey
Silver Donating Member
 
Posts: 3109
Images: 787
Joined: Tue Apr 20, 2004 5:56 pm
Location: Central Coast, CA

Re: pull out drawer question

Postby GuitarPhotog » Thu May 14, 2015 9:01 pm

Many people build the galley with it's drawers and cabinets into the trailer before putting on the skin. That gives full access to the sides of the cabinets. And allows the counter and cabinets to add structural stability to the trailer. Some cooler slide outs I've seen have a single slider on the center bottom of the tray and rely on guides on the side to stabilize.

Is your skin already in place?

<Chas>
:beer:
GuitarPhotog
Silver Donating Member
 
Posts: 1779
Images: 55
Joined: Tue Feb 08, 2011 12:52 pm
Location: Grants Pass Oregon

Re: pull out drawer question

Postby tony.latham » Thu May 14, 2015 10:59 pm

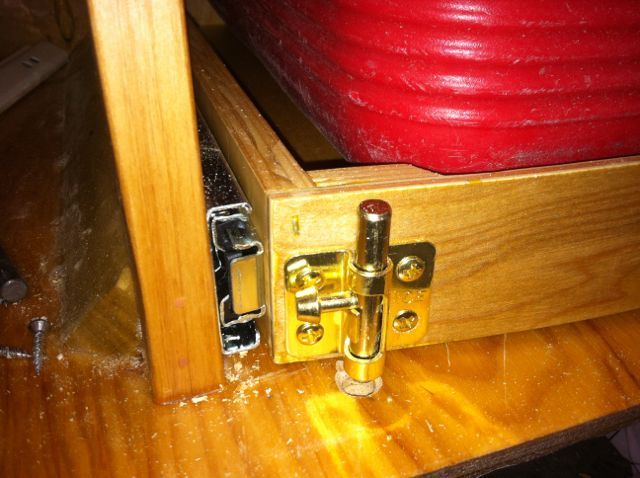
as I watch the video, reality struck how do you install a slider against a wall? :? Answer you do not you build that part outside the trailer and insert it inside the trailer with the drawer and slider already attached.


I put the sliders on the walls... :thinking:

Image

If you look at those two drawers, the outside sliders are attached on the walls. Works fer me.

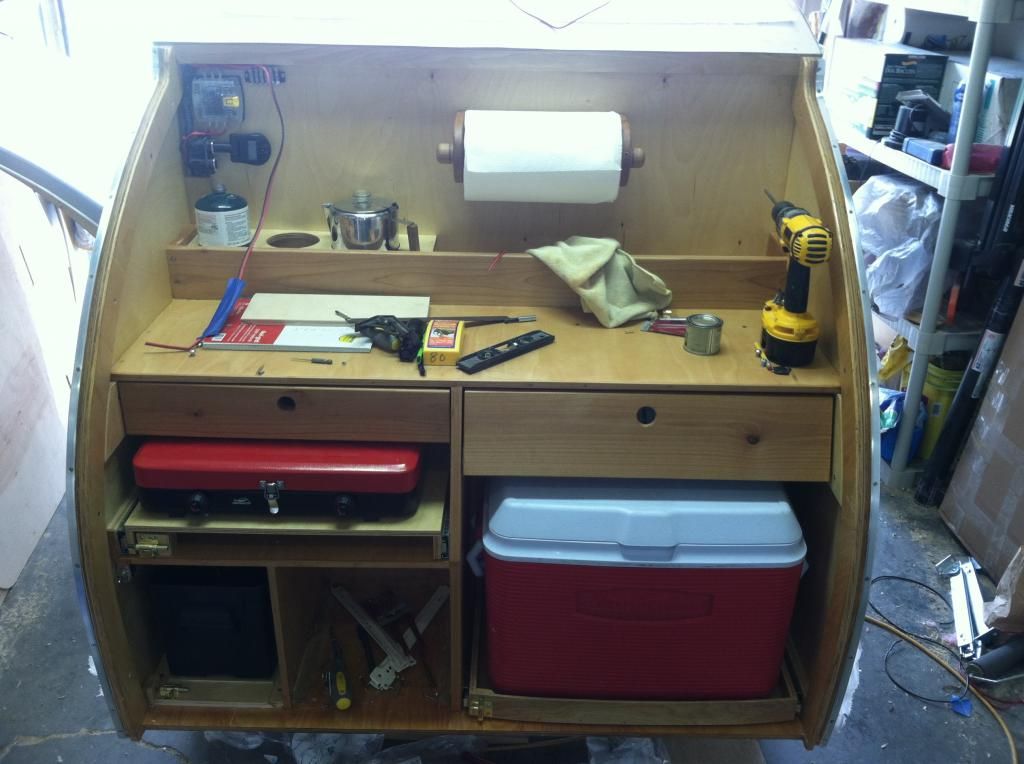
Cooler slider:

Image

Image

Why not on the walls?

T
User avatar
tony.latham
Gold Donating Member
 
Posts: 7073
Images: 17
Joined: Mon Jul 08, 2013 4:03 pm
Location: Middle of Idaho on the edge of nowhere
Top

Re: pull out drawer question

Postby noseoil » Thu May 14, 2015 11:04 pm

Ron, if I understand your question properly, it's how do you attach the drawer guide itself to the side panel (the outside wall panel) of the galley, is that correct? If so, I'll give an example of what my build is in this area.

First, I'm making a 1/2" baltic birch drawer body, to make a good snug fit for the bottom of my cooler. It's just a short drawer body (about 3 1/2" tall X the footprint of my cooler at the bottom). Usually, the cooler is tapered at the bottom from its mold, so make sure to allow for the fit at the actual height of the drawer body & cooler sides where they meet. On my build, I'm using a 1/2" strip of baltic birch to provide a lip for the hatch to close against & make a place for the gasket to nest when the hatch is closed. This 1/2" strip attaches to the inside panel on both sides and curves from the floor up to the hinge at the top (about 2 1/2" wide X 1/2" thick). I will have a slide-out stove/oven combo unit on the left & a pull-out drawer for the cooler on the right. I'm attaching a 2" tall strip of 1/2" baltic birch at the bottom of the wall, and butting into the curved piece which goes around the edge of the galley opening. This will form a sort of an "L" shape between the floor & galley opening for the hatch. It goes on the floor & fits between the bulkhead for the galley & the hatch opening.

The lower 2" piece at the floor level will be to hang the full extension drawer guides for the stove & cooler drawer box (against the side panels or walls). Because I will have the 1/2" material for the hatch to close against, I need to pad-out the wall at the bottom so the drawer guide can slide past the lip at the curved part of the wall. In the middle (between the two pull-out units, the stove & cooler) I'm building a tall narrow box to support the weight of the center of the counter. It will have a small, narrow drawer box to hold whatever stuff will fit in the space that's left between the stove & cooler. It might hold a baking tray, skillet or something similar, but it's going to be so narrow that it isn't really a full size drawer.

If this doesn't make sense, let me know. I haven't done the full assembly yet, so I don't have a picture to post. It will be in my build when I get that far. Here's a sketch of what I'm doing, just found it in my notes. Look at the lower part of the page. Best, tim

Image
Last edited by noseoil on Thu May 14, 2015 11:22 pm, edited 2 times in total.
Build log: viewtopic.php?f=50&t=60248
The time you spend planning is more important than the time you spend building.........

137905
User avatar
noseoil
1000 Club
1000 Club
 
Posts: 1822
Images: 670
Joined: Sun Apr 27, 2014 8:46 am
Location: Raton, New Mexico, living the good life!
Top

Re: pull out drawer question

Postby Ron Dickey » Thu May 14, 2015 11:05 pm

I am designing this one as I go and that part was not thought out before hand so yes my skin is on.

I am thinking of putting the slider part that would be attached to the wall and attaching it to a thin board then after attaching the pull out part to the drawer with will not be much taller then 4" and open at the top (a cooler will ride in it).

Then pulling the drawer out and attaching the wood strip that has the wall side of the slider attach to it and screw it to the existing wall. I will lose a little space but I think it will work. This is where I put one of those :shock: smiley guys with his fingers crossed.

Wow it is raining out a rarity here 3 yr. drought.

:rainy: here we do not run from the rain we run into it and dance!!
Ron
173882......173887
Inside almost done--Trolly top has opening windows & roof.doors need assembling--pictured above waley windows..galley 1/3 done
Cross Bow in Build Journals....http://www.tnttt.com/viewtopic.php?f=50&t=54108
User avatar
Ron Dickey
Silver Donating Member
 
Posts: 3109
Images: 787
Joined: Tue Apr 20, 2004 5:56 pm
Location: Central Coast, CA
Top

Re: pull out drawer question

Postby Ron Dickey » Thu May 14, 2015 11:51 pm

noseoil wrote:Ron, if I understand your question properly, it's how do you attach the drawer guide itself to the side panel (the outside wall panel) of the galley, is that correct? If so, I'll give an example of what my build is in this area.

First, I'm making a 1/2" baltic birch drawer body, to make a good snug fit for the bottom of my cooler. It's just a short drawer body (about 3 1/2" tall X the footprint of my cooler at the bottom). Usually, the cooler is tapered at the bottom from its mold, so make sure to allow for the fit at the actual height of the drawer body & cooler sides where they meet. On my build, I'm using a 1/2" strip of baltic birch to provide a lip for the hatch to close against & make a place for the gasket to nest when the hatch is closed. This 1/2" strip attaches to the inside panel on both sides and curves from the floor up to the hinge at the top (about 2 1/2" wide X 1/2" thick). I will have a slide-out stove/oven combo unit on the left & a pull-out drawer for the cooler on the right. I'm attaching a 2" tall strip of 1/2" baltic birch at the bottom of the wall, and butting into the curved piece which goes around the edge of the galley opening. This will form a sort of an "L" shape between the floor & galley opening for the hatch. It goes on the floor & fits between the bulkhead for the galley & the hatch opening.

The lower 2" piece at the floor level will be to hang the full extension drawer guides for the stove & cooler drawer box (against the side panels or walls). Because I will have the 1/2" material for the hatch to close against, I need to pad-out the wall at the bottom so the drawer guide can slide past the lip at the curved part of the wall. In the middle (between the two pull-out units, the stove & cooler) I'm building a tall narrow box to support the weight of the center of the counter. It will have a small, narrow drawer box to hold whatever stuff will fit in the space that's left between the stove & cooler. It might hold a baking tray, skillet or something similar, but it's going to be so narrow that it isn't really a full size drawer.

If this doesn't make sense, let me know. I haven't done the full assembly yet, so I don't have a picture to post. It will be in my build when I get that far. Here's a sketch of what I'm doing, just found it in my notes. Look at the lower part of the page. Best, tim

Image


Got it. I am working this out in my head. The part I can not get around is, when the drawer is pulled out to attach the slider to it, THE PART that is against the wall will only get a screw at the end where it is past the wall if it goes that far! :NC The second one will need to have a hole drilled through the side of the drawer and be bolted on (very small & short bolt).

the last 3 entries were within a 4 min. time I was answering GuitarPhotog's question and when I was done tony.latham and noseoil had entered their thoughts. it was like a magic act. :applause: :applause: :applause:
173882......173887
Inside almost done--Trolly top has opening windows & roof.doors need assembling--pictured above waley windows..galley 1/3 done
Cross Bow in Build Journals....http://www.tnttt.com/viewtopic.php?f=50&t=54108
User avatar
Ron Dickey
Silver Donating Member
 
Posts: 3109
Images: 787
Joined: Tue Apr 20, 2004 5:56 pm
Location: Central Coast, CA
Top

Re: pull out drawer question

Postby Ron Dickey » Thu May 14, 2015 11:56 pm

tony.latham wrote:
as I watch the video, reality struck how do you install a slider against a wall? :? Answer you do not you build that part outside the trailer and insert it inside the trailer with the drawer and slider already attached.

I put the sliders on the walls... :thinking:


If you look at those two drawers, the outside sliders are attached on the walls. Works fer me.

Cooler slider:

Image
Why not on the walls?

T

I can do the walls it is the part that the drawer is attached to which could be small bolts bolting to the inside of the drawer counter sunk so it will not hit the cooler. :thumbsup:
173882......173887
Inside almost done--Trolly top has opening windows & roof.doors need assembling--pictured above waley windows..galley 1/3 done
Cross Bow in Build Journals....http://www.tnttt.com/viewtopic.php?f=50&t=54108
User avatar
Ron Dickey
Silver Donating Member
 
Posts: 3109
Images: 787
Joined: Tue Apr 20, 2004 5:56 pm
Location: Central Coast, CA
Top

Re: pull out drawer question

Postby Ron Dickey » Fri May 15, 2015 12:06 am

tony I forgot to say I like the lock idea that is why I left that photo in :D

all my cupboards will be held close with window locks.
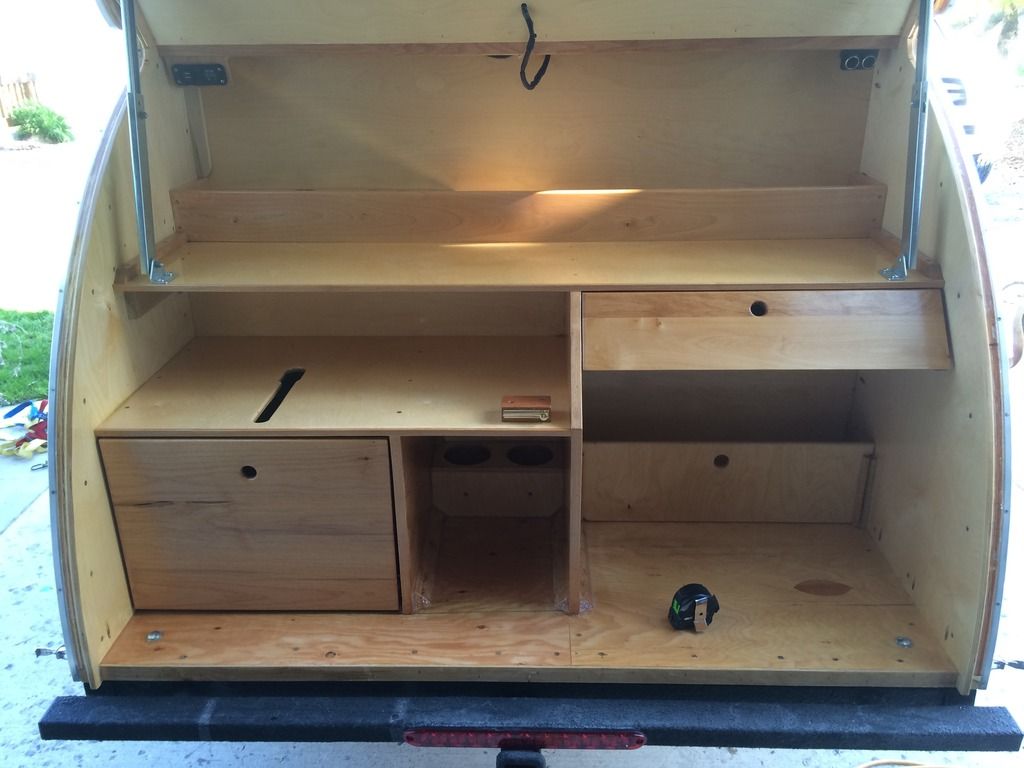
121517
these are my inside cabinets. click on it you can see it bigger. need to seal them.
Ron
173882......173887
Inside almost done--Trolly top has opening windows & roof.doors need assembling--pictured above waley windows..galley 1/3 done
Cross Bow in Build Journals....http://www.tnttt.com/viewtopic.php?f=50&t=54108
User avatar
Ron Dickey
Silver Donating Member
 
Posts: 3109
Images: 787
Joined: Tue Apr 20, 2004 5:56 pm
Location: Central Coast, CA
Top

Re: pull out drawer question

Postby daveesl77 » Fri May 15, 2015 6:21 am

In my build, the entire galley slides out of the back of the camper in two sections. I haven't done any photos yet, as the galley finalization and insertion is next week's project. My trailer is a bit larger - 5' x 5' x 10'. I have a bed frame that is 18 inches above the floor base. My galley system then sits underneath the bed.

The galley is essentially two wood boxes, with external primary dimensions of 16" x 16" x 48". Each box has a primary compartment that is a single piece (these are cabinets), each being 16 x 16 x 24. The final 24" of each box is 8 x 7.5 x 24 and fold over each other. These contain 1 - the propane stove and 2 - the sink / tankless water heater. When the galley boxes are pulled out, these compartments then flip out, making each galley box 6' long.

The galley boxes will travel lengthwise with the doors facing each other. I'm building a hinge pin on each so that once they extend past the rear of the camper they can be individually rotated 90 degrees. This gives me the option of having an "L" shaped galley or a very wide one that stands perpendicular to the trailer.

The rail system I'm using is actually pretty simple. Aluminum angle mounted to the final 2' of each box, which rides inside bearing wheels mounted on vertical supports. Underneath each box are a series of those furniture mover sliders. At the solid end of each box is an adjustable leg. This is the part that I have to do photos of when complete, as it is too hard to explain, but I got the idea from an expedition portal kitchen trailer build. This works for me as my base trailer floor is at 20" above the ground, making the sink/stove sections at 29" and the cabinet tops (countertop space) at 37" above the ground. If in an L configuration, length out of the back of the camper is 78" and extends past the side by a maximum of 30".

dave
*******
Dave and Regina - Enjoying old age, a LOT!

Build Journal - http://www.tnttt.com/viewtopic.php?f=50&t=62386
User avatar
daveesl77
Donating Member
 
Posts: 871
Images: 273
Joined: Tue Jan 27, 2015 4:33 pm
Location: Pocahontas County, West Virginia
Top

Re: pull out drawer question

Postby KCStudly » Fri May 15, 2015 6:35 am

Ron, if you are concerned about how the slides attach to the wall, from my experience they either have a catch mechanism that allows you to take the moving portion of the glide out, or they have access holes in the inner glide that lets you put a screw thru the fix track when the glide is lined up in the correct position (usually closed). Get one in your hand and I think you will see that it is not that difficult.

An important thing is to make sure that they are both the same height off the floor (use a temporary spacer to set the height the same on both sides, and to make sure they are parallel to the floor) and that they are both the same distance from the face frame (if not flush).
KC
My Build: The Poet Creek Express Hybrid Foamie

Poet Creek Or Bust
Engineering the TLAR way - "That Looks About Right"
TnTTT ORIGINAL 200A LANTERN CLUB = "The 200A Gang"
Green Lantern Corpsmen
User avatar
KCStudly
Donating Member
 
Posts: 9640
Images: 8169
Joined: Mon Feb 06, 2012 10:18 pm
Location: Southeastern CT, USA
Top

Re: pull out drawer question

Postby noseoil » Fri May 15, 2015 7:50 am

KC is correct! the slides are attached to the "walls" as one 1/2 of the part, and the inner slide section is attached to the drawer, box, stove, cooler or whatever. If you allow 1/2" per side (just a fat 1/2" for easy opening & closing) or 1+" for clearance total, the body of the drawer and its inner track just slips into the outer track when it's pushed into place. The screws go in first, before the tracks are installed. Usually there's a "lock" on the inner slides to remove the drawer completely from it's track.
Build log: viewtopic.php?f=50&t=60248
The time you spend planning is more important than the time you spend building.........

137905
User avatar
noseoil
1000 Club
1000 Club
 
Posts: 1822
Images: 670
Joined: Sun Apr 27, 2014 8:46 am
Location: Raton, New Mexico, living the good life!
Top

Re: pull out drawer question

Postby aggie79 » Fri May 15, 2015 8:08 am

As Noseoil said, the slides separate into two halves - a drawer side and a case/wall side. Some slides separate with a friction fit; others will have a small plastic lever or catch that you have to depress to separate the halves.

Each have half usually has two holes and two slots - one vertical and one horizontal - for screws. Install screws in the slots first so that you can adjust the fit of the drawer/shelf. Then once everything is aligned, install screws in the two holes to lock everything in position.

You need to keep everything parallel when installing the slides. Rather than trying to mark parallel lines and installing the slides to the lines, it is easier to use spacers cut on a table saw to position the slides and then install the screws.
Tom (& Linda)
For build info on our former Silver Beatle teardrop:
Build Thread

93503
User avatar
aggie79
Super Duper Lifetime Member
 
Posts: 5405
Images: 686
Joined: Tue Aug 07, 2007 5:42 pm
Location: Watauga, Texas
Top

Re: pull out drawer question

Postby noseoil » Thu May 21, 2015 7:59 am

Ron, here's the galley stove with tracks installed. Not ready to go in yet, galley not assembled yet.

Aluminum angle fastens to the stove for added structural strength. Screws attach the angle from the bottom into the stove.
Image

Track attached to the stove. 7 screws tapped into the stove sides with blue lock-tite.
Image
Build log: viewtopic.php?f=50&t=60248
The time you spend planning is more important than the time you spend building.........

137905
User avatar
noseoil
1000 Club
1000 Club
 
Posts: 1822
Images: 670
Joined: Sun Apr 27, 2014 8:46 am
Location: Raton, New Mexico, living the good life!
Top

Re: pull out drawer question

Postby noseoil » Wed Jun 10, 2015 8:00 am

Here's a follow-up shot of the (nearly) finished installation. I did the stove & cooler first, set it up, and only then built the center box part to fit in place. That way, the guides, walls, drawers & everything fit into the space. I still use a "layout stick" for all of my stuff. It's easier than using a tape measure. If the stick is the right size, so are the parts which go on it.

Image
Build log: viewtopic.php?f=50&t=60248
The time you spend planning is more important than the time you spend building.........

137905
User avatar
noseoil
1000 Club
1000 Club
 
Posts: 1822
Images: 670
Joined: Sun Apr 27, 2014 8:46 am
Location: Raton, New Mexico, living the good life!
Top

Re: pull out drawer question

Postby KCStudly » Wed Jun 10, 2015 9:01 am

Plus one on layout sticks, temporary installation spacers/props (such as for helping to set cabinets at the desired height and/or depth), and any other method that takes the brain out of the equation. "That Looks About Right" is in fact a visual exercise. :lol:
KC
My Build: The Poet Creek Express Hybrid Foamie

Poet Creek Or Bust
Engineering the TLAR way - "That Looks About Right"
TnTTT ORIGINAL 200A LANTERN CLUB = "The 200A Gang"
Green Lantern Corpsmen
User avatar
KCStudly
Donating Member
 
Posts: 9640
Images: 8169
Joined: Mon Feb 06, 2012 10:18 pm
Location: Southeastern CT, USA
Top


Return to Teardrop Construction Tips & Techniques

Who is online

Users browsing this forum: No registered users and 3 guests