Page 1 of 1

Attach Inner Walls To The Outside Walls

PostPosted: Sat Oct 03, 2015 9:34 pm
by RunnerDuck
I'm curious as to what's the best way to attach the inner walls to the outer wall.

I've seen people that use dado's in the side walls an insert the inner walls in the slot. That appears to be a real pain.

I've seen people use edging boards screwed to the side walls and against the inner walls. I don't like this as it doesn't look very clean.

I'm thinking about just gluing and screwing through the outer wall into the inner wall with flat-head screws.

Thoughts?

Re: Attach Inner Walls To The Outside Walls

PostPosted: Sat Oct 03, 2015 11:16 pm
by tony.latham
I've seen people that use dado's in the side walls an insert the inner walls in the slot. That appears to be a real pain.


:thinking: It's easy with sandwiched walls and makes for an unquestionably stronger joint. :thumbsup:

Image

Here you can see me cutting in the dado for the lower bulkhead using a router jig.

Image

The two forward dados in the wall are for bulkheads for a headboard with slider storage and a shelf.

Image

It takes some thought–-planning--on assembly, but that's teardrop building.

Image

Tony

Re: Attach Inner Walls To The Outside Walls

PostPosted: Sun Oct 04, 2015 12:52 am
by dales133
I just glued and screwed mine with loads of sikaflex 11fc.
I havnt used it yet so can't comment on how well it does but this is verry strong flexible adhesive so I have every faith in it

Re: Attach Inner Walls To The Outside Walls

PostPosted: Sun Oct 04, 2015 8:47 am
by RunnerDuck
tony.latham wrote:
:thinking: It's easy with sandwiched walls and makes for an unquestionably stronger joint. :thumbsup:


Thanks Tony for the input and great photos.

My big question is; "How do you hold all the pieces that go into the dado's while you raise the walls"?

That's the part I don't understand. It seems like you'd need three monkey's each with four arms to get it all in place. :frightened:

Thanks again.

Ken

Re: Attach Inner Walls To The Outside Walls

PostPosted: Sun Oct 04, 2015 8:51 am
by RunnerDuck
dales133 wrote:I just glued and screwed mine with loads of sikaflex 11fc.
I havn't used it yet so can't comment on how well it does but this is very strong flexible adhesive so I have every faith in it


Thanks dales133 for the reply.

Why did you choose a flexible adhesive instead of TB2 or something like that?

Thanks,

Re: Attach Inner Walls To The Outside Walls

PostPosted: Sun Oct 04, 2015 12:24 pm
by tony.latham
"How do you hold all the pieces that go into the dado's while you raise the walls"?


Runner:

Good question. I wonder how many times I thought about this problem on my first build. Obviously the temporary deadmen are key. They're screwed to the floor and set so a clamp can go through the door openings of the walls.

I always dry fit first, in other words, I assemble without glue just to make sure everything fits. I clamp one wall on first. Once the first wall is set, you can slide the bottom rear bulkhead in and screw from the outside. The same for the bottom slider board. (BTW, these bottom cross members are pre-drilled with kreg screw holes so that once they are glued into the walls, you can easily screw them to the floor for extra strength.)

For the upper slider board, I find a piece of scrap wood that's the same thickness as the slider board and cut it the exact length as the width between the dados, or the distance the two slider boards will be apart. I'll then glue or screw a 1 x 2" (or whatever I have laying around) that overlaps this scrap by about two inches on both ends. I can now clamp this piece to the bottom slider board. I take the second slider board, stick it in its dado and set it on this makeshift support and clamp it in place. (And add a screw to its butt to hold it in the wall.)

I do something similar with the upper rear bulkhead (that sits forward of the lower bulkhead*): One end is placed in the dado, a couple of screws are placed to hold it there, and the far end is held up with a support stick––or leg–– that's cut to the proper height and clamped in place.

It helps to have pencil or chalk marks on the floor to align the crossmembers before you lift wall #2 up.

I build my walls with a 1/4" thick lip that covers the outside of the floor. The internal wall structure sits on the floor. This way, you can set the second wall on the floor, angled out from the crossmembers, and then bring it in while a helper performs any needed alignment of the crossmembers into the dados. And then clamp it to its deadman.

It's actually suspiciously easy. Assuming you've done a dry run.

I use PL Premium glue in these joints and the floor/wall attachment. (I screw from the outside of the wall overlap into the sides of the floor and have kreg holes pre-drilled on the inside of the walls to screw diagonally into the floor.)

T

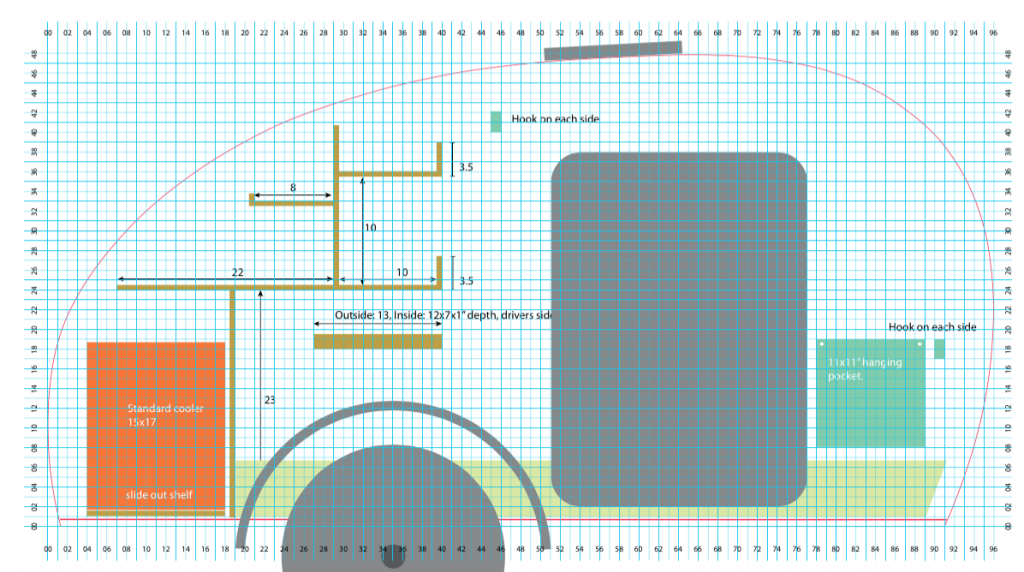
*p.s. My rear bulkheads are staggered. The top one is set 1/2" above the lower one, so that the kitchen counter protrudes into the cabin to form the lower shelf. You can see it in this preliminary sketch of an 8' long Grumman I built:

Image

Re: Attach Inner Walls To The Outside Walls

PostPosted: Sun Oct 04, 2015 1:40 pm
by dales133
RunnerDuck wrote:
dales133 wrote:I just glued and screwed mine with loads of sikaflex 11fc.
I havn't used it yet so can't comment on how well it does but this is very strong flexible adhesive so I have every faith in it


Thanks dales133 for the reply.

Why did you choose a flexible adhesive instead of TB2 or something like that?

Thanks,

I used flexible adhesive with a high bond strenth as I felt it was less likely to fail under extreme twisting and racking.
Ive seen samples of the stuff cured about 5mm wide by 15mm thick gaining a piece of timber and a piece of steel.
You can stretch it try to tear it,bend it and it just won't break.
Tony Dado method is probably a better option depending on your construction technique but it pretty confident with the glue I used it should be fine.
I m considering adding some cleats under the lower interior shelf for added insurance

Re: Attach Inner Walls To The Outside Walls

PostPosted: Mon Oct 05, 2015 9:32 am
by aggie79
I too used a combination of rabbet and dado joints to join sidewalls to the floor. The rabbets and dados provide "registration" to align the components and a physical ledge for the sidewalls to sit which helps in a one-man operation. I used PL Premium adhesive in the joints and deck screws fastened from the outside of the sidewall framing into the floor and bulkhead and headboard framing. I did pre-assemble (without adhesive), used temporary braces to hold the walls in place, and pre-drilled the holes for the deck screws.

Sidewall with dados and rabbet (at the bottom for floor):

Image

First sidewall up, glued and fastened to floor, with temporary bracing:

Image

Bulkhead and headboard framing glued and fastened to first sidewall; (smaller) brace in place to maintain first sidewall plumb/square to floor; second sidewall temporarily in place for pre-drilling:

Image

Second sidewall in glued and fastened in place:

Image

Re: Attach Inner Walls To The Outside Walls

PostPosted: Mon Oct 05, 2015 10:25 pm
by KCStudly
I did something similar but a bit simpler. My walls sit on top of my floor with deck screws running up thru the border frame of the floor into the sill plate of the wall. Instead of cutting a dado for the stick built and skinned vertical bulkhead, I just ended the inner cabin wall skins and inner galley wall skins (using a temporary spacer to butt them up against) where the bulkhead would go.

Lots of details in this part of my build: http://www.tnttt.com/viewtopic.php?p=1030573#p1030573

In summary, I did dry fits using temporary cleats screwed to the outside edge of the floor to register the walls.
Image
Image

These were placed strategically so that I could clamp the walls to them at the front, rear and thru the door opening.

I pilot drilled up thru the floor into the bottoms of the walls then opened the holes thru the floor for the screw threads so that they wouldn't fetch up.

The bulkhead was fit, squared against a temporary cleat on the curb side, a temporary clamp bracket at the top of the street side wall, and pocket screwed to the blocking in the floor. I used more deck screws from the outside thru a pillar in the wall into the bulkhead framing.

The clamp blocks were reused on the curb side to set that wall.

I did much of this work by myself, but did have some help with positioning for the initial dry fits. Double check everything is aligned correctly and square before PL.

PL rather than wood glue because it is a little more forgiving on construction grade fits (as opposed to TB2 and finish carpentry).

If you are using simple plywood construction, you may want to rethink about using cleats or corner blocks. I would not recommend screwing into the edge of plywood, or even the end grain of stick framing. All of my panels are built up with assembly screws going into side grain. (I used a lot of biscuit joinery in the sub-frames to avoid having fasteners clash later at the major assemblies.)

Re: Attach Inner Walls To The Outside Walls

PostPosted: Tue Oct 06, 2015 8:02 am
by noseoil
This is a detail shot of the "galley bulkhead" sitting in place. I ran a slot for the bulkhead, then a larger one which holds the sandwich panel walls on the deck (floor). Easy to do, strong, light & simple. The 1/4" bulkhead is actually over too far in this shot. It's in a 1/4" deep X 1/4" wide dado for the actual assembly. I had a friend come over to help me with the setup of the panels, since it's too busy with one person. With two doing the work, the actual assemble of the main components took a couple of hours (walls, bulkhead, headboard, footboard & galley upper cabinet).

Image

Re: Attach Inner Walls To The Outside Walls

PostPosted: Wed Oct 07, 2015 9:06 am
by RunnerDuck
Thank you everyone for all the great photos and suggestions. I'm feeling much more confident in moving forward with dado's. It actually now looks quite doable with some simple fixturing and an extra set of hands.

I'm moving ahead with my design with these thoughts and usgestions in mind.

Thanks again and onward!