Tightening the Top Skin with a ½” Wrench
Tightening the Top Skin with a ½” Wrench
More information at www.romeonovember.blogspot.com
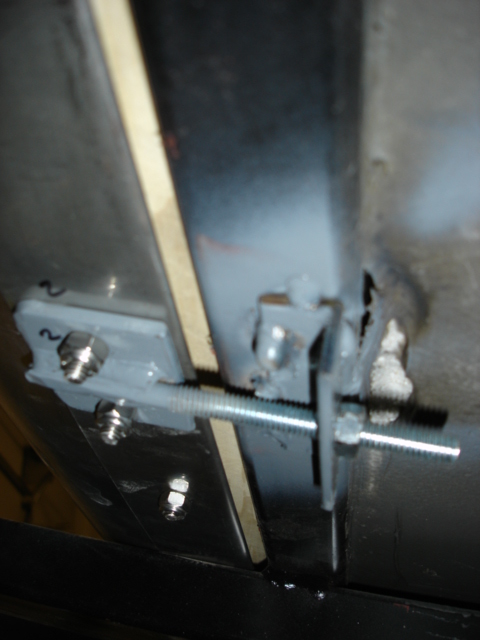
I would like to pass along an idea that was tried on the Three Texas Teardrops Project. After watching the trouble with attaching the top skin on the first Teardrop, I tried to innovate a way to tighten the top skin with a tension device. It worked very well. I was able to tighten the skin in just a few minutes with a ½ inch wrench; I can remove the top skin and make adjustments very easily.
The picture shows an all thread rod that is welded to a flat plate. The flat plate is bolted to a stainless steel leading edge that is wrapped over the .040 aluminum skin. The stainless steel leading edge is a 3” wide piece that is folded in half so the total width is 1.5”. A piece of angle iron was then welded to the bottom of the front frame. The all thread is passed through the angle bracket and the nut is tightened to desired tension.
I hope that this might help someone with their project.

More information at www.romeonovember.blogspot.com
I would like to pass along an idea that was tried on the Three Texas Teardrops Project. After watching the trouble with attaching the top skin on the first Teardrop, I tried to innovate a way to tighten the top skin with a tension device. It worked very well. I was able to tighten the skin in just a few minutes with a ½ inch wrench; I can remove the top skin and make adjustments very easily.
The picture shows an all thread rod that is welded to a flat plate. The flat plate is bolted to a stainless steel leading edge that is wrapped over the .040 aluminum skin. The stainless steel leading edge is a 3” wide piece that is folded in half so the total width is 1.5”. A piece of angle iron was then welded to the bottom of the front frame. The all thread is passed through the angle bracket and the nut is tightened to desired tension.
I hope that this might help someone with their project.
 I really like a lot of the details you all are using on your trailers, I'm planning on copying a few for my project. Hope you don't mind.


