Page 1 of 2
Pre-fab homebuilt teardrop

Posted:
Thu Feb 02, 2006 12:56 pmby EZ
I see there a lot of ways to build teardrop camper sides. Some folks just cut 3/4" side walls and add a roof. Some go totally the other direction and build a frame, attach it to the floor and then add the outside covering, insulation and inside covering (not sure of the advantage to this).

I was planning on building pre-fabricated walls made of 1/2" ply/3/4" pink foam/paneling sandwich with windows and door installed and then attaching them to the floor and add a roof. It seems that gluing the sticks to the outside ply, fitting and gluing the foam and then gluing the inside panels on top of that while things are flat makes the most sense. Maybe using weights instead of nails. Going one step further and installing the windows and door might work too. Of course I have never done this.
I am still toying with the idea of replacing the 1/2" ply outside with 1/4" Luan. I would love to see how strong a composite sandwhich wall like that would be. But how to attach the stringers for the top?
This is fun!
EZ
Posted:
Thu Feb 02, 2006 1:01 pmby gman
Thinking the same thing, easyier to get out of the shop to assemble, maybe use long ss screws thru from the outside to join stringers, add a notched wood block inside to glue in place.
Re: Pre-fab homebuilt teardrop
Posted:
Thu Feb 02, 2006 1:04 pmby Steve Frederick
EZ wrote:I see there a lot of ways to build teardrop camper sides. Some folks just cut 3/4" side walls and add a roof. Some go totally the other direction and build a frame, attach it to the floor and then add the outside covering, insulation and inside covering (not sure of the advantage to this).
I was planning on building pre-fabricated walls made of 1/2" ply/3/4" pink foam/paneling sandwich with windows and door installed and then attaching them to the floor and add a roof. It seems that gluing the sticks to the outside ply, fitting and gluing the foam and then gluing the inside panels on top of that while things are flat makes the most sense. Maybe using weights instead of nails. Going one step further and installing the windows and door might work too. Of course I have never done this.
I am still toying with the idea of replacing the 1/2" ply outside with 1/4" Luan. I would love to see how strong a composite sandwhich wall like that would be. But how to attach the stringers for the top?
This is fun!
EZ
Check out my site or my CD. I've been doing it for three T/D's. Exactly as you've detailed..Working on #'s 4 and 5 now!!
Got it down pat..I've considered offering an assemble-yourself kit!!
Many "disciples" doing it that way. Less work, strong walls, light too!
Posted:
Thu Feb 02, 2006 3:22 pmby EZ
I am planning on using a bevelled 2 X 2 along the top edge of the floor on each side, set back the thickness of the wall. The wall will set on top of the floor instead of attaching to the side and the 2 X 2 will give a good chunk to attach the wall with glue and screws. Inside I will run my carpeting over the bevel of the 2 X 2 for the "sunken living room," effect.

I still would like to try 1/4" Luan for the outside material, but how would you connect the stringers? I thought about notching out the foam/paneling, sort of like a dado (if that's the right term) but then there would be very little surface area to glue on the top unless you count the foam and the paneling. Not much to screw the top to while the glue dries.
EZ
Posted:
Thu Feb 02, 2006 4:17 pmby Ira
EZ--you want to use 1/4" luan for the sides and exterior roof? No ply on the sides?
Posted:
Thu Feb 02, 2006 6:11 pmby Nitetimes
EZ wrote:I still would like to try 1/4" Luan for the outside material, but how would you connect the stringers? I thought about notching out the foam/paneling, sort of like a dado (if that's the right term) but then there would be very little surface area to glue on the top unless you count the foam and the paneling. Not much to screw the top to while the glue dries.
EZ
The simplest thing to do is like in this pic,
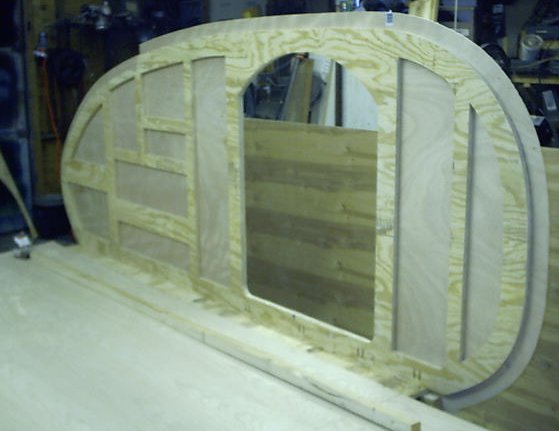
Make your upper frame the thickness of your spars + the thickness of your ceiling material shorter than your sides. Then after you assemble your walls you can stand them up and attach them, then lay the ceiling on the lip created by the frame. Then you just lay your spars on top and screw them down to the framework. It's real simple and easy to do.
Hope this made sense.
Posted:
Thu Feb 02, 2006 6:46 pmby Steve Frederick
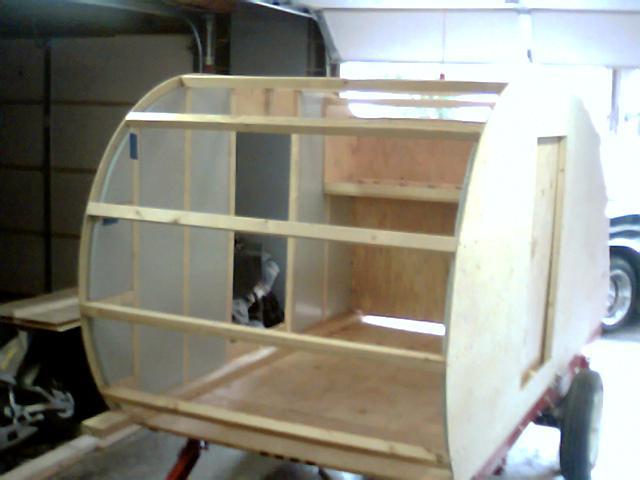
Or this!

The foam is in the voids between framing. The framineg is 1-by's..There's a ledge on the top to build the headliner upon..The roof framing is installed on top of the headliner. Groove at the bottom is for the flor to slide into..A big torsion-box, when done!
Posted:
Thu Feb 02, 2006 8:27 pmby EZ
Actually, luan plywood IS plywood. I am sure a sandwich of luan with 3/4" pink foam and paneling glued together would be very strong and very light. With the addition of the same material for the roof, especially curved (stressed) I think it would create a really strong box, especially with a few bulkheads. These things aren't that big. Heck, people build airplanes with foam sandwiched between a thin layer of fiberglass all the time. Burt Rutan's favorite. It seems to me that 3/4" plywood sides for an 8 foot long box is massive overkill.
I don't want to get a piece of 4 X 8 plywood and cut out areas to make a frame to fill in with foam. Sure that would be strong and a little lighter than just plywood but more expensive and a lot of work. Lots of folks use the stick and sandwich method to build their sides, I just want to do it with luan and on a flat surface so the whole thing becomes one integral unit. My experience with luan plywood, cheap as it is, is that it is pretty strong.
Maybe a camper built like that would disinegrate going down the road at 60 miles an hour. After studying amateur aircraft construction I don't think it would. Just doing a little eye-ball, SWAG engineering here.
EZ
Posted:
Thu Feb 02, 2006 8:29 pmby Hardin Valley Magic
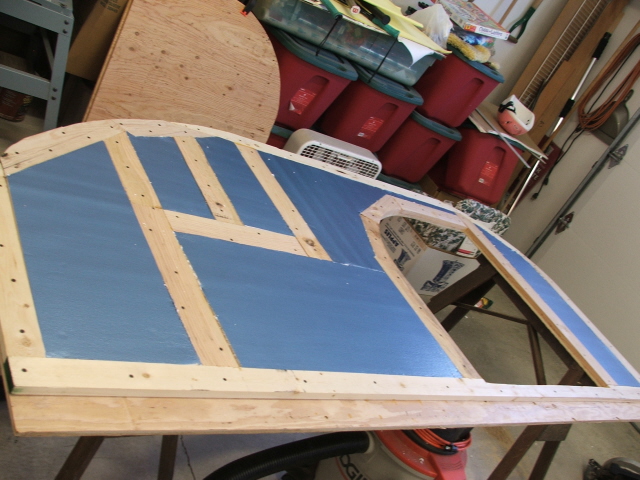
EZ here is a pic of the way I did it. I used 1/4" luan for the outside and attached studs to it with 1 5/8' screws and let them short so the spars would rest on them. Then ran 3" screws through the spars and into the top of the studs. However after completing the inside framing I covered the luan with 3/8" bead board. It was covered with titebond and shot on with 1" staples.
Sorry for the long reply. Check my gallery for more pics.
Posted:
Thu Feb 02, 2006 9:34 pmby cracker39
EZ, I'm going to use 1/4" (or 5mm) luan for my outside skin too, on 3/4" thick framing. I run a 2" wide framing piece around the entire edge, and that 's what helps secure the spars. The edge framing has notches in it for the spars to fit into. One screw goes thru the ply into the ends of the spars, and two screws go through the spar ends into the framing. With Titebond II glue also.
Here is a link to a diagram on my web site that isn't reachable normally as I quit displaying it on the web page.
http://web.tampabay.rr.com/wdsummers/sq ... raming.jpg
Posted:
Thu Feb 02, 2006 11:07 pmby Nitetimes
Any of the above will work, I basically did the same thing as Steve did only with ply instead of sticks. The advantage to the way we did it is you have a lip to lay your ceiling on and you just sit your spars on top. Any way that works for you is gonna work. Luan is fine for the outside skin provided it is well waterproofed. Mine is 1/4" - 3/4" - 1/4" and it is plenty strong. Build it the way you want it and impress yourself with your ingenuity no one else.
Posted:
Thu Feb 02, 2006 11:24 pmby EZ
You know guys, truth is that I am trying (having) to build cheap and fast. I am on an extremely limited budget and spring is aproaching. I also like to build light. As light as possible, engineering-wise. Some of you folks are building really nice campers, and I hope to do that some day. If I had my choice (and more time and money) I would go for a really nice unit and build more robust. I'm just replacing a tent, but it will be a nice replacement.
EZ
Posted:
Thu Feb 02, 2006 11:31 pmby madjack
Posted:
Fri Feb 03, 2006 12:02 amby bledsoe3
EZ, Here's a picture of mine. I removed all of the screws after the glue dried. Then I glued the inner skin on and trimmed with a router.
The bottom 1X4 sit on top of the floor and the remainder covers the side rail.
Here is the wall installed with the inner skin in place.

fiberglass
Posted:
Fri Feb 03, 2006 1:52 amby jayd
EZ,
I don't know if its possible, but I've been thinking of building a squared type tear such as the weekender using foam core and fiberglass. I'm thinking of building it with 2" think foam (except for the floor, load bearing interior bulkhead and cabinets) glued and screwed together. Then coat it with a latex paint to protect the foam. Lay up several layers of glass cloth with a poly resin. Use a decent grade ply wood for the floor, interior galley bulkhead and cabinets. Sand, smooth, paint and fix up the inside. I think if done properly this could be a fairly strong, very light weight and inexpensive construction.
Don't take my world for it. I've have never built a tear. I think I'm going to give this a shot though.
Good luck.
Jay


