Hot Forming Polycarbonate windows
Hi All
Thanks to all who contributed to my first post on this subject and guided my decisions.
The main feature of my 'Short Wife Standy' Tear Drop design is its wrap around front window. I am hopeful that the window will be an extension of the side windows and look like just one black line wrapping round line side to side.
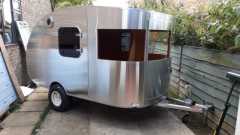
The design is a mix of styles from other builds but a little unique and so copying other people has not been an option. See my other posts on light weight ply/foam composite construction.
This could be a lengthy description but instead I will keep it punchy and assume if anyone is interested they will ask. Yes there are 25.4mm in an inch.
Polycarbonate v Acrylic = More resistant to impact.
Thickness = 3mm is on the thick side of what I was recommended I am just not brave enough to go thin.
Technique = Drape moulding. Essentially at temperature it should just droop over what ever it is resting on.
Temperature recommended = 155C Actual 150C to 165C measured mid oven.
De-gassing recommended =125C for 4hrs Actual 100C for 6hrs
Cycle time (mins) - 15 to temperature; 15 to 20 at temp; 10 to cool to 100C door closed, 10 to 70C before lifting out; re-tool and load oven 15. Say 1hr 15min per run.
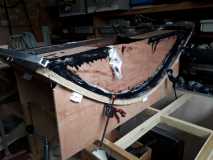
I took a pattern off the window. 6x3mm thick 40mm wide strips of plywood clamped and PVA glued.
From this I set in a sheet of 1mm Ally and built wooden supports to keep its shape. I used Glass tape a Oven Flue Sealer (max temp 300C)
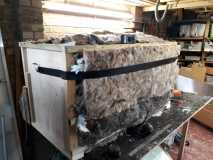
I built an oven walled with rock wool
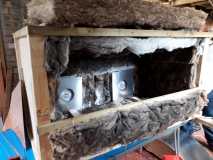
Heaters were parts for fan assisted ovens and temperature controller was of the bulb type.
Heaters were 2kW 230V rating and wired in series for 1.25kW
(Later I took one out which raised the power to 2.5kW but left both fans running.
1. Test runs I encountered the following problems
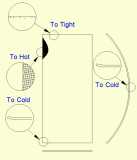
To hot – bubbles formed in the material – Solution de-gas as suggested by the manufacture
Cold lip curl – The sheet would curl up at the ends which could have been cold and in the middle which could again be to cold.
2. Tests runs
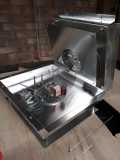
I Decided to use a top clamp to hold down the curl edges.
This gave rise to marks under the clamps, solved by loosening the clamps a little.

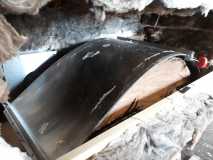
This image shows the clamp in place, the red object is a meat thermometer, cool down took longer that I thought.
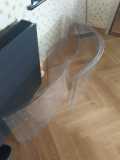
Here the bent ploycarbonate is fully con-formal to the tool.
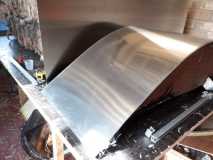
I now own a stock of windows for all eventualities. One set will be covered with tinted film and fitted to the TD.
If I had my life to live again.
1. More heaters to even out the temp across the oven.
2. Line the oven to remove all the fibres of rock wool.
3. Do in a clean room and not my garage.
4. Run cooler and longer and out-gass for longer and cooler.
Clive
See also build journal http://www.tnttt.com/viewtopic.php?f=50&t=63510
Thanks to all who contributed to my first post on this subject and guided my decisions.
The main feature of my 'Short Wife Standy' Tear Drop design is its wrap around front window. I am hopeful that the window will be an extension of the side windows and look like just one black line wrapping round line side to side.
The design is a mix of styles from other builds but a little unique and so copying other people has not been an option. See my other posts on light weight ply/foam composite construction.
This could be a lengthy description but instead I will keep it punchy and assume if anyone is interested they will ask. Yes there are 25.4mm in an inch.
Polycarbonate v Acrylic = More resistant to impact.
Thickness = 3mm is on the thick side of what I was recommended I am just not brave enough to go thin.
Technique = Drape moulding. Essentially at temperature it should just droop over what ever it is resting on.
Temperature recommended = 155C Actual 150C to 165C measured mid oven.
De-gassing recommended =125C for 4hrs Actual 100C for 6hrs
Cycle time (mins) - 15 to temperature; 15 to 20 at temp; 10 to cool to 100C door closed, 10 to 70C before lifting out; re-tool and load oven 15. Say 1hr 15min per run.
I took a pattern off the window. 6x3mm thick 40mm wide strips of plywood clamped and PVA glued.
From this I set in a sheet of 1mm Ally and built wooden supports to keep its shape. I used Glass tape a Oven Flue Sealer (max temp 300C)
I built an oven walled with rock wool
Heaters were parts for fan assisted ovens and temperature controller was of the bulb type.
Heaters were 2kW 230V rating and wired in series for 1.25kW
(Later I took one out which raised the power to 2.5kW but left both fans running.
1. Test runs I encountered the following problems
To hot – bubbles formed in the material – Solution de-gas as suggested by the manufacture
Cold lip curl – The sheet would curl up at the ends which could have been cold and in the middle which could again be to cold.
2. Tests runs
I Decided to use a top clamp to hold down the curl edges.
This gave rise to marks under the clamps, solved by loosening the clamps a little.
This image shows the clamp in place, the red object is a meat thermometer, cool down took longer that I thought.
Here the bent ploycarbonate is fully con-formal to the tool.
I now own a stock of windows for all eventualities. One set will be covered with tinted film and fitted to the TD.
If I had my life to live again.
1. More heaters to even out the temp across the oven.
2. Line the oven to remove all the fibres of rock wool.
3. Do in a clean room and not my garage.
4. Run cooler and longer and out-gass for longer and cooler.
Clive
See also build journal http://www.tnttt.com/viewtopic.php?f=50&t=63510

