Framing for trailer with rooftop tent

Anything to do with mechanical, construction etc

Re: Framing for trailer with rooftop tent

Postby Socal Tom » Mon Feb 22, 2021 7:50 am

ptulli wrote:
noseoil wrote:137818


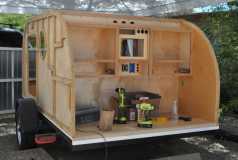
That picture freaks me out, I won't lie. LOL! I hate to waste wood, but the weight savings has got to be great! Question I would have, would that hold up off-roading? I'm not doing the Rubicon trail with it, but I want it to be able to take the abuse. I want to go overlanding and be ready for what I might encounter. This is my second concern behind the trailer being able to hold a rooftop tent.
For the off reading, the answer depends on how it’s all put together. If those empty spaces are tightly filled with foam, and both sides are sandwiched with other layers, and it’s glued well, then it will be fine with a decent suspension ( meaning not 3500lb springs and a 1000lb trailer). For holding an RTT, I’d feel better if the sections around the doors were a bit wider, but the same concept applies. It’s not the plywood that gives the strength, it’s the overall panel. Where the RTT needs extra care is ensuring that the mounting points for the trailer transfer the weight to the frame . The panel could work fine, but more wood means greater margin for error.
Socal Tom
Donating Member
 
Posts: 1347
Images: 12
Joined: Sun Jun 29, 2008 9:21 am
Location: San Diego Ca

Re: Framing for trailer with rooftop tent

Postby noseoil » Mon Feb 22, 2021 9:48 am

Our teardrop has about 20,000 miles on it now & has had no problems structurally so far. The inner 1/8" Baltic birch skins were glued in place on a flat bench first, then stained & coated with urethane, prior to standing them up on rabbet joints along the floor panel's edges (with glue & drywall screws from the bottom & sides). The individual framing members along the side panels are used as "hard points" for attaching the cabinets, which were fastened from the outside with long drywall screws & glue, prior to skinning. The 1/4" galley bulkhead slides into a dado in the walls & floor (glue & screws again) and provides shear resistance from racking, as the hatch provides little resistance against twisting at the back of the box. The raw canvas covered headliner sits in a rabbet joint, then has the spars screwed in from the outside. The spars are glued in place against the top of the headliner, no nails needed here with enough glue. Red oak spars were used at the points where the solar panel & the hatch attach with screws, for better holding power than the poplar.

159902

Once all of the interior assembly was done with drywall screws (headboard, footboard/entertainment cabinet, upper galley, counter, lower galley cabinet) wiring was run & foam insulation was fitted into all voids, walls & roof. Next the outer 1/8" Baltic birch skins were glued & stapled in place to finish the structural part of the walls & added to the roof spars to fully encapsulate the box's structure. If I were adding a roof tent, there would be more "hard points" in the roof structure, to accommodate loads (both static & dynamic) & distribute them down & into the floor & trailer frame. A walking surface needs more beef for tromping around up there, but it's easy enough to do.

159982

I think where people make mistakes in scantlings on a teardrop build, come from a lack of understanding in the strength of materials & how forces travel through members as loads are applied. A 3/4" plywood frame with inner & outer skins can be extremely strong, if it is glued together well & fastened at the edges into a strong structural box. Forces are moving into & out of the skins, through the center webs, & out to the other side continually. You can't see this, but it's happening every time a load is applied (wind from moving, bumps from rocks, leaning against a side, sitting on the floor as you enter, etc). A simple rabbet joint at the roof & floor allows for good glue bonding & solid mechanical fastenings from 2 different directions.

A roof truss system in a house can use 2x4's which are 2' apart for the top chords, with 1/2" plywood as the outside skin for walking around. This can be reduced to 3/4" trusses placed 1' on center with 1/4" roof sheathing (never done in a typical building, this is just an example). I guess you could use 3/8" trusses on 6" centers & 1/8" Baltic birch for the skins for walking around on the roof if you wanted. Remember, there are wind loads, snow loads & mechanical loads all applied to the individual members which make up the house frame. This is a weird example, but it's making the point that if things are done correctly, you can use less material & save weight to have a strong box to sleep in & tow behind a vehicle.

My point is that the 3/4" plywood frame with 1/8" skins is plenty strong for a regular teardrop if attention to fastenings & details are done properly. A roof tent is just another load to be figured out, but we already have roof vents, solar panels & other stuff attached to a teardrop, so why not one more thing?

159940

160020
Build log: viewtopic.php?f=50&t=60248
The time you spend planning is more important than the time you spend building.........

137905
User avatar
noseoil
1000 Club
1000 Club
 
Posts: 1820
Images: 669
Joined: Sun Apr 27, 2014 8:46 am
Location: Raton, New Mexico, living the good life!

Re: Framing for trailer with rooftop tent

Postby ptulli » Tue Feb 23, 2021 7:07 pm

tony.latham wrote:
That picture freaks me out...


I've seen Tim's teardrop up close. It'll last several generations.

Tony


I have no doubts it would for regular travel, but it's the off-road abuse I'm worried about. Not having built one before just curious if it'll hold up or if the house frame idea would be a better set up for the walls.
Tow Rig: 2016 Wrangler 2d, planning overlanding/off-road camper (squaredrop/squareback)
ptulli
Teardrop Builder
 
Posts: 41
Images: 13
Joined: Sun Jan 17, 2021 2:01 am
Location: NH
Top

Re: Framing for trailer with rooftop tent

Postby ptulli » Tue Feb 23, 2021 7:41 pm

noseoil wrote:Our teardrop has about 20,000 miles on it now & has had no problems structurally so far. The inner 1/8" Baltic birch skins were glued in place on a flat bench first, then stained & coated with urethane, prior to standing them up on rabbet joints along the floor panel's edges (with glue & drywall screws from the bottom & sides). The individual framing members along the side panels are used as "hard points" for attaching the cabinets, which were fastened from the outside with long drywall screws & glue, prior to skinning. The 1/4" galley bulkhead slides into a dado in the walls & floor (glue & screws again) and provides shear resistance from racking, as the hatch provides little resistance against twisting at the back of the box. The raw canvas covered headliner sits in a rabbet joint, then has the spars screwed in from the outside. The spars are glued in place against the top of the headliner, no nails needed here with enough glue. Red oak spars were used at the points where the solar panel & the hatch attach with screws, for better holding power than the poplar.

Once all of the interior assembly was done with drywall screws (headboard, footboard/entertainment cabinet, upper galley, counter, lower galley cabinet) wiring was run & foam insulation was fitted into all voids, walls & roof. Next the outer 1/8" Baltic birch skins were glued & stapled in place to finish the structural part of the walls & added to the roof spars to fully encapsulate the box's structure. If I were adding a roof tent, there would be more "hard points" in the roof structure, to accommodate loads (both static & dynamic) & distribute them down & into the floor & trailer frame. A walking surface needs more beef for tromping around up there, but it's easy enough to do.

I think where people make mistakes in scantlings on a teardrop build, come from a lack of understanding in the strength of materials & how forces travel through members as loads are applied. A 3/4" plywood frame with inner & outer skins can be extremely strong, if it is glued together well & fastened at the edges into a strong structural box. Forces are moving into & out of the skins, through the center webs, & out to the other side continually. You can't see this, but it's happening every time a load is applied (wind from moving, bumps from rocks, leaning against a side, sitting on the floor as you enter, etc). A simple rabbet joint at the roof & floor allows for good glue bonding & solid mechanical fastenings from 2 different directions.

A roof truss system in a house can use 2x4's which are 2' apart for the top chords, with 1/2" plywood as the outside skin for walking around. This can be reduced to 3/4" trusses placed 1' on center with 1/4" roof sheathing (never done in a typical building, this is just an example). I guess you could use 3/8" trusses on 6" centers & 1/8" Baltic birch for the skins for walking around on the roof if you wanted. Remember, there are wind loads, snow loads & mechanical loads all applied to the individual members which make up the house frame. This is a weird example, but it's making the point that if things are done correctly, you can use less material & save weight to have a strong box to sleep in & tow behind a vehicle.

My point is that the 3/4" plywood frame with 1/8" skins is plenty strong for a regular teardrop if attention to fastenings & details are done properly. A roof tent is just another load to be figured out, but we already have roof vents, solar panels & other stuff attached to a teardrop, so why not one more thing?


A lot of great info thank you! Sounds like that should deal with the weight issue. You are right about comparing to a house roof, didn't even think of that. Just want to make sure it'll hold up with the racking of off-road. How are the spars done?
Tow Rig: 2016 Wrangler 2d, planning overlanding/off-road camper (squaredrop/squareback)
ptulli
Teardrop Builder
 
Posts: 41
Images: 13
Joined: Sun Jan 17, 2021 2:01 am
Location: NH
Top

Re: Framing for trailer with rooftop tent

Postby noseoil » Fri Feb 26, 2021 8:39 am

"How are the spars done?" With a rabbet joint, glue & screws.

160003
Build log: viewtopic.php?f=50&t=60248
The time you spend planning is more important than the time you spend building.........

137905
User avatar
noseoil
1000 Club
1000 Club
 
Posts: 1820
Images: 669
Joined: Sun Apr 27, 2014 8:46 am
Location: Raton, New Mexico, living the good life!
Top

Re: Framing for trailer with rooftop tent

Postby ptulli » Sun Feb 28, 2021 7:36 pm

Sorry I should have been more specific. Your picture helped, thank you. I should have said, how far apart do you put them and are they on flat or edge. I see from the picture that you have them on edge how far apart; 8", 10", 12", 16", ...? I'm guessing around 12" but want to be sure. I have a rough idea on the kitchen area that I'll post up soon.
Tow Rig: 2016 Wrangler 2d, planning overlanding/off-road camper (squaredrop/squareback)
ptulli
Teardrop Builder
 
Posts: 41
Images: 13
Joined: Sun Jan 17, 2021 2:01 am
Location: NH
Top

Re: Framing for trailer with rooftop tent

Postby tony.latham » Sun Feb 28, 2021 8:16 pm

how far apart do you put them and are they on flat or edge...


Just like a floor joist, the strength is in the vertical direction.

My rule thumb for spar spacing is 12” on the nearly flat portions of the roof and 8” in the front curve. But that’s not written in stone.

With my last build, I installed a solar panel on the left side of the roof. It was attached with screws through the panel’s grommets, so that’s what drove the setting of the first several spars. The other issue is the fan opening. It needs to be 14-1/4” square. Because of this larger gap -- and the weight of the fan–– I doubled the two spars next to the fan opening. (Use two spars on either side of the fan.)

Image

Tony
User avatar
tony.latham
Gold Donating Member
 
Posts: 6900
Images: 17
Joined: Mon Jul 08, 2013 4:03 pm
Location: Middle of Idaho on the edge of nowhere
Top

Re: Framing for trailer with rooftop tent

Postby ptulli » Mon Mar 01, 2021 7:35 pm

tony.latham wrote:
how far apart do you put them and are they on flat or edge...


Just like a floor joist, the strength is in the vertical direction.

My rule thumb for spar spacing is 12” on the nearly flat portions of the roof and 8” in the front curve. But that’s not written in stone.

With my last build, I installed a solar panel on the left side of the roof. It was attached with screws through the panel’s grommets, so that’s what drove the setting of the first several spars. The other issue is the fan opening. It needs to be 14-1/4” square. Because of this larger gap -- and the weight of the fan–– I doubled the two spars next to the fan opening. (Use two spars on either side of the fan.)

Tony


Awesome thanks! I forgot about the fan, sounds like what you did when I built my house around the chimney. I gotta finish my sketches to have you guys look it over.
Tow Rig: 2016 Wrangler 2d, planning overlanding/off-road camper (squaredrop/squareback)
ptulli
Teardrop Builder
 
Posts: 41
Images: 13
Joined: Sun Jan 17, 2021 2:01 am
Location: NH
Top

Re: Framing for trailer with rooftop tent

Postby ptulli » Sat Mar 20, 2021 6:47 pm

Been a bit, I kept slacking at getting the drawing of the galley done. I'm not sure on the uppers so I didn't put dividers in and on the bottoms after the spot for the fridge/freezer I'm not exactly sure but I'll do some draws and then another cabinet. I'm debating on putting the battery in that far cabinet or I might add a tongue box attached to the cabin with all the electric and an access to the inside to put shoes. Thoughts?

Here is the galley idea so far.... 164570
Tow Rig: 2016 Wrangler 2d, planning overlanding/off-road camper (squaredrop/squareback)
ptulli
Teardrop Builder
 
Posts: 41
Images: 13
Joined: Sun Jan 17, 2021 2:01 am
Location: NH
Top

Re: Framing for trailer with rooftop tent

Postby ptulli » Sat Mar 20, 2021 7:57 pm

Here is the outside on the driver side, basic outside. The black is the door of course. The top corners are rounded but I just sketched it square-ish. Possible ideas on the driver side is a instant hot water/shower. Passenger side looks the same as driver, only thing I can think of would be adding a spot for using my RVQ from my popup.

164573
Tow Rig: 2016 Wrangler 2d, planning overlanding/off-road camper (squaredrop/squareback)
ptulli
Teardrop Builder
 
Posts: 41
Images: 13
Joined: Sun Jan 17, 2021 2:01 am
Location: NH
Top

Re: Framing for trailer with rooftop tent

Postby tony.latham » Sat Mar 20, 2021 8:20 pm

Here is the outside on the driver side, basic outside.


The bottom of the door needs to be half-way into the mattress so you sit on it instead of the doorway.

:thinking:

Tony
User avatar
tony.latham
Gold Donating Member
 
Posts: 6900
Images: 17
Joined: Mon Jul 08, 2013 4:03 pm
Location: Middle of Idaho on the edge of nowhere
Top

Re: Framing for trailer with rooftop tent

Postby tony.latham » Sat Mar 20, 2021 8:34 pm

Here is the galley idea so far....


When I was building a teardrop for my sis and brother-in-law, I recall him telling me to build it so they could fit a "regular cooler in." And I recall thinking, "what in the hell is a regular cooler?"

Since then, I've been a believer in designing the galley for specific "appliances." Not trying to figure out what fits after the fact.

Image

Image

And I'm also big on using the Reliance water jugs for a simple running water system.

Image

Something to consider.

Tony
User avatar
tony.latham
Gold Donating Member
 
Posts: 6900
Images: 17
Joined: Mon Jul 08, 2013 4:03 pm
Location: Middle of Idaho on the edge of nowhere
Top

Re: Framing for trailer with rooftop tent

Postby noseoil » Sun Mar 21, 2021 8:51 am

I'm with Tony on his approach to building a galley. Making an opening 1/4" too small for the item which needs storage is a large problem on a build. When I did the "upper" galley cabinets, I went to Wally's World & found a coffee maker which was the smallest full size one they had. The layout for the face frame opening height was done so this would fit inside the cabinet when stowed with the doors closed. Same thing with the cooler & stove. The center opening was what was left over after the big things were setup. It's like loading a moving van, the biggest stuff goes first, the smallest stuff fills up the gaps that are left over...

The opening where the rear bumpers are sitting (grab rails) is where the coffee pot sits when we have electric to run it, otherwise, it's a perk type.
160045

160213

160305
Build log: viewtopic.php?f=50&t=60248
The time you spend planning is more important than the time you spend building.........

137905
User avatar
noseoil
1000 Club
1000 Club
 
Posts: 1820
Images: 669
Joined: Sun Apr 27, 2014 8:46 am
Location: Raton, New Mexico, living the good life!
Top

Re: Framing for trailer with rooftop tent

Postby Socal Tom » Sun Mar 21, 2021 3:53 pm

+1 on the design it around the appliances you plan to use. Mine is currently designed around a Waeco CF35 and a Camp Chef oven. Those water jugs are a KISS way to deal with water if you plan on incorporating one.
Tom
Socal Tom
Donating Member
 
Posts: 1347
Images: 12
Joined: Sun Jun 29, 2008 9:21 am
Location: San Diego Ca
Top

Re: Framing for trailer with rooftop tent

Postby ptulli » Sun Mar 21, 2021 6:31 pm

tony.latham wrote:
Here is the outside on the driver side, basic outside.

The bottom of the door needs to be half-way into the mattress so you sit on it instead of the doorway.
Tony


I have the door only 6" up from the bottom, should I go lower? I do plan on putting a couple floor storage spots as well, if that makes a difference.

noseoil wrote:I'm with Tony on his approach to building a galley. Making an opening 1/4" too small for the item which needs storage is a large problem on a build. When I did the "upper" galley cabinets, I went to Wally's World & found a coffee maker which was the smallest full size one they had. The layout for the face frame opening height was done so this would fit inside the cabinet when stowed with the doors closed. Same thing with the cooler & stove. The center opening was what was left over after the big things were setup. It's like loading a moving van, the biggest stuff goes first, the smallest stuff fills up the gaps that are left over...
The opening where the rear bumpers are sitting (grab rails) is where the coffee pot sits when we have electric to run it, otherwise, it's a perk type.


I agree with building for the galley with the appliances in mind, it was suggested earlier as well and does make the most sense. I found the Dometic fridge/freezer I would like to get so I am using that as my height for the counter top and also the depth of the galley. I did check the height for a coffee make for the wife as I don't drink it, but I do it for her, lol. Main debate for the uppers is how I will set the width for each cabinet. The counter I am going to put a 2/3 burner cooktop on above the fridge/freezer so that should be ok there, I hope lol. The other end will have a sink. Below it I will have the water pump, may put the water below the trailer as well, still figuring that out. I am also debating putting the battery there but I don't like mixing water and electricity. I think that is all the major stuff for the galley I can think of. Am I missing anything? The only other thing is if this ends up being too tall for the cook, aka the wife, I may have to change the design to a pull out for the sink and cook top.

That reason is because I will be putting this up on 35" tires to match the Jeep after it's lift hopefully this summer. Any suggestions on how I can check for that before I build?
Tow Rig: 2016 Wrangler 2d, planning overlanding/off-road camper (squaredrop/squareback)
ptulli
Teardrop Builder
 
Posts: 41
Images: 13
Joined: Sun Jan 17, 2021 2:01 am
Location: NH
Top

PreviousNext

Return to Teardrop Construction Tips & Techniques

Who is online

Users browsing this forum: No registered users and 18 guests