Page 1 of 1
I need encouragement!!!

Posted:
Tue May 30, 2006 5:45 pmby bennelson
Hey Everyone!
I am going insane here!
I finally have some nice weather again to keep working on my Cubby-type homebuild teardrop.
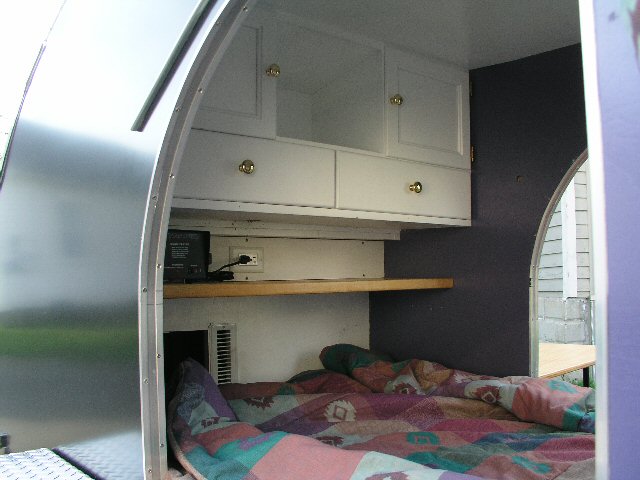
The shell of it is pretty well finished, less doors, hatch and trim.
I have a metal roof with woody sides.
I just got the outside corner bead on. The one side looks ok, but I got a lot of caulk gunk all over the other.
I have both doors built, and "test trimmed" both door and opening for the one side and tacked the door in with a couple screws on both sides of the trim.
IT DOESN'T FIT! Seems the problem is with bending trim - it gets all squirley and twists and bulges so the door can't properly close. I think I need to pull off the door opening trim and sand it down, smooth out the corner curves. (I am using the "D" shape doors)
Also, I have no idea of what the best way to do the intersection of the roof edge trim and hatch hinge. What's the best way to have them all run together and look nice and not leek!? I will be using a stainless piano hinge (4 ft) with a rubberized cloth material underneith it.
The only thing I am really happy with at this point is the electrical items. Dome light, porch light, and Fantastic vent are all perfect. Easy to install and look nice.
I am kinda discouraged with all this trim work. I don't think curved aluminum likes me.
Any kind words of encouragement will be gratiously accepted.
Check out my album for metal butchering photos.
-Ben
PS - My wife has a broken arm and PMS... - it's not helping any... Hope she heals soon!
Posted:
Tue May 30, 2006 5:59 pmby bennelson
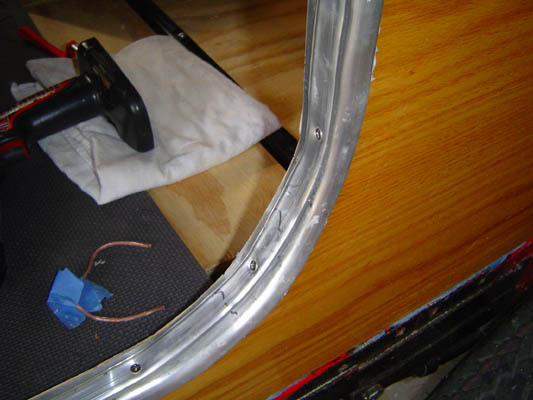
Here is just a taste of my metal butchery.
So much for making nice bends around corners.
Posted:
Tue May 30, 2006 6:03 pmby asianflava
I kinda got into this bind what made it worse was that I was on a time crunch. I had to get the trailer finished because I was going to camp in it that weekend.
I cut the doors down 1/8in because I was using trim that was 1/8 thick. I also rabited the doors because I was putting 1/8in thick T-molding on them. When I went to install the doors, they wouldn't fit! What I found was that the top trim was a tad long so it wasn't pulled all the way against the door frame. I discovered this because when I removed the trim, the silicone wasn't squished down at all. After I trimmed the piece, the door fit OK. Actually, it was just OK because I messed up the door by cutting it down. I cut it down on the jointer, with my limited experience with the jointer it developed a bow on that side.
I'll fix it later, I'll clamp a straight edge to it and run the router across the edge. It happens to all of us weather we'd like to admit it or not.
Posted:
Tue May 30, 2006 6:07 pmby madjack
Ben, was the Al dead soft or annealed...the best manner of bending is the "pull and tap" method....pull slowly while tapping with a rubber hammer...a block of wood, used as a dolly can help keep the hammer blows from showing...a bending jig can help tremendously...we used a jig for most everything we bent and the proof is in the pudding..............
madjack

Posted:
Tue May 30, 2006 6:20 pmby PaulC
Hi MJ, Just had a quick look in your album and could'nt see any pic's of the jig you mentioned. Any chance of a description or pic on that one? I'll be using the same moulding you have used, on my No.2, so it may be helpful.
Cheers
Paul

Posted:
Tue May 30, 2006 6:26 pmby bennelson
This trim was advertised as extra soft, but was still a little springy - so I used a torch to soften it some more.
With it being that soft, it sure shows off the mallet marks!
Posted:
Tue May 30, 2006 6:30 pmby PaulC
Hi Ben, One of the things that I learned is that building a TD is probably the steepest learning curve I have ever experienced. I bought twice the amount of aluminum that I needed for trimming and used all of it. The first attempt ended in the bin but the second was okay. The old "trial and error" method may not be cheap but it works for me

Cheers
Paul
Posted:
Tue May 30, 2006 6:38 pmby mikeschn
Ben,
Take it off...
Get some dead soft aluminum angle from Grant or the fix it shop in Montana.
Lay a thin strip of aluminum down on the end grain of the doorway, and then capture with some dead soft aluminum angle... Let me find a quick picture...
Ah, here's one...
Mike...
Posted:
Tue May 30, 2006 7:57 pmby madjack
PaulC wrote:Hi MJ, Just had a quick look in your album and could'nt see any pic's of the jig you mentioned. Any chance of a description or pic on that one? I'll be using the same moulding you have used, on my No.2, so it may be helpful.
Cheers
Paul
Paul, the only jig pics I have are under my WWW button...look at "door jambs" and "skin and trim"...we used some chi-ply when we first started and didn't like it so it got dumped in favor of better ply...the chi-ply was used for bending forms...the outside edge trim was dead soft and didn't require much of any effort to bend
...use the tap and pull method to get a good smooth bend and avoid at all costs to NOT hit the trim directly with a hammer but rather use a hardwood block(dolly) between the work and the hammer to avoid hammer marks
madjack
Posted:
Tue May 30, 2006 7:59 pmby madjack
bennelson wrote:This trim was advertised as extra soft, but was still a little springy - so I used a torch to soften it some more.
With it being that soft, it sure shows off the mallet marks!
Ben you say you "heated" it up...did you actually go thru the annealing process or just "heat" it up...if all you did was heat the Al up, you didja self no favors and may have actually hurt your efforts....
madjack
Posted:
Tue May 30, 2006 8:46 pmby Ben W
I'm just throwing this out...I ended up buying, but when I was going to build I decided I was going to buy the door trim kit from Cary at Camp-Inn. It was already bent and ready to go. Now, if your doors are smaller than the Camp-Inns, this may still be an option.
-Ben
Posted:
Tue May 30, 2006 9:13 pmby Gage
You can most likely save that trim by un screwing all but one screw (leave a screw in the flat area to hold the basic location of the trim) and then taking your time, work it with a rubber mallet so it is flush/flat to the wood and then screw it down. Do like the MadJack sugested. Take you time and think about what your doing. It doesn't have to be done in 15 minutes. Oh, and keep the heat away from it. You don't want it dead soft. You just want it soft enough to work with and some takes more time than others. One reason you should buy from one of the teardrop parts places. Even though it may cost a little more.
Have a good day.
