Northwoods Progress

Did you just design your very own teardrop or tiny trailer? Want to discuss it? Here's the place to post your design for discussion!

Postby Steve Frederick » Tue Jun 12, 2007 6:27 am

Great looking job!
I think the shutters are a cool idea! :thumbsup:
Also, my opinion on the exterior...fwiw...epoxy/clear or spar varnish.
Again, great Job!
Blessings, Steve
Adirondacks, Upstate New York
Building Journals
The Shop Manual's 8-years old!! Thank's everyone!
New! 'Rondack Lodge Plans!Order Here!
Image
User avatar
Steve Frederick
Custom Teardrop Builder
 
Posts: 1984
Images: 29
Joined: Thu Apr 15, 2004 5:02 pm
Location: Upstate New York, Adirondacks (Great Sacandaga Lake)

Postby tonyj » Tue Jun 12, 2007 11:11 am

Juneaudave wrote:Follow this link to a builder that puts clear coat on his kayaks....The results look so good I have to figure this guy shoots in a booth!!! Toquenatch

:thumbsup:


If you guys don't stop linking me to kayak websites where I have to painstakingly scour every detail on every page, I am going to get fired!!!

Sorry about the hijack. What were y'all talking about?

Still drooling over the finish on that kayak!
Still graced with two eyes and ten fingers (due in no small part to luck!).

Just when you think a problem is solved, an uglier result replaces it.

tony
User avatar
tonyj
Super Lifetime Member
 
Posts: 2468
Images: 160
Joined: Mon Sep 26, 2005 10:18 pm
Location: Texas, Corpus Christi

More Progress

Postby Bigwoods » Sat Jun 23, 2007 10:26 pm

Here is my latest progress. I have a couple coats of finish on the galley. I have not decided how to finish up the center, top and bottom. I may leave the bottom part of that galley open to hold a cooler.


Also I have done some work on the inside. The finish sure made the knotty pine pop. I have some framing in for the cabinet and have been reading about sliding doors and and using sliders. I'll continue with that also.


I put some cherry stain on the outside and thought it was dark. Mrs Bigwoods really want it painted on the outside. She thought there would just be too much wood. I didn't know you could have too much wood showing, but will consider painting the outside.

About ready to start the hatch.


Image


Image
Greg in Northern Minnesota

Image

Image
User avatar
Bigwoods
500 Club
 
Posts: 602
Images: 104
Joined: Thu May 27, 2004 10:45 pm
Location: Northern Minnesota
Top

Postby doug hodder » Sat Jun 23, 2007 10:30 pm

Good job Greg....nice choice on the wood! Looking forward to seeing the continuation of this project! Doug :thumbsup: :thumbsup:
doug hodder
*Snoop Dougie Doug
 
Posts: 12625
Images: 562
Joined: Tue Dec 14, 2004 11:20 pm
Top

Postby Miriam C. » Sat Jun 23, 2007 10:37 pm

:thumbsup: :applause: :applause:
Beautiful galley Greg. I am sure however you finish it---it will be impressive.

GitRdun ;)
“Forgiveness means giving up all hope for a better past.â€
User avatar
Miriam C.
our Aunti M
 
Posts: 19675
Images: 148
Joined: Wed Feb 15, 2006 3:14 pm
Location: Southwest MO
Top

Postby Bigwoods » Sat Jun 23, 2007 11:07 pm

Thanks for the nice words. I have been very fortunate to find some very nice wood around the place. The cabinet top is 11" cedar. I sure am glad I picked up a planer at a garage sale a few years ago.

This is the most fun I have had on a project. I've made a lot of mistakes and sustained a few injuries, and gone to work with glue, stain and paint on my hands. (Wonderful when you work with peoples eyes).

This is a blast and the first time I camp in it will be heaven.
Greg in Northern Minnesota

Image

Image
User avatar
Bigwoods
500 Club
 
Posts: 602
Images: 104
Joined: Thu May 27, 2004 10:45 pm
Location: Northern Minnesota
Top

Postby Bigwoods » Fri Jun 29, 2007 11:37 pm

Hello from Bigwoods. I'm still hard at it and have reakized the parts of the build I dreaded were the most fun. Galley is 85% done and I'm half way through the hatch frame. I did not look forward to that at all, but it is fun!

I made laminated ribs on a jig like choatica did with his. It was so much fun to leave it in the jig overnight, pull it out the next day, and have the shape perfect. I think it work out very well.


I'll get some pictures this week end.

BTW choatica has not post since last fall. If you remember he was the guy with avatar that looked like a convict.
Greg in Northern Minnesota

Image

Image
User avatar
Bigwoods
500 Club
 
Posts: 602
Images: 104
Joined: Thu May 27, 2004 10:45 pm
Location: Northern Minnesota
Top

Postby mikeschn » Sat Jun 30, 2007 5:51 am

Looking forward to the pics.

Can we spread the word that building the hatch is FUN!!!

R.E. Choatica... let's hope he didn't get picked up for something... :?

Mike....

Bigwoods wrote:
I'll get some pictures this week end.

BTW choatica has not post since last fall. If you remember he was the guy with avatar that looked like a convict.
The quality is remembered long after the price is forgotten, so build your teardrop with the best materials...
User avatar
mikeschn
Site Admin
 
Posts: 19202
Images: 479
Joined: Tue Apr 13, 2004 11:01 am
Location: MI
Top

Postby martha24 » Sat Jun 30, 2007 10:32 am

Greg,
Looks like your doing a great job. :thumbsup: :thumbsup: :thumbsup:
Love the way your finished wood is looking.
Martha ;)
Martha ;)

Image
User avatar
martha24
1000 Club
1000 Club
 
Posts: 1353
Images: 237
Joined: Thu Aug 03, 2006 4:32 am
Location: Calif., Goleta
Top

Postby pauld3 » Sat Jun 30, 2007 11:10 am

AWESOME Possum!!!
:applause: :applause: :applause:
Paul & Lynn Donovan
The Toad Drop Inn
Liberal, KS
Image
User avatar
pauld3
The 300 Club
 
Posts: 432
Images: 94
Joined: Wed Jan 24, 2007 2:00 pm
Location: Kansas, Liberal
Top

Laminating the Spars

Postby Bigwoods » Sun Jul 01, 2007 12:27 am

Thought I would show how I made the spars. I was about to get some more plywood and thought I would just give this a try. I had a few 2X4s around and ripped then into thin strips.

The second part was to use the pattern that Mike had suggest be saved in the generic Benroy plans. I made a jig on a painted board so the glue would not stick. Drew the pattern and made the spars about 1 1/4"
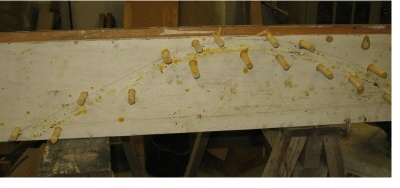


Image


I used glue, buttered on each strip and started to layer in the jig. Each spar is about 6 -7 strips. I saw some gaps when all the strips were in place, so I clamped them to take the gap away ang wiped off any excess glue.
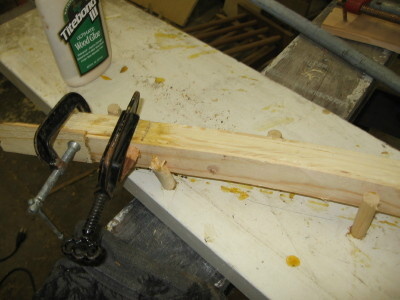
Image


I let each spar dry at least 8 hours. When I finished the last one I ran them trough the planner to get a nice laminated, even surface.
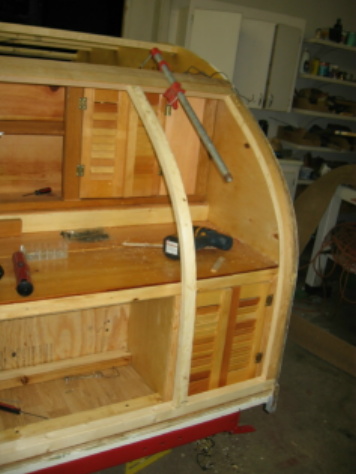
Image


The finished spars were glue and screwed in place. The shape was perfect when compare to the back edge of the trailer. I took Gage's advice and built the rear hatch in place.
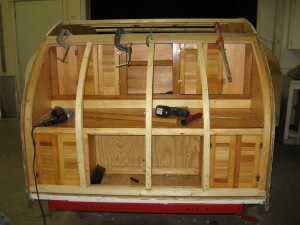
Image


So, if'n the spars hold there shape, I don't think I will have any springback.
Now I gotta get more supplies.

I ended up enjoying this part of the project because it worked so well. The most dreaded parts of the build were the most fun.


One ugly part is that I used cherry stain on the outside. Looked terrible. I have covered it with kilz and now will be painting the exterior. Disappointed at first, now I am figuring different color combinations and that is a joy. I'll just have to come up with something nice as I am doing this build on the cheap.
Greg in Northern Minnesota

Image

Image
User avatar
Bigwoods
500 Club
 
Posts: 602
Images: 104
Joined: Thu May 27, 2004 10:45 pm
Location: Northern Minnesota
Top

Postby madjack » Sun Jul 01, 2007 12:51 am

...great progress Greg...love the way ya did the ribs.......... 8)
...I have come to believe that, conflict resolution, through violence, is never acceptable.....................mj
User avatar
madjack
Site Admin
 
Posts: 15128
Images: 177
Joined: Thu Dec 02, 2004 5:27 pm
Location: Central Louisiana
Top

Postby toypusher » Sun Jul 01, 2007 6:32 am

Greg,

Coming along very nicely there! Real nice job on the hatch ribs. Looking forward to seeing the paint scheme.
User avatar
toypusher
Site Admin
 
Posts: 43040
Images: 324
Joined: Fri Jan 28, 2005 12:21 pm
Location: York, PA Area
Top

Postby sdtripper2 » Wed Jul 11, 2007 12:17 pm

Greg:

You surely have made good progress.

See you used the Titebond III glue. How did that work out for you?
That is the glue that won the testing in that wood working article.

Will you have cross members on your hatch spars as well?
"A man who is good enough to shed his blood for his country
is good enough to be given a square deal afterwards." -------Theodore Roosevelt

Steve
User avatar
sdtripper2
Search Garoux
 
Posts: 2162
Images: 168
Joined: Mon Oct 10, 2005 1:32 am
Location: California, ... San Diego
Top

Postby Bigwoods » Wed Jul 11, 2007 11:41 pm

Steve,

The hatch frame is done. I am waiting for my hinge. I used Titebond II & III and I found I liked the II much better. It easier to work with. I did add the cross members per Mike's Generic Benroy instructions. I was careful to pre-drill the ribs as I did not want to seperate the laminations.

Now I am working on wiring and the inside cabin doors. Mrs. Bigwoods had some nice ideas. I was glad that she is getting involved. I think there was some resentment with the time I spent with the tear. Seems like she has other stuff she wants me to do, like mow and cut trees.


I tried the old line "I could be sitting on a barstool" and she said "yes, and I could be shopping at Nieman Marcus".

She did find a new feather tick mattress that she said we could use in the tear. That might be cool, if I don't have any leaks that would ruin it.

More pix to come.
Greg in Northern Minnesota

Image

Image
User avatar
Bigwoods
500 Club
 
Posts: 602
Images: 104
Joined: Thu May 27, 2004 10:45 pm
Location: Northern Minnesota
Top

PreviousNext

Return to Member Designs

Who is online

Users browsing this forum: No registered users and 2 guests