Page 1 of 2

HVAC placement

PostPosted: Mon Sep 28, 2020 2:11 pm
by cmrcmk
Howdy folks,

I'm getting closer to starting construction and have my design hopefully almost done. The two big things left are the layout of the galley (which is pretty well fleshed out in my mind if not in Sketchup) and the placement of the A/C and ventilation which has me totally stumped. I'm hoping some of you might have better ideas than I do because all I can come up with is going to be some combination of expensive and time consuming.

First, let me introduce you to my design:

Image
Image
Image

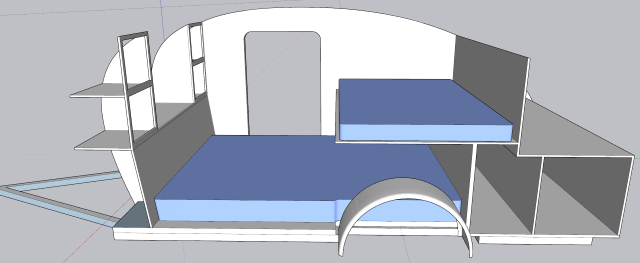
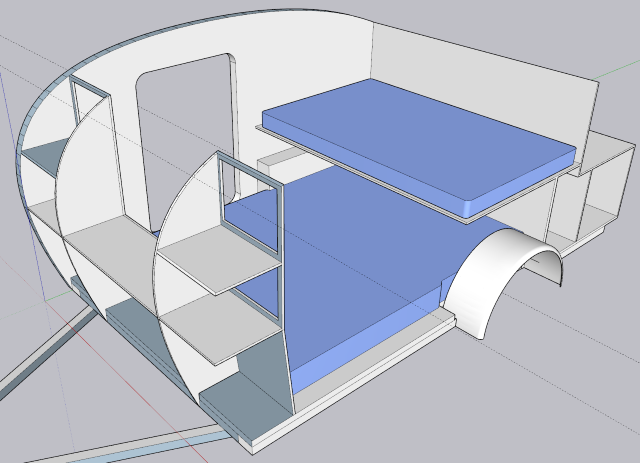
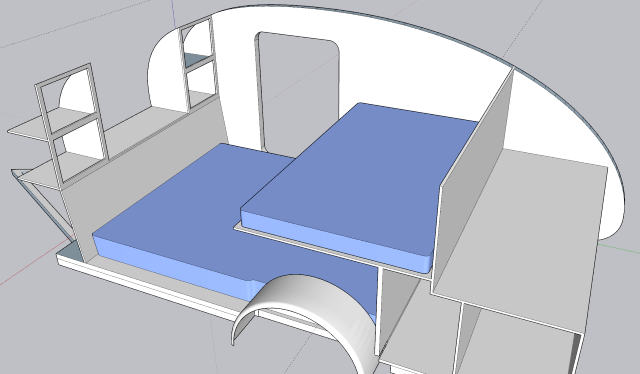
It's a mashup of the Atma Travelear profile with the innards of the 2+2H from the design library. There's two mattresses so the kids can come along, cabinets in the front of the cabin and doors on each side. These features should ensure we can bring everyone and everything we want but it also has the effect of basically using up all the wall space in the cabin. I'd like (and my wife requires) a small air conditioner like a $200 window unit.

Ideally, it would work so that all occupants would receive some of the cool air without it being right by someone's head or feet, chilling them just so everyone else can feel some of it. I also want it permanently installed, not having to hook it up and remove it at every campsite. It has to be accessible without tearing the camper apart so that I can clean and eventually replace it. I'm optimistic the teardrop will outlive the A/C so access is critical, even if there are several bolts involved. Finally, I'm trying to keep the costs in check.

I could get a Dometic or Coleman RV roof unit but that would represent 20-30% of my budget so pretty unappealing.
I could put it in the tongue box or at the foot of the lower bed and make some basic ducting to get air distributed around the cabin.
Finally, I could install it in the front cabinets, taking up some storage space but more significantly, messing up the clean lines I hope to have on the outside.

Can any of you see a more sane way that doesn't involve expensive roof units, time- and space-intensive ducting, or visual spoil?

Thanks in advance!

Re: HVAC placement

PostPosted: Mon Sep 28, 2020 4:10 pm
by Shadow Catcher
163294 It can be left home...

Re: HVAC placement

PostPosted: Tue Sep 29, 2020 6:20 am
by cmrcmk
Is that a ClimateRight? I thought they’d been discontinued?

EDIT: Looking closer, is that a homemade ducting setup for a generic window unit? That's an interesting idea, though it would have to be setup and broken down at every campsite.

Re: HVAC placement

PostPosted: Tue Sep 29, 2020 2:52 pm
by troubleScottie
Yes, home built -- there are threads on the design and construction. A shaker AC unit with a connection manifold, hoses and blower.

Get out unit, connect hoses and control, attach to power, you are good to go.

Re: HVAC placement

PostPosted: Tue Sep 29, 2020 3:38 pm
by aggie79
cmrcmk wrote:EDIT: Looking closer, is that a homemade ducting setup for a generic window unit? That's an interesting idea, though it would have to be setup and broken down at every campsite.


You could mount the unit in a tongue box and connect hoses as needed.

troubleScottie wrote:Yes, home built -- there are threads on the design and construction. A shaker AC unit with a connection manifold, hoses and blower. Get out unit, connect hoses and control, attach to power, you are good to go.


Here's a link to the DIY ClimateRight: http://www.tnttt.com/viewtopic.php?f=30&t=44561.

Re: HVAC placement

PostPosted: Wed Sep 30, 2020 7:02 am
by cmrcmk
Thanks folks. Definitely worth a read.

Re: HVAC placement

PostPosted: Wed Sep 30, 2020 1:00 pm
by Shadow Catcher
148535143657143656143655
Takes me about ten minutes to set up. very quiet and the best part you can live it at home. Only used one day on our Teddy Roosevelt trip (wish we had taken the heater). The AC unit was about $100 to replace (do not ask me why I needed to). Working on a HEPA filter addon now.

Re: HVAC placement

PostPosted: Wed Sep 30, 2020 4:26 pm
by Socal Tom
The RV unit will we waaaay over sized, and probably ice up frequently. I'd go with Shadow catchers system. Its what I did. A 5K unit works great. The only change I recommend is that the ducts should come off of the side of the unit ( the way that climate rites do). This design will make it less likely to ice up.
Tom

Edit: If you really want to go all out, run some pcv from low on the front to guide the cold air above your heads, then have the return on the other side ( also high since heat rises). That should make sure the air flows throughout the cabin.

Re: HVAC placement

PostPosted: Wed Sep 30, 2020 9:19 pm
by wysedav
What about the front side in the center of the headboard and the condenser hanging out into the front utility box. Then it would be pretty simple to ventilate the box or leave the door cracked when it is in use. I built essentially an ATMA clone and put the AC towards the rear and vented at the roof, it was very difficult in my opinion. I had to manage condensate, ventilation, waterproofing, a bunch of sheet metal work etc. And I still always worry about water damage, that's why I like the option of opening the utility box door when using AC. You have a definitive watertight seal when you're not using it. Peace of mind.

Nice design work so far!

Re: HVAC placement

PostPosted: Thu Oct 01, 2020 12:48 pm
by cmrcmk
Shadow Catcher wrote:Takes me about ten minutes to set up. very quiet and the best part you can live it at home. Only used one day on our Teddy Roosevelt trip (wish we had taken the heater). The AC unit was about $100 to replace (do not ask me why I needed to). Working on a HEPA filter addon now.

Have you had any concerns about thieving with it sitting out loose at night? Is that why you had to replace it?

As for leaving it at home, you appear to be from Ohio where I'm sure A/C is less often useful than here in the south. In NC, it's good to have 6 or more months a year and where some of my family lives in GA and TX, there are only a couple months a year where not having A/C would be 100% not regretted.

Socal Tom wrote:The RV unit will we waaaay over sized, and probably ice up frequently. I'd go with Shadow catchers system. Its what I did. A 5K unit works great. The only change I recommend is that the ducts should come off of the side of the unit ( the way that climate rites do). This design will make it less likely to ice up.

Good point on the rooftop option. I had evaluated the rooftop A/C almost entirely on costs, not on thermal capacity. If I did strap a 13K BTU unit to the top of my tear, it would probably cut on and off a lot, making it more likely to disrupt our sleep.

Socal Tom wrote:Edit: If you really want to go all out, run some pcv from low on the front to guide the cold air above your heads, then have the return on the other side ( also high since heat rises). That should make sure the air flows throughout the cabin.

I'm actually thinking about that kind of vent arrangement with the tongue box approach. See image below.

wysedav wrote:What about the front side in the center of the headboard and the condenser hanging out into the front utility box. Then it would be pretty simple to ventilate the box or leave the door cracked when it is in use. I built essentially an ATMA clone and put the AC towards the rear and vented at the roof, it was very difficult in my opinion. I had to manage condensate, ventilation, waterproofing, a bunch of sheet metal work etc. And I still always worry about water damage, that's why I like the option of opening the utility box door when using AC. You have a definitive watertight seal when you're not using it. Peace of mind.

Nice design work so far!


You and I are on the same page. After exploring the tongue box option further, this is what I've come up with:
Image
Image

I made the image animated (hope that shows up for y'all) so that it's hopefully easier to see how it all overlaps. And also because I've never done that before and I was curious if I could. :)

The red ducting is hot air movement: from the cabin to the front of the unit and also exhausting hot air out the back of it. Blue is cold air blown into the cabin or drawn in from the outside to feed the exhaust.

The obvious downside is I'm giving up a good bit of storage space for ducting, about 3 cubic feet overall. The upside is it would be integrated into the tear and *should* provide good air distribution. Anywhere else I can think to put the A/C unit would be entirely inside the cabin so also taking up space, probably about that same 3 cubic feet. That'd be either with the A/C unit in the front cabinets with no ducting or at the foot of the lower bed but with ducting (so probably even more space consumed).

I'm really appreciating y'all's feedback. Keep it coming!

Re: HVAC placement

PostPosted: Thu Oct 01, 2020 5:38 pm
by aggie79
In my teardrop, with the ClimateRight predecessor, I had a return air grill at the foot of the bed and ducted it underneath the teardrop to the unit in the tongue box. This allowed for a flow-through ventilation.

Regardless of your method, be sure that the return air duct is high enough to be above mattress, pillows, heads on pillows, and/or feet if ducting from the back.

Re: HVAC placement

PostPosted: Fri Oct 02, 2020 7:17 am
by cmrcmk
aggie79 wrote:In my teardrop, with the ClimateRight predecessor, I had a return air grill at the foot of the bed and ducted it underneath the teardrop to the unit in the tongue box. This allowed for a flow-through ventilation.

I've looked at your original setup as a starting point for all this. I didn't realize you had the return air running under the cabin. How did you ensure it wouldn't get damaged on the road?

aggie79 wrote:Regardless of your method, be sure that the return air duct is high enough to be above mattress, pillows, heads on pillows, and/or feet if ducting from the back.

The current design has return air grills on each side of the mattress. Because of the perpendicular upper bed, there's about 4 inches on each side of the lower mattress.

Re: HVAC placement

PostPosted: Fri Oct 02, 2020 9:06 am
by aggie79
cmrcmk wrote:
aggie79 wrote:In my teardrop, with the ClimateRight predecessor, I had a return air grill at the foot of the bed and ducted it underneath the teardrop to the unit in the tongue box. This allowed for a flow-through ventilation.

I've looked at your original setup as a starting point for all this. I didn't realize you had the return air running under the cabin. How did you ensure it wouldn't get damaged on the road?


My return air duct was a 2" x 3" downspout with 1/2" insulation all around and then placed inside of a 3"x4" downspout. It was anchored using downspout straps screwed into the frame crossmembers. Installed, there was 8"-9" of clearance between the bottom of the duct and the road. I never had any road damage to the underside of the teardrop or ductwork. In fact, even driving through many heavy rains, the bottom side of the teardrop remained clean and dirt-free.

We only camped in campgrounds. I wouldn't recommend a duct below the teardrop if going off-road.

I will say that my tongue box, lower outside corners of the front of the teardrop, and my fenders did "take a beating" from rocks and debris kicked up from the road. On my fenders, I ended putting on some clear "helicopter" film and this solved the paint chipping problem on the fenders.

Re: HVAC placement

PostPosted: Fri Oct 02, 2020 11:23 am
by wysedav
I like your work, nice job. I think you're making it harder/more complicated than it has to be. I would try really hard to get the whole control side and the evap into the headboard and get rid of all the cold side ducting. just the compressor/condenser hangs out in the utility box. You just need a few vent doors to let air into the box, to minimize/eliminate the ducting in the box I would just add a 6" muffin fan to continually bring in cooler outside air.

I'm sure your design will work too. It just seems like more work and possibly experimentation to get it right.

Good luck,

David

Re: HVAC placement

PostPosted: Fri Oct 02, 2020 12:11 pm
by bdosborn
I used drawer slides and a cargo door for mine, it was pretty simple to do:
Image

Image

Bruce