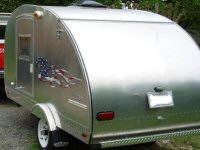
The Plastic Fantastic Tear Drop (PFTD).
I did a guesstimate calculation on these. If the wheels are under fenders outboard of the side walls. I figured a box could be made using 1/8" thick 4x8 sheets laminated into a SIP platform for the floor. I'd use 2"x2"x3/8" C-channels around the outside edge. Trim the foam so the c-channels slip over the edge of 2" thick foam. Then laminate a 4x8' sheet onto both sides to make the SIP. Before the SIP is made, some thought needs to go into it to figure out where to put blocking for bolting a minimalist frame to it. The side walls could be made with the same construction, but thinner C-channels for the borders. Problem is not being able to thermal form their standard profiles. Somebody else's may be able to be substituted as this spot doesn't need to be that sturdy. For the roof. thermal form a L channel on top of the side walls with the leg up on the outside side. Glue it in place, and glue ones on the front and back of the base SIP. you may with to screw it down. Use flat head screws and countersink them so they are flush. Then bend a sheet of Filon to the inside, and glue it in place. place your vacuum bagging matting, and bag sheeting on the inside, and tape it to the walls. Hook up the tubing, etc. Now back to the outside, glue down a sheet of 1/2" pink/blue foam, and vacuum bag it down. This will be a bit of a free form vacuum bagging with the curve set by the filon, and foam working against each other. Lather rinse repeat gluing and vacuum bagging 1/2" layers until the roof is 2" to 3" thick. Before vacuum bagging on the second layer, glue the blocking needed for the trunk latches and handle hardware in place. Before the filon sheet is glued in place, glue in the blocking for the hatch hinges, and handle hardware. Then vacuum bag on another filon sheet for the outside skin. Filon sheets could be used on the side walls to make them lighter. Finally cap the edge all around with another L, but leg down this time. Glue in place, and if possible no screws.
Now for the hatch...

Cut out will be done using a straight 3/4" diameter router bit long enough to go through the roof. Layout router guide boards at the top and bottom. Use the inside edge of the top side L for the guides along the sides. Make 4" radius 1/4 round fillets for the corners to make the edge of the hatch rounded. place some supports under the hatch area on the inside. Route out the hatch being as accurate as possible. Do your last cut along the top, and place a spacer in the routed out gap as the bottom before you route out the top. This is to keep the hatch from sagging and distorting the cut. Thermal form 1/8" thick Ls to fit the inside edge and glue in place. You can use creative vacuum bagging to clamp them in place as the glue cures. Do the same for the outside edges with 1/8" thick Ls. Now, on to the hatch piece. Fit and glue on a 1/8" thick L to the inside edge. Fit and glue on a 1/4" thick L to the outside. Now fit and glue on a flat bar 1/4" thick, and wide enough that it has 1"+ inches overlap to the inside, and hangs over 3/4" to 1" to the outside. A seal between this and the outside face L on the main body is your water seal.
Blocking for the hinges and latches. It will need to be installed as the foam is laminated up. Automotive trunk/door type post and latch can be used for securing the hatch. Blocking may be needed to the inside at a couple spots. Route out that first layer of foam, but don't cut through the filon. Carve a block of FRP to fit the curve of the filon, and glue in place. This blocking likely needs to be at least 3" wider and longer the area the post holding plate needs to attach to. So, for a post holding plate with a 1"x3" base, the blocking should be 4"W by 6"L. Similar will be needed on the hatch for the actual latches. Similar will be needed for the hinges on both the body and hatch. Use long throw boat hatch hinges to clear the molding. Use a locking t-handle for actuating the trunk latches. You may need to use your own bell crank to get the control rod angles right. Just pop rivet it to the existing one. If junkyard diving for trunk latches, get the ones that are actuated by a lever. The thickness of the hatch will preclude using ones that have the key right at them.
Side doors can be made similar to the rear hatch, but should be done before the roof is built up. Otherwise there is no access into the inside to support the hatch when it is being cut out.
As an alternate material, HDPE, High Density Polyethylene, could be used. It would be more easily thermal formed, and supported with foam it would be reasonably sturdy in the SW summer sun. Larger radius curves at the edges could be made.
OK, I'm done writing this up. I have to do other things. Some details left out like bolting it to the minimalist frame, tail lights, etc. Have fun with it. hopefully I described things well enough.


 The nice thing is with thermal forming it should be possible to make complex curves like the curve at the top sides of a TD. Oh yeah, that reminds me. Because many are thermal formable at reasonable temperatures, they might not do well in the south west in the summer. I would not put them in a position where they will be carrying a heavy load like a frame does.