Has anyone done anything like this? Do you see a problem with ducting through any of the cabinets, out the floor, or any other concerns? I know it will keep the camper cool (relatively) and dry as my sailboat cabin was about twice the cubic ft. Air under the trailer will likely be cooler than the air around window screens and door screens. It will probably be more humid, but, the shelter of the ducts through the floor will be a good trade off me thinks!
Teardrops n Tiny Travel Trailersor t n ttt for short (tnttt.com) |
Alternative to roof vent...
6 posts
• Page 1 of 1
Alternative to roof vent...
![]() by TimC » Tue Jun 02, 2015 4:38 pm
by TimC » Tue Jun 02, 2015 4:38 pm
I want to eliminate the typical roof vent/fan unit for two reasons. Forgetting to close it prior to/during a rainstorm and another potential hole for leaks to develop at. On a sailboat I just sold I had a 12v computer case fan attached to a snap disc (thermostat, on @ 90 deg-off @80 deg) which was attached directly to a solar panel (35w) which will also charge my battery. The fans I bought are 120mm, 45cfm, 19 dB-A (quiet), 1.8w, .15a. I want to duct the fans (one on each side) out above the cabin cabinets into the galley cabinets and duct down to through the floor. To provide make-up air I will have to put in a duct or two on the front or side wall(s) so the fans are not just providing negative air pressure in the cabin.
Has anyone done anything like this? Do you see a problem with ducting through any of the cabinets, out the floor, or any other concerns? I know it will keep the camper cool (relatively) and dry as my sailboat cabin was about twice the cubic ft. Air under the trailer will likely be cooler than the air around window screens and door screens. It will probably be more humid, but, the shelter of the ducts through the floor will be a good trade off me thinks!

Has anyone done anything like this? Do you see a problem with ducting through any of the cabinets, out the floor, or any other concerns? I know it will keep the camper cool (relatively) and dry as my sailboat cabin was about twice the cubic ft. Air under the trailer will likely be cooler than the air around window screens and door screens. It will probably be more humid, but, the shelter of the ducts through the floor will be a good trade off me thinks!
Tim
Niagara, WI
My First Benroy Teardrop Build Thread - A 5x8 Woodie - http://www.tnttt.com/viewtopic.php?f=50&t=63575
My Second Teardrop (partial) Build Thread - Started August '16 - http://www.tnttt.com/viewtopic.php?f=50&t=66939
#3 My son's Benroy Foamie team build - Started July '20 - http://www.tnttt.com/viewtopic.php?f=50&t=72877
-

TimC - Gold Donating Member
- Posts: 1439
- Images: 751
- Joined: Sat May 23, 2015 4:15 am
- Location: WI/MI border
Re: Alternative to roof vent...
![]() by daveesl77 » Tue Jun 02, 2015 5:35 pm
by daveesl77 » Tue Jun 02, 2015 5:35 pm
I have done exactly this. I have a set of forward cabinets/shelves. When I did my design I specifically put in room to allow for ducting. So, in the front curved section I built in 2 ducts, an exhaust and an intake. These both exit underneath the trailer behind the first crossmember. I haven't installed the deflector/adapter yet, but the exterior part I'm making out of aluminum sheet. Primary vent faces backward and pulls/exhausts air from under the trailer. However, with the ideas the folks here came up with on adapting a window airconditioner to a diy petcool unit, the aluminum boxes also will have two 4" hose adapters in them. One for AC return air, one for AC supply air. Picked up a used 5000 btu unit for $15 and will build the adapter box for the unit out of aluminum sheet. This lets me mount the AC off the unit or under it. Hoses duct into the ductwork. Ducts have 2 5" fans in each section, exhaust and supply. I've been testing as building and here in Florida it has been steady in the mid 90s for a month now. Without air running and only the fans, the interior of the camper is 8-15 cooler than the outside temp in the shade. I also have foam insulation in walls/floor/roof.
It does work and I'm glad I did it.
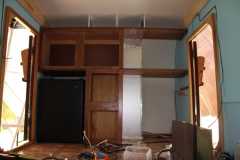
Here is what I wrote on the posted photo...
Got the base cabinet/shelving/ductwork done today. Still need to wrap the ends with 1/8 ply, finish the doors. On the top the duct on the left is return and the one on the right is supply. Both exit through the floor, behind a crossmember. Both will end up having 12v fans in them. On the bottom part I'm fabricating a dual purpose vent mount, so I can either use it as straight ventilation or as an AC adapter, each duct is 5" x 8" opening on the bottom and 6x12 at the top. There will be another shelf on the right side, just above the powerstrip. Once the covers are all in you won't see any ductwork, wires, etc.
dave
It does work and I'm glad I did it.
Here is what I wrote on the posted photo...
Got the base cabinet/shelving/ductwork done today. Still need to wrap the ends with 1/8 ply, finish the doors. On the top the duct on the left is return and the one on the right is supply. Both exit through the floor, behind a crossmember. Both will end up having 12v fans in them. On the bottom part I'm fabricating a dual purpose vent mount, so I can either use it as straight ventilation or as an AC adapter, each duct is 5" x 8" opening on the bottom and 6x12 at the top. There will be another shelf on the right side, just above the powerstrip. Once the covers are all in you won't see any ductwork, wires, etc.
dave
*******
Dave and Regina - Enjoying old age, a LOT!
Build Journal - http://www.tnttt.com/viewtopic.php?f=50&t=62386
Dave and Regina - Enjoying old age, a LOT!
Build Journal - http://www.tnttt.com/viewtopic.php?f=50&t=62386
-

daveesl77 - Donating Member
- Posts: 871
- Images: 273
- Joined: Tue Jan 27, 2015 4:33 pm
- Location: Pocahontas County, West Virginia