Slowly the husband and I have been working on a gypsy wagon. We have started and stopped and stopped and started so may times that we have forgotten where things are............maybe our minds and how to do things.
We built our teardrop in 2006 and installed a converter/breaker box now we don't remember how. The diagram for the WFCO is really vague. The shore power we got but we are unsure of how the 12 volt lines are supposed to go in. Where does the negative side of the 12 volt line hook up? Does anyone have any real photos?
Wiring a WFCO electrical panel
2 posts
• Page 1 of 1
Wiring a WFCO electrical panel
![]() by dakotamouse » Sat Apr 15, 2017 8:43 pm
by dakotamouse » Sat Apr 15, 2017 8:43 pm
Where did you get it? We didn't get it, we built it!
Myron and Mary
-

dakotamouse - Titanium Donating Member
- Posts: 1121
- Images: 128
- Joined: Sat Oct 22, 2005 10:23 am
- Location: Bismarck, ND
Re: Wiring a WFCO electrical panel
![]() by S. Heisley » Sat Apr 15, 2017 10:22 pm
by S. Heisley » Sat Apr 15, 2017 10:22 pm
This one was taken several years ago and I have since changed it just a little; but, both the old way and the new way worked/work fine:
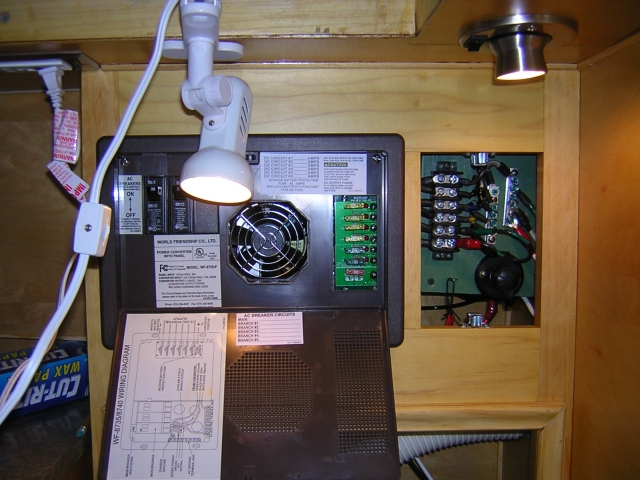
If you start on page 31 of my big photo album and work back to the other pages, 32,33, etc, you can see the majority of what I did. I used bus bars to connect everything. The positive wires from the converter attach on one side of the black bus bar and the positive electrical (hot) wires for the cabin and battery connect adjacent to each, according to what area they are for. Further, I also coordinated the wire sheath colors and mapped everything so that I always know which wire goes to what. (I know...a bit over the top...most people don't do that. I even coordinated the electrical tape...didn't want to take the chance of getting confused later on.) When I originally did it, I couldn't get a ground bus with enough connection points; so, I used two on the negative wires and connected them together with an extra wire. I have since found one that had enough connection points; so, I replaced the two shorter silver ones with the new, longer bus that I found. (Changed, new bus not shown in the picture.)
If the converter is still made the same, the red wire on the converter was for the battery. The rest of the positive wires coming from the converter were for your cabin use.
The best way to replace an old converter is to mark everything with tags or colored tape and then take pictures before you pull everything apart. That way, you can be pretty certain that you have put it back together the same. That's what I did when I had to replace my WFCO with another. ...Worked great.
...Hope this helps.
PS. If you need help with a different WFCO (They are all a little different, depending on the model.), you might check with Zack (absolutsnwbrdr). He has installed a couple different WFCOs.
...Sharon....
I think I can...I THINK I can...I THINK; I CAN! (I think I did it!)
http://www.doityourselfrv.com/handcraft ... g-trailer/
viewtopic.php?f=50&t=27313&start=555
http://www.squidoo.com/painting-a-campi ... ramebuster

I think I can...I THINK I can...I THINK; I CAN! (I think I did it!)
http://www.doityourselfrv.com/handcraft ... g-trailer/
viewtopic.php?f=50&t=27313&start=555
http://www.squidoo.com/painting-a-campi ... ramebuster
-

S. Heisley - Super Lifetime Member
- Posts: 8866
- Images: 495
- Joined: Mon Sep 17, 2007 10:02 am
- Location: No. California