How I fitted Shockies

Ask questions about Harbor Freight trailers, or questions about building your own...

How I fitted Shockies

Postby Kody » Thu Aug 22, 2013 12:09 am

I finally managed to take some photos of the way I mounted the shockies on the trailer frame. It looks easy and it was but it took a while to figure out so I could mount them the way I wanted. Anyone could make the parts with just an angle grinder, a cutting off wheel and a normal wheel to clean up the edges and welds if need be. I wanted to mount the shockie so the rubber bushes would be seated on the bolt and be clear of any thread. The idea of the thread chewing into the rubber bushes did not appeal to me at all. The top mount as pictured has worked extremely well but if I were to do this again, I would alter the lower mount to be the same as the top one. The first photo shows how the bushes are mounted completely clear of any thread on the high tensile bolt, its a grade 8 bolt 12mm in diameter with a fine thread. I didn't want to mount the bolt/s by welding them to the frame or spring plate. Welding Grade 8 bolts does not appeal to me in the slightest. This method is very neat and everything can be replaced very easily.

Image
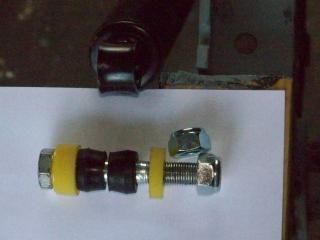
The tapered bushes fit into each side of the shockie, the bolt has a special plastic washer on each side of the bush to position the shockie and a nut is wound down to hold them all in place. The nut is tightened enough to seat the bushes and then the assembly is placed into the bracket that is welded onto the top of the frame. It's then secured firmly with another lock nut.

Image
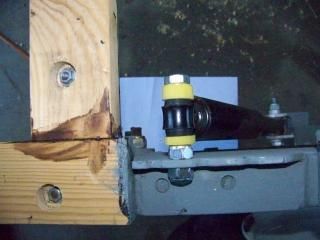
This shows how it all bolts together. The bottom end of the shockie can be seen with the mounting bolt and nut on the right. Two bolts can be seen that hold the wood onto the trailer frame. The bolts appear to be offset in the holes but they are actually exactly in the center of the hole. The wood is 35mm x 70 mm Russian Pine of some kind.

Image
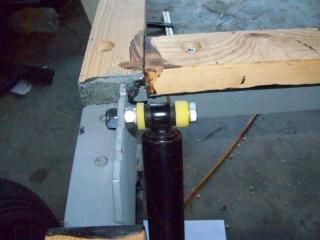
This is a front view and shows more detail of the mounting plate and the clearance between the side of the trailer and the shockie. The method of mounting the shockie was dictated by the length of the shocks that were available. The ones I wanted, the shorter "Monroe" model, are not available here in Australia. Shorter ones would have been so much easier to mount. However, I am very pleased how this has all worked out. Feel free to copy and or utilize any of the design features if you can use them. If anyone would like more detailed info, I can either send you a drawing/s or post them on here.

Kody
Never be afraid to ask questions here, Prov. 11:14
User avatar
Kody
The 300 Club
 
Posts: 341
Images: 22
Joined: Fri Aug 24, 2012 5:14 am

Re: How I fitted Shockies

Postby pchast » Thu Aug 22, 2013 2:59 pm

Thanks for the pictures.
:thinking:
pchast
Platinum Donating Member
 
Posts: 2065
Images: 97
Joined: Mon Jan 28, 2013 5:47 pm
Location: Athens, NY


Return to Trailer and Chassis Secrets

Who is online

Users browsing this forum: No registered users and 1 guest