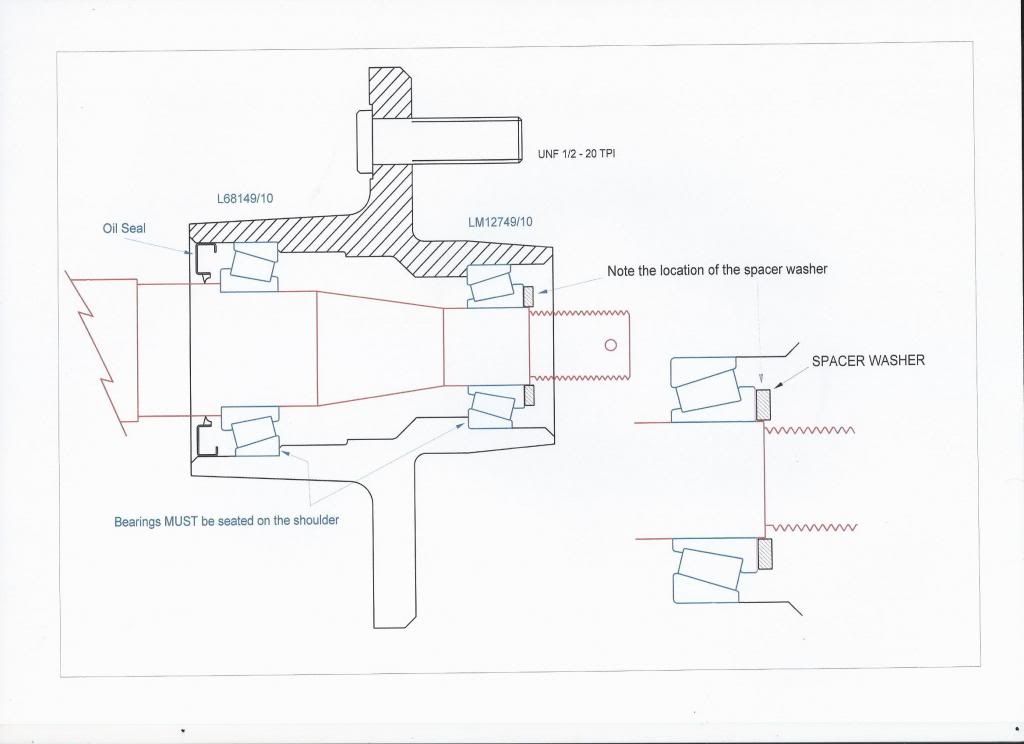
The drawing shows how the bearings are seated and where the vitally important spacer/washer fits at the outer end of the bearings. Nearly all the axles I have worked on have had a small step where the bearing journal drops down in diameter to then become the threaded section for the castellated nut. It is essential that the spacer fit the bearing journal and extend out past the step. This then allows the nut to apply the correct pressure on the bearings to seat them all together. If a washer /spacer with too small a hole to enable the spacer to fit over the bearing journal is used, the bearings wont seat correctly and the wheel will wobble. This becomes a disaster going somewhere to happen. The bearings MUST be seated firmly on the shoulder of each seat as shown.
The hub pictured is a standard trailer hub "off the shelf" and drawn exactly to scale. It is for Ford bearings as noted in the drawing. The best pictures I could find on the forum were for the front wheel of a car. These operate in a very different environment than our TD wheels do. The important thing to note however, is that it is essential to set the bearings up to have just the right amount of looseness. It's better to have the bearings slightly loose rather than too tight. While this will save your bearings from seizing up because they are too tightly assembled, it is still very wrong to have "loose" bearings. The bearings must have a certain amount of "preload" applied to them. Too much preload and they seize up, too little and they wear out very quickly. With just the right amount of preload, the bearings will last for many years.
So how much preload is required? The correct preload must consider the radial load and the axial load. This figure can be calculated using the data from the SKF Catalogue which I have, or you can "guesstimate" the amount needed. Only half of the circumferential area of the bearing carries the load so it's important to get this as right as you can. The easiest way to get the correct preload is to set it up so the nut is just touching the spacer. Fit the split pin in and the cap then go for a spin around the block. Do not back the nut off to get the split pin through the nut. If you have to make an adjustment, thin the spacer down with a file or machine a few "thou" off the face with a lathe. Make sure the spacer overhangs or protrudes past the bearing journal as shown. Check the hubs for temperature after 200 yards. If they are cool, they may need a little more loading. If the hubs are hot, go back home and release the pressure with the nut. If the hubs are just warm after a couple of miles, they would be just about perfect but keep you eye on them.
Some of the cheap hubs and bearings I have seen, employ a standard Deep Groove bearing in both sides of the hub. These things are not meant for the high speeds of the highway and should never be used in a trailer of any kind. They will simply not take the axial loads imposed on them and you are guaranteed to have major trouble.
Hope this helps you all, if you have any questions just ask.
Kody