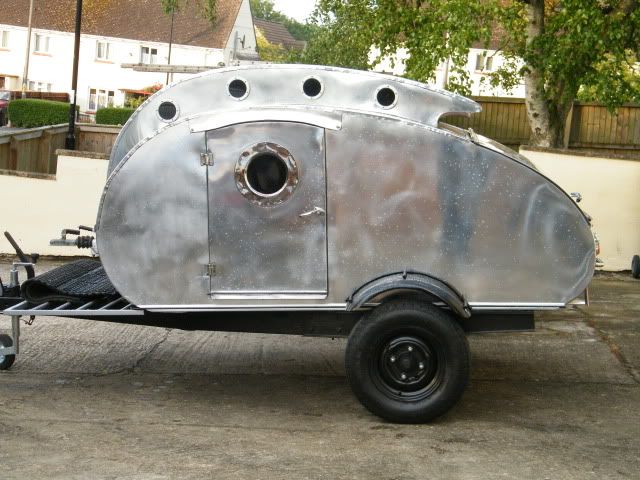
Amateur boatbuilder decides to make land shanty.

This is the place where you can introduce yourself, and include a photo if so desired.

Amateur boatbuilder decides to make land shanty.

Postby Ravenous » Tue Jul 21, 2009 9:14 pm

Hello from Coastal Georgia,
I am enamoured of the 2+2 in A. Gibbons design page.
I have decided I must build it.
I am struggling with the trailer frame and welding for the moment.
I will read the back posts for as much information as I can. I imagine I will still manage to ask a few beginner questions along the way.
I look forward to getting past the trailer and frame part and to the plywood, electrical, and galley where at least I have walking around sense.
a few hours on a 120v mig welder this evening--bouncing around on scrap metal and blowing the breaker every few inches--has me doubting that I will be able to do this part myself. But I am not yet ready to throw in the towel.
Look forward to associating with what seems to be a nice group.
Thanks for the welcome and having a place for Beginners to post. Ignorance is a natural state, without it, you couldn't learn cool new things.
Peace,
Ravenous
User avatar
Ravenous
Donating Member
 
Posts: 31
Joined: Tue Jul 21, 2009 7:33 pm
Location: Coastal Georgia

Postby Juneaudave » Tue Jul 21, 2009 9:19 pm

Ahoy there fellow amateur boatbuilder!!! Do I see a woody in the future? We're looking forward to your build!!! :thumbsup:
User avatar
Juneaudave
Super Duper Lifetime Member
 
Posts: 3237
Images: 380
Joined: Sun Jul 03, 2005 12:11 pm
Location: Juneau, Alaska

Postby Roly Nelson » Wed Jul 22, 2009 1:29 am

Welcome to the board, and if your skills are no better than mine, you better have a pro do it. All I managed to do with a buzz-box welder, was stick the welding rod over and over and never once struck an arc that was worthwhile. Get er done and post some pics. Good luck.
Roly :? :R :thumbsup:
See the little 1/2 Nelson Woody constructions pics at: http://gages-56.com/roly.html
User avatar
Roly Nelson
L'il Ol' Woody Builder
 
Posts: 2971
Images: 13
Joined: Sun Jan 30, 2005 12:45 pm
Location: Wildomar, Calif
Top

Postby BillandMarijo » Wed Jul 22, 2009 5:54 am

Welcome to the forum.
Good Luck on your build,
Bill and Marijo :applause:
Hope to see you on the road.
Bill and Marijo

Also We Are On Facebook
Friend Us.
Bill Peterman
Marijo Haselbarth Peterman
User avatar
BillandMarijo
500 Club
 
Posts: 814
Images: 36
Joined: Sat Mar 01, 2008 8:16 pm
Location: Altoona Pennsylvania
Top

Thanks for the encouragement!

Postby Ravenous » Wed Jul 22, 2009 5:42 pm

I ordered my metal through a local welding shop that specializes in large props for shrimp fishing boats. I told them that I had been practicing welding all week, and they laughed and said I should be an expert then,
Yeah ha! ha!
I told them I wouldn't mind getting a quote on what they would charge me for doing the job. They sent me back in the shop to talk to Bill, a nice older guy with lots of experience in life and welding. We jawed for about an hour and he told me he could do the job (laying everything out and getting the perfectly square and level and then weld it up) in about 8 hours. I went back to Jack who is evidently in charge, and he said the cheapest rate he could give me on the $8 hrs was $55. Probably worth it, but I don't want to pay that much. He suggested I look around for someone freelance who might do the job for $10 or $20 an hour. So I will try that. I figure I can get the metal home, get it all cut, laid out and square in the meantime, and start looking for a good buy on my axle.
I was looking around on the forum last night and I see that Wolfgang is building a 2+2 right now - so I am reading everything and trying to absorb. Just like past boatbuilding projects, there always seem to be a few big bumps to get over at the beginning.
Just the way it is. When advice is given, I listen carefully and ponder, so any advice anyone has to offer on this project is welcome.
Well enough chatter, I'm going to read some more, and practice my welding. Hey, did you guys know that a freshly welded piece of metal will burn you through a work glove even after a couple of minutes? Yep.
User avatar
Ravenous
Donating Member
 
Posts: 31
Joined: Tue Jul 21, 2009 7:33 pm
Location: Coastal Georgia
Top

Postby Steve_Cox » Wed Jul 22, 2009 7:40 pm

Ravenous,

Welcome from just down the road a piece.
Steve
User avatar
Steve_Cox
4000 Club
4000 Club
 
Posts: 4903
Images: 196
Joined: Sun Apr 03, 2005 8:46 am
Location: Albuquerque New Mexico
Top

Postby Carter » Sun Jul 26, 2009 9:01 am

Welcome Ravenous

The 120v welders have a short duty cycle and probably say they require a 20/30 amp circuit. Try doing a 2" weld and letting the machine (and your frustration) cool off for a few minutes before you do another one. Like anything else it just takes practice. I don't care for the heavy welding gloves so I wear a lighter weight glove on my torch hand and a heavy welding glove on the other where I need more protection from the hot metal.

Good Luck,
Jim
I need a new Avatar. I'd put my dog up there but she doesn't look much like me. She's the skinny one.
User avatar
Carter
Gold Donating Member
 
Posts: 319
Images: 32
Joined: Sun Aug 10, 2008 6:45 am
Location: Rochester Hills, MI
Top

Postby Mini Renegade » Sun Jul 26, 2009 1:38 pm

welcome to the forum. Welding gloves, you haven`t seen a Yorkshire man welding then? No gloves here just a nice sun tan on the hands!
If evvr tha dus owt fr nowt, allus do it fr thissen
User avatar
Mini Renegade
500 Club
 
Posts: 520
Joined: Tue May 15, 2007 2:26 pm
Location: (Old) York
Top

Practice is paying off

Postby Ravenous » Fri Jul 31, 2009 11:24 am

Jim,
Thanks for the advice. I switched to a lighter glove and started paying more attention to my hand, angle, and distance. And I switched to the highest setting and moved slower. I don't really know what happened, but my weld started looking like a real weld. You are right about the breaker. I currently have a 15 amp breaker on the outlet I am using, so I get about an inch and a half before I lose power. When I set up my frame I will set up at least a 30 amp breaker on an outlet in my shop. I've been practicing on my back porch for convenience. My shop is a mess, and I've been slack about getting out there and getting it ready for the build.
Now I understand something one of the welders at the prop shop said. Something like "If you are going to be doing a lot of welding, you are going to want more than a 120." Because there is a 10 minute time limit on use, even with an appropriate sized breaker, I can only do a little at a time. Actually, this is okay with me, as I am generally a slow, work-a-minute, Look-and-ponder-five-minutes kind of guy.
Mini Renegade,
I am sure a Yorkshire man would laugh his a-- off at my attire and groan at my attempts. But running half a dozen adequate looking runs, has me encouraged that I might be able to do this. I am hoping that if I practice and take my time on the REAL job, I can achieve minimum adequacy.
I have a few questions in that regard.
First, I noticed that Wolfgang, who is building the 2+2 also, used rectangular tabs welded on to reinforce his joint where the 2" square tubing angle meets the straight sides.
http://www.tnttt.com/viewtopic.php?t=28640&highlight=wolfgang
This would be the joint I am most worried about with my lack of skills. Is this a good idea? Is there something else I could do to reinforce this joint that would work better?
Second, what about bolting AND welding. On boat trailers that see salt water, bolts are usually the first items to rust out, but for a teardrop, maybe it would be okay to at least single bolt each joint and then weld for dimensional stability?
Third, can I count on some reinforcement of the frame simply from the attachment of the wooden floor and framing?
Thanks again.
I am going to try to move this post to General Discussion so forgive me if this shows up twice.
Peace,
Ravenous
User avatar
Ravenous
Donating Member
 
Posts: 31
Joined: Tue Jul 21, 2009 7:33 pm
Location: Coastal Georgia
Top

Postby madjack » Fri Jul 31, 2009 11:43 am

Welcome Rav, the angle reinforcements are a good way to go and give you a place to bolt the floor/body to...frame requirements are actually minimal and are nowhere near as much as needed for a utility trailer...why...because the body of a TD forms a torsion box which is EXTREMELY strong and rigid within itself leaving the steel frame with no actual job to do but connect the tongue to the axle and provide attachment points for the body...being a boat builder, your skils should translate well to this project...looking forward in anticipation to see what you come up with............
madjack 8)
...I have come to believe that, conflict resolution, through violence, is never acceptable.....................mj
User avatar
madjack
Site Admin
 
Posts: 15128
Images: 177
Joined: Thu Dec 02, 2004 5:27 pm
Location: Central Louisiana
Top

Postby Carter » Sat Aug 01, 2009 6:36 am

You're welcome
I bought a 220 machine but it is overkill for small frames. They have 120 Hobarts at the local community college and they work just fine. The young man I was watching there was making 6" passes one after another without any problem at all on 1/8 material. Try setting the voltage and wire feed at what it says on the chart and moving the proper speed to get decent results and adjust from there. I was told you should push on horizontal welds and go bottom to top on vertical. The opposites may work better for you. You want it strong but you don't have to pass a bend test, do whatever gives you the best results.

Keep practicing
Jim
I need a new Avatar. I'd put my dog up there but she doesn't look much like me. She's the skinny one.
User avatar
Carter
Gold Donating Member
 
Posts: 319
Images: 32
Joined: Sun Aug 10, 2008 6:45 am
Location: Rochester Hills, MI
Top

Postby Carter » Sat Aug 01, 2009 7:11 am

I made 4 combination gussets/Atwood Stabilizer mounts. 1x2 channel and a piece of 2x4x1/8 bar stock. 3/8" holes 3"on center. Just an idea

Jim

Image
I need a new Avatar. I'd put my dog up there but she doesn't look much like me. She's the skinny one.
User avatar
Carter
Gold Donating Member
 
Posts: 319
Images: 32
Joined: Sun Aug 10, 2008 6:45 am
Location: Rochester Hills, MI
Top

The SlumberMAX is STUNNING!

Postby Ravenous » Tue Aug 11, 2009 10:45 pm

Dave and Marcia,
I've just spent about half an hour looking at your albums and Website.
I am astounded and amazed at the beautiful finish and pattern of your stripper Teardrop.
I love the fin like embellishment and the extreme quality of your build.
I like the woody look, but I have never finished a boat bright due to the maintenance required to keep a good clear finish over an epoxy substrate. Of course a boat finish is in a position to receive a little more abuse perhaps.
What do you think? How much maintenance is involved in maintaining a beautiful finish like you have on your SlumberMAX?
Again, Yours is the sweetest little teardrop. My wife, Dianne, who usually just looks for my benefit, brightened up and wanted to see more. We love it..
Thanks and happy traveling,
Rav (Rhett Davis).
Peace,
User avatar
Ravenous
Donating Member
 
Posts: 31
Joined: Tue Jul 21, 2009 7:33 pm
Location: Coastal Georgia
Top

Postby Juneaudave » Tue Aug 11, 2009 11:04 pm

Thanks Rav..so far so good with the auto clear. Only time will tell. What I can say is that regardless of what you use for brightwork, it will last longer if covered or stored when not in use. The sun is torture to clear coats and epoxy. On my boats, I've used good marine spar, and re-varnish every other year or so depending on how much use. It doesn't take long and really isn't a big deal for me. Matter of fact, re-varnish time is a good time to make other repairs, get gear lined out and so forth. Good luck with your build!!!!
:thumbsup:
User avatar
Juneaudave
Super Duper Lifetime Member
 
Posts: 3237
Images: 380
Joined: Sun Jul 03, 2005 12:11 pm
Location: Juneau, Alaska
Top

Postby Wolfgang92025 » Tue Aug 11, 2009 11:12 pm

Rav,

Welcome to the forum.

I followed the frame design from the forum's design library for the 2&2 when made the frame. The double plate at the front where the tongue attaches to the frame takes the most stress. I wanted to make sure something else would fail before the tongue comes off the frame. The plan is to attach the floor to the angle iron and attach everything else to the floor.

Regards

Wolfgang
Wolfgang

Image
User avatar
Wolfgang92025
Lifetime member
 
Posts: 1098
Images: 660
Joined: Fri Apr 18, 2008 10:16 pm
Location: Salt Lake City area, Utah
Top

Next

Return to Newbies, Introduce yourselves

Who is online

Users browsing this forum: No registered users and 2 guests