Howdy,
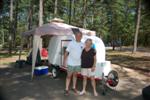
I guess I still qualify as a newbie-I’ve been lurking around here for a while, but haven’t had time to post anything about my TTT. (I had to build it on a deadline!) Anyway, after consuming every spare moment for 3 months, it is done (well, are they ever really done?), my deadline met (in time to take it on my 3rd honeymoon), and its 4,700+ mile maiden voyage has concluded. Now that I have a little breathing room I will take the time to sit down and chronicle the adventure. I’ve added several pictures to my personal gallery. Unfortunately, during the early part of the build the only pictures that I took were with my cell phone and I haven’t had any luck interfacing it with my computer to transfer the pictures-but I’m working on that.
I can’t really recall when I first became aware of teardrops/ttt’s, it probably happened while surfing the web looking for information on Woodie wagons. The first one I ever saw in person was a fairly rough original example at the Ozark Antique Auto Assoc. swap meet in Springfield, MO a few years ago. It lacked a galley, but the compactness really appealed to me.
I dug deeper, researching the possibilities. When I ran across Andrew Gibbens’ plans for a canoe-carrying trailer I was hooked! Since I’d pulling it behind a small 4x4 I felt that the boxy profile was more appropriate than a swoopy teardrop (I have had some second thoughts about that though…)
Our future plans for retirement include building and living on the road in a “house truck”. I figured building this TTT would be a good exercise in preparation for the house truck project. I started out by taking inventory of the materials that I had on hand that were suitable for the project. Then using the basic design from Mr. Gibbens’ I roughed out some of the details.
Later I will write up a sidebar including the pitfalls that I fell into. As I pass these pitfalls in my diatribe that follows I make note.
For an axle I used a piece of 2”x 2”x 0.125” tubing. I machined two flanges for the ends to accept rear hub/bearing assemblies from a junk Toyota Camry that I had. I ordered a pair of 1,500lb springs and hangers from Northern Hydraulics and picked up some u-bolts at the local farm store. Since I intend to drag this thing off-road as well as on, I mounted the axle under the springs for maximum clearance. That also allowed the trailer to ride level without a drop hitch.
I welded up the 4’ x 8’ frame from 1 ½” x 3/16” angle iron. (See Pitfalls sidebar) and made a tongue out of a piece of 3” x 3” x ¼” tubing that was on the scrap pile. I made it extra long so I could open my spare tire carrier and hatch while coupled to my rig. An added bonus of having that extra length: I can carefully jackknife it into two standard parking places with out sticking out into the aisle, forming an L. That was handy more than once on her maiden voyage.
As an aside: my wife has bothersome skin allergies. This played a big part in some of my material selection. I originally planned to use a piece of marine-glued plywood for the floor. That was until I priced ordering a sheet from the local building supply mega store. Not only was the cost prohibitive, being 600+ miles from the nearest saltwater evidently makes marine plywood a special order only item. With an order of one sheet I was looking at an 8 to 12 week wait! Time to back up and punt. In light of my wife’s skin I didn’t think using an exposed sheet in CCA (or whatever they are using these days) treated plywood would be a good idea, so I topped a ½” sheet of treated plywood with a sheet of ¼” luann (sp?) plywood (Actually it was something like 15/64” but for all practical purposes it is a ¼”) to isolate the interior from the chemicals that could potential emanate from it.
I framed the walls with (nominal) 2x2s screwed and glued together with liquid nails with the “studs” spaced to accommodate my door and windows salvaged from a junk Winnebago. I reinforced the corner joints with 1” angle brackets screwed and Gorilla glued to the studs. My anchor bolts that attach the walls to the frame pass through these brackets as well. Each framed wall is sandwiched between two sheets of screwed and glued luann, with the space between the studs filled with pieces of 1” Styrofoam insulation.
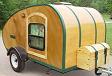
For the exterior skin I chose to try out the fiberglass, textured wallboard that is commonly used in bathrooms etc. I plan to store my TTT inside, so I’m not too worried about effects from UV exposure. Plus I plan to keep it waxed with a good grade of automotive wax, which should help as well. I glued (see Pitfalls sidebar) the skin onto the two sidewalls before I attached them to the frame-I figured it’d be much easier to do horizontally than vertically. With the walls up, I attached the “rafters” and framed in the front wall.
When work progressed to the rear hatch, progress slowed to a crawl. It was really time consuming getting everything just right. For the seal around the galley hatch I used some of the stuff that they put on the sides of overhead garage doors. It not only seals well, but forms a gutter to drain the water off.
I used more luann and 2x2s to construct the interior cabinet. I mounted an am/fm cd in the upper middle of the cabinet with two speakers on each side. The cabinet really enhances the bass even at the low volume that we usually are using. (we wouldn’t want to disturb the other campers) I also left a shelf in the middle and wired in a 12v accessory outlet so if we happen to be camping in an urban area we can watch a little portable tv. I finished the interior wood with a couple of coats of spray-on clear polyurethane. The luann’s red hue contrasts nicely with the blonde pine trim we chose.
I bought the corner trim for the exterior and the rainproof hinge for the galley from Li’l Bear. Excellent products and service too! I tried some neat vinyl bathtub trim for the three horizontal seams that I have. It looked great, but gave problems (see pitfalls). For the galley countertop I had an neat stainless steel shelf that I cut to fit. I had small stainless sink that I was going to use but a good friend of mine gave me a more suitable one from a camper he had dismantled. He also gave me the 12v water pump, which worked out perfect for me. I chose to use a common 7-gallon water jug for my supply tank, I carry an extra in the tow rig in case I run out before I get to a place to refill. For a stove I bought a 3-burner unit from another friend, but it turned out to be a little too large to fit on my counter top so I ended up using the burners out of a propane tabletop camp stove. I cut hole in the ss countertop and mounted the camp stove burners under it will the controls accessible at the edge. After reading someone’s idea of using the small disposable cylinders I nixed the idea of mounting a bottle on the tongue. On our maiden voyage we were gone two weeks and cooked at least 25 meals on one bottle and it is still going strong.
I got a deal on ebay for a roof vent with a 12v fan in it. That’s also where I picked up a nifty fluorescent light fixture. I mounted a couple of battery powered led reading lights above the head of the bed-they really worked out great. For added ventilation on those muggy, humid nights my dad gave me a nifty 12v oscillating fan. In the dry country we never ran for more than five minutes a night. When we got back in the humidity belt it ran nearly all night long! For power I chose a group 31 deep cycle battery. I wanted as much reserve as possible in case I needed to run the fans all night. I originally intended to mount an onboard inverter to charge the battery in camp, but decided not to-as it turned out electric hookups were the exception rather than the rule. I wired it up so that the tow rig would charge it when it was running, and it never seemed to strain anything. But even running the fan as much as we did those last nights the battery never seemed to wane.
When it came time for a mattress, a custom one was required. I ended up with a sleeping area 45” by 76”-not exactly a standard mattress size. Several years ago my parents had a camper mattress made at a place in Belle, MO called Cotton Bell. They make futon mattresses and covers and will gladly custom make a mattress for you at an incredibly reasonable price. Once again though, I had to take my wife’s allergies into consideration. Their normal mattresses have a latex foam rubber core. I had them construct one without the foam core but with 5” of cotton batting. It’s probably not as comfortable as it would be with the foam, but there’s no chance of a latex allergic reaction.
I picked up a set of plain round fenders from the farm store-at $12 apiece I sure couldn’t order any, pay shipping and get them any cheaper. I primed them and painted with a dark gray (nearly black), hammer tone Rust-o-leum paint (the same stuff that I also used on the frame) thinking it they might withstand rock chips a little better than ordinary paint. I was able to use a tiny automotive space-saver spare tire and hang it from the floor above the axle. It’s out-of-the-way and doesn’t affect ground clearance either. I used off the shelf taillights and turn signals. All of my other electrical circuits are routed through an automotive type fuse box mounted under the galley counter.
A tongue jack and caulking all of the seams rounded it out.
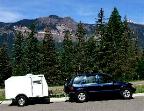
I am amazed at how it pulls. I just knew that the wind in Kansas would whip it all over the place, but I swear that the tow-rig/TTT combo drives better in strong wind than the tow rig does by itself in less wind!
On my usual 55-mile commute through hills and around curves I average 23 mpg. On this trip I averaged around 20 mpg. My worst tank was 19 mpg, while trying to run 70 mph on the interstate in the mountains and my best tank was 22-while poking along between 45 and 55 mph, again in the mountains. I drove as fast as 80 mph on a long level stretch in southern Arizona and pulled a few mountains in 1st gear at less than 25 mph for 8 to 10 miles at a stretch in western Utah.
Pitfalls:
In retrospect it would’ve been much less troublesome to have purchased new 1 ½” tubing for the 4’x 8’ frame. But, I had a lot of left over 1 ½”x1 ½” x 3/16” angle and decided to use it to construct my frame, doubling it to “box” the perimeter. Even with being extremely careful about not heating the work up too much I had lots of warpage problems to deal with when I boxed in the sides-nothing insurmountable-just a lot of unexpected work, all because I was dead set on using as much on hand material as possible for the project.
When gluing on the skin I initially used the cement recommended for use with the fiberglass boarding bathroom applications. I glued the skins on the sides before erecting and attaching them to the frame. Later, when working on the interior, I had a high-powered halogen work light shining in through one of the window openings. After several hours I noticed that the fiberglass skin around the window had expanded from the heat of the lamp (which had also softened the glue) and bowed away from the plywood. I reclamped it and moved the lamp. I knew this could pose a problem since we were going to be traveling through the mountains and the desert-one night we saw 27 degrees in the mountains and temps soared over a hundred that afternoon in a valley. For the rest of the skin I used a contact cement that was not as sensitive to the temperature swings. I did notice a slight bubbling in that area of the skin when we were in higher temperatures, but it always smoothed out easily when it cooled down. The skin was pretty much held captive by the edge trim and the window frame despite the soft glue.
The vinyl trim that I used for the horizontal seams looked great, but some of it didn’t last the first day! The putty type adhesive that came on the trim softened in the meagerest sunlight, and the wind did the rest. I haven’t come up with an alternative yet, but plan to visit Li’l Bear’s website soon.
That pretty much sums up the construction phase. Then next chance I get, I will chronicle our adventure-with pictures!
Cheers!
Kenny
Teardrops n Tiny Travel Trailersor t n ttt for short (tnttt.com) |
Newbie from MO. Warning: Longgggg!
15 posts
• Page 1 of 1
Newbie from MO. Warning: Longgggg!
![]() by pbbelly » Mon Jul 02, 2007 11:21 am
by pbbelly » Mon Jul 02, 2007 11:21 am
Last edited by pbbelly on Wed Jul 04, 2007 3:27 pm, edited 1 time in total.
-
pbbelly - Teardrop Inspector
- Posts: 20
- Images: 14
- Joined: Tue Apr 24, 2007 6:26 pm
- Location: Rolla, MO
![]() by Miriam C. » Mon Jul 02, 2007 1:56 pm
by Miriam C. » Mon Jul 02, 2007 1:56 pm

Hi Kenny! Nice TTT and some really nice pictures. Thanks for sharing them and the story with us.
A question: The sink counter/top is a really great addition.
We have a new section called "Trips......" so I will look forward to the full trip and story.


“Forgiveness means giving up all hope for a better past.â€
-

Miriam C. - our Aunti M
- Posts: 19675
- Images: 148
- Joined: Wed Feb 15, 2006 3:14 pm
- Location: Southwest MO