Page 9 of 22

Re: BLUE RIDGE Rambler, Bob and Lynn's 6x14 CT

PostPosted: Wed Jun 24, 2015 9:19 am
by lrrowe
What 7 on the rear? Your photo shows just three on the bottom. Or do they just come on when making turns, etc?

Re: BLUE RIDGE Rambler, Bob and Lynn's 6x14 CT

PostPosted: Wed Jun 24, 2015 10:14 am
by aggie79
Bob,

Great progress on your CTC! You'll definitely be campable by the time of the outing.

Take care,
Tom

Re: BLUE RIDGE Rambler, Bob and Lynn's 6x14 CT

PostPosted: Wed Jun 24, 2015 10:37 am
by wtcreaux
lrrowe wrote:I noticed you removed the stock leveler and added a "mount to the side" one.

Obviously yours too was in the way of your tail gate. I have got to deal with that issue also. I am thinking of having a new plate made to slide it back about 8".

Do you have any flexing issues with the frame with it being so far back. I doubt you do have any given the size of your frame.


Bob,

I actually have 2 of the drop-leg jacks. You can just barely see the driver's side one in the picture.

Here is a better pic
129544


Having 2 gives me almost NO flex when in the front of the trailer.

Re: BLUE RIDGE Rambler, Bob and Lynn's 6x14 CT

PostPosted: Wed Jun 24, 2015 4:33 pm
by lrrowe
aggie79 wrote:Bob,

Great progress on your CTC! You'll definitely be campable by the time of the outing.

Take care,
Tom


Got many interior walls cut and fitted today and yes definitely making progress. But I am estimating that my outing will be like tent camping except we will be sleeping inside four walls. I do not expect any amentities to be ready by then.

Re: BLUE RIDGE Rambler, Bob and Lynn's 6x14 CT

PostPosted: Wed Jun 24, 2015 4:35 pm
by lrrowe
Wtcreaux,
I understand what you did now. That could be my backup plan if I do not weld on a new mounting plate.

Re: BLUE RIDGE Rambler, Bob and Lynn's 6x14 CT

PostPosted: Fri Jun 26, 2015 9:47 am
by lrrowe
Finished cutting all the wall panels yesterday and dry fitted them.
The boards cut in a horizontal pattern in the front will be hidden behind cabinets. I just made the best use of scrap pieces.
They have been removed and staining will start today.
Also I hope today to go buy the prepainted ceiling panels and more ceiling insulation today if the rain stops.
Image

This panel cutting template makes cutting both a breeze and very accurate.
Image

I knew better, but I showed myself again that you cannot spill Acetone on EPS boards.
Image

Re: BLUE RIDGE Rambler, Bob and Lynn's 6x14 CT

PostPosted: Thu Jul 02, 2015 7:31 pm
by lrrowe
MISTAKE!
I was finishing screwing down the top of my subfloor. And you know how as soon as you do something bad, you try to stop and it is too late? I screwed right into the PEX tubing I had installed in the subfloor. I was able to repair it, but now the water flow is reduced just a tad because of the smaller diameter of the connector.

Image

Also do you know when it is time to stop work? When you find yourself making serious mistakes.

STAINING:
My wife Lynn is helping to stain the sides of our trailer walls.
Image

INSULATION AND FLOOR STAINING:
Got a lot done with the ceiling insulation. 1/2 in insulation board goes over what you see here.
Also stained the floor with Dock floor stain from Sherman Williams. Allure Vinyl Strips will go on after the walls and ceiling panels are up.
Image


SHOWER PAN:
Before the shower pan is secured, wiring is wrapped around the back of it.
Image

The drain and extension were added and shower pan positioned in place. The drain system is shown in the pan.
Image

The shower drain extension and drain plug/tube shown. I will use a garden hose to drain shower water to 5 gal bucket. If sink is added later, it will run into this setup with a "Y" added.
Image

Image

Re: BLUE RIDGE Rambler, Bob and Lynn's 6x14 CT

PostPosted: Thu Jul 02, 2015 8:20 pm
by Spotman
Nice progress. Sorry about the mistake in the floor.

Re: BLUE RIDGE Rambler, Bob and Lynn's 6x14 CT

PostPosted: Fri Jul 03, 2015 8:08 am
by OverTheTopCargoTrailer
Great job bob

Your gonna be ready for Alaska camping with that insulation package.

One small tip, get 10 cans of the $8 spray on undercoating and spray the cap out
your trailer underside, don't get the cheaper $6 crap. I have zero rust after almost 2 years.
best deal, other then the extra bright rear & side lights.

Cheers OTTCT

Re: BLUE RIDGE Rambler, Bob and Lynn's 6x14 CT

PostPosted: Fri Jul 03, 2015 8:13 am
by lrrowe
Thanks Bob and Jerry.
Jerry, I will bet you are referring to those red spots in the last picture and think it is rust. It is not. It is that darn Virginia/Carolina red clay that splattered up during heavy rain storms.

Re: BLUE RIDGE Rambler, Bob and Lynn's 6x14 CT

PostPosted: Tue Jul 14, 2015 8:07 pm
by lrrowe
This coming Thursday I venture out on my first real camping outing (not including my hunting trip last year) with the CT and it is not really ready. But I paid for the nights many months ago so I could go along with the Old Dominion Chapter of TearJerkers for a few days at the Creeper Trail in Southwest VA. My wife and I are anxious to meet other TnTTT'rs out there so regardless of the readiness of the trailer, we are going.

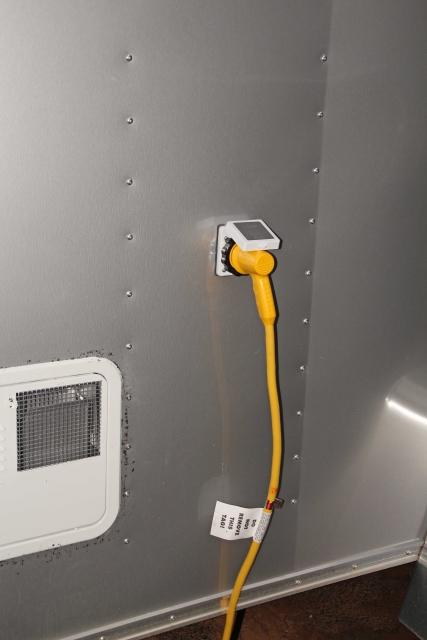
I just wired one outlet so we have a refrigerator working and my wife is happy about her coffee pot. I have not gotten her into the wilderness aspect of cooking without electricity yet. Other then that, the trailer is in essence just a tent with hard sides and top.

I hurried as fast as I can to get to the state these photos shown, struggling with an ailing back.

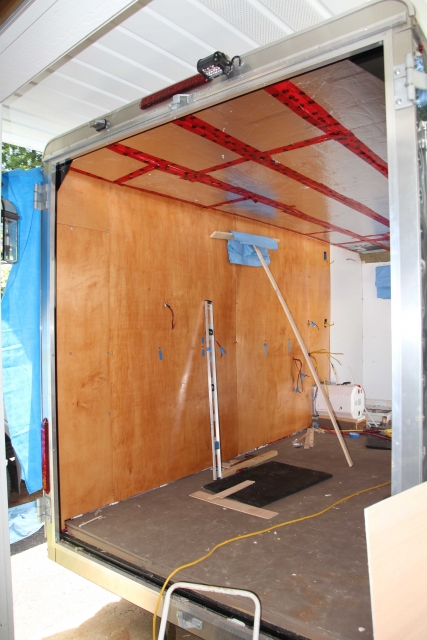
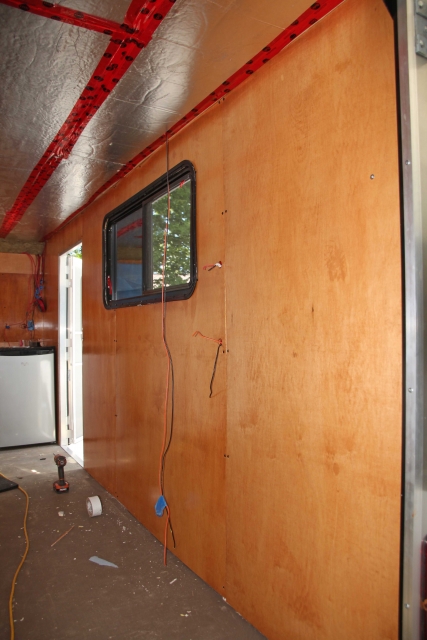
The interior panels are all up and final ceiling insulation installed.
Image
Image

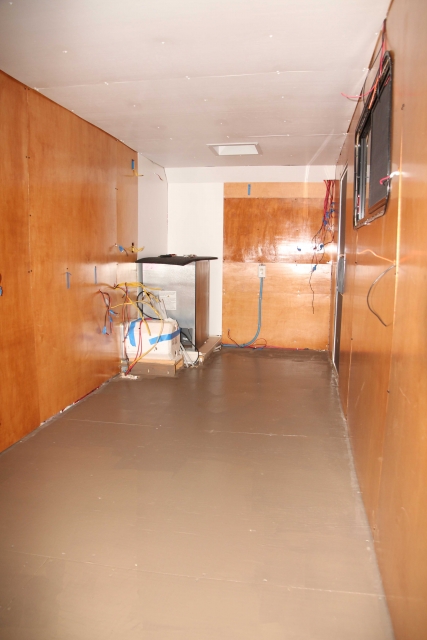
The ceiling is up and floor recoated with a sealer (before Allure Vinyl Panels are installed later)

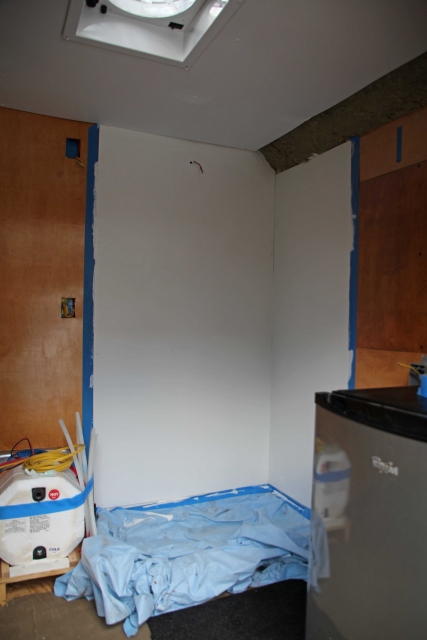
And you know it is time to quit when you sort of paint yourself into a corner so to speak. See how I temporary located the refrigerator in the shower pan while painting the floor. But I forgot to plug it back into the outlet. Now I have to wait til the paint dries. And it does not do that quickly when you watch it.

Image

The Shower Panels got their final coat.
Image

The Marinco 30 Amp inlet installed. But only temporarily as the PD4045 is not yet installed. This powers only one outlet for the refrigerator.
And yes, I have some clean up to do with the sealer around the heater cover.
Image

Re: BLUE RIDGE Rambler, Bob and Lynn's 6x14 CT

PostPosted: Tue Jul 14, 2015 10:40 pm
by hankaye
lrrowe, Howdy;

Lookin' gooood! Take your time, smooth ='s efficency which ='s
a better pace. Enjoy yor time and have a fun time at the outing.

hank

Re: BLUE RIDGE Rambler, Bob and Lynn's 6x14 CT

PostPosted: Tue Jul 14, 2015 10:54 pm
by Rainier70
It's coming together! Enjoy your trip even if your CT isn't "finished".

I am not sure that they are ever truly finished anyway. I've been camping in mine for two years now, and it hasn't been finished yet either. I started out using my hammock in mine before I got my beds built. Slowly I keep doing a few small jobs when I get a minute, and it isn't in use.

A little more each week and you will soon have it to a comfort level if not a finished level. Don't wait for finished...Enjoy camping in it now.

Re: BLUE RIDGE Rambler, Bob and Lynn's 6x14 CT

PostPosted: Wed Jul 15, 2015 1:03 am
by lrrowe
Hank, Cindy, I know you both are right. It is just disappointing only being this far along after almost 10 months even with the long medical downtime. But yes, I hope to come away from this outing with the "lets go anyway" attitude.

I am not happy with some of my work and do plan on slowing down the process in order to either make things right or to do them on a "higher quality" basis the first time. The critical path (for all you manufacturing or project types out there) to get to usability is essentially done now.

Re: BLUE RIDGE Rambler, Bob and Lynn's 6x14 CT

PostPosted: Wed Jul 15, 2015 8:16 pm
by wanabxtrm
....still ahead of me!