The Big Lug

Converting Cargo Trailers into TTTs

Postby Steve_Cox » Sun Feb 22, 2009 11:09 am

Cathy Jo,

I like that color :lol:

Remember when we were talking about putting a sliding glass door with a screen just inside the back drop door and using the drop door as a back porch? Any more thoughts along those lines? It would provide lots of light and a big porch too! I see those for free quite often on craigslist, but at 80" X 72" it might be too big.
Steve
User avatar
Steve_Cox
4000 Club
4000 Club
 
Posts: 4903
Images: 196
Joined: Sun Apr 03, 2005 8:46 am
Location: Albuquerque New Mexico

Postby devigata » Sun Feb 22, 2009 12:04 pm

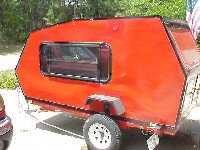
That must have been you and John talking about that, because I don't remember anything about a glass door. When the ramp is down on the jack stands, it's the perfect height to sit on with feet on the ground, so there may be no need to put chairs on it, although it is large enough.

We picked up a 10X10 canopy on clearance a few weeks ago that I think will work well over the ramp and be tall enough so that I can stand under it to cook. We drew out some lines yesterday:

Image

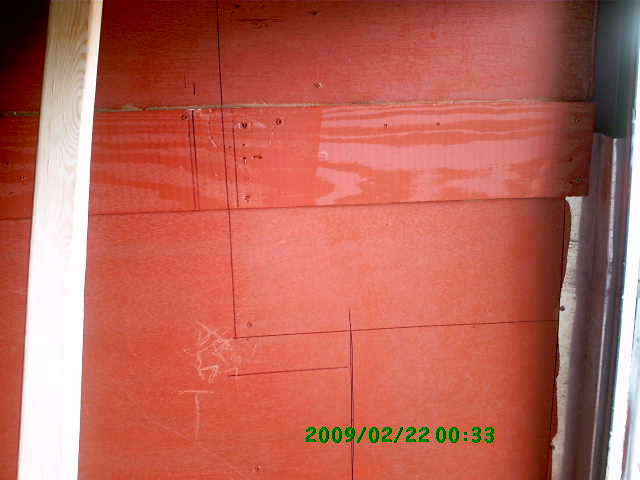
You can see where the frame for the plywood will come down by the rib to the countertop at 36" high, then go down again at the end of the cots. We got 2X3's cheaper than 1X2's so that's what the frame will be made of. The ply is 1/4" and the countertops will be 1/2"X11 1/4" boards (I think).

I'm hoping the stove will be "sunken" into the countertop like yours in the Gypsy, and I have some plastic drawers that will be used, too.

The more we talk about the galley design, the more it changes. Once sawdust starts flying, I can't make any more changes, so all this discussion is good (right?).
User avatar
devigata
Donating Member
 
Posts: 282
Images: 82
Joined: Sun Apr 13, 2008 12:01 pm
Location: Orlando, Florida

Postby devigata » Tue Feb 24, 2009 5:27 am

John put a second coat of paint on the floor yesterday while I was at work. Such a sweetheart!

He also picked up a spare tire mount at HF. He aims to put it on the nose wall, high enough to clear a tongue box for our campfire tools (axe, hatchet, tripod, etc.). Don't know if he'll build a box or if we can scrounge one. Of course that can't be mounted until the floor dries really well. This is oil-based paint.

Can someone tell me about jack stands? I think there are some that are mounted on the trailer then fold away. Have seen pics of them on here, but don't know what to search on to find them.
User avatar
devigata
Donating Member
 
Posts: 282
Images: 82
Joined: Sun Apr 13, 2008 12:01 pm
Location: Orlando, Florida
Top

Postby devigata » Sat Feb 28, 2009 5:14 am

Spare Tire mounted:
Image

Galley Wall beginning:
Image

Image

And from the inside:
Image

I wish I weren't putting in nearly 20 hours of overtime each week. I'd love to be in on this much more than just looking at the progress. I have been wearing a goofy grin lately, just thinking about it.

My husband is wonderful, through and through!
User avatar
devigata
Donating Member
 
Posts: 282
Images: 82
Joined: Sun Apr 13, 2008 12:01 pm
Location: Orlando, Florida
Top

great job

Postby kevin57 » Sat Feb 28, 2009 11:58 am

great job. i hope you guys enjoy it as much as we have. keep up the good work and take lots of pics.
Kevin

happy wife = happy life
User avatar
kevin57
Teardrop Advisor
 
Posts: 86
Images: 70
Joined: Thu Jun 12, 2008 4:29 pm
Location: metropolis,il.
Top

Postby razorback » Sat Feb 28, 2009 9:10 pm

Hey divigata
Here is a link to Atwoods Stabilizer jacks. Many many places have these.
You should be able to find multiple RV places in the Orlando area that have these or ones like them.
http://www.lowcosttrailersupplies.com/t ... s-asj.html

Larry
razorback
Super Lifetime Member
 
Posts: 585
Images: 12
Joined: Mon May 21, 2007 6:14 pm
Location: NLR, arkansas
Top

Re: great job

Postby devigata » Sat Feb 28, 2009 11:52 pm

kevin57 wrote:great job. i hope you guys enjoy it as much as we have. keep up the good work and take lots of pics.


Thanks, Kevin! This whole thing started when I pitched my tent in the dark, on a bunch of rocks. At that time I was wanting to build a teardrop, but it was John's idea for the cargo conversion.

Your build pics were an inspiration to me when designing. Even at this early stage, I'm dreaming of a second build and it will have barn doors and not a ramp.

Did you build your countertop height from the ground or the floor of the trailer?
User avatar
devigata
Donating Member
 
Posts: 282
Images: 82
Joined: Sun Apr 13, 2008 12:01 pm
Location: Orlando, Florida
Top

Postby devigata » Sun Mar 01, 2009 12:08 am

razorback wrote:Hey divigata
Here is a link to Atwoods Stabilizer jacks. Many many places have these.
You should be able to find multiple RV places in the Orlando area that have these or ones like them.
http://www.lowcosttrailersupplies.com/t ... s-asj.html

Larry


ATWOOD stabilizer jacks! Thank you so much! And they're available at Harbor Tools! YAY!!! We have a store just around the corner, so we'll look at them this weekend.

It's supposed to be rainy tomorrow/today/Sunday, so I don't know if I'll be able to get out there with a touch-up paintbrush and broom, but pics are being taken of it's progress. John said the next step will be some wiring.
User avatar
devigata
Donating Member
 
Posts: 282
Images: 82
Joined: Sun Apr 13, 2008 12:01 pm
Location: Orlando, Florida
Top

counter height

Postby kevin57 » Sun Mar 01, 2009 12:05 pm

the countertop is about 38 in. off the ground, so i built a small platform to stand on that makes it about 36 in. also keeps you out of the mud if it's raining.

thanks
kevin
Kevin

happy wife = happy life
User avatar
kevin57
Teardrop Advisor
 
Posts: 86
Images: 70
Joined: Thu Jun 12, 2008 4:29 pm
Location: metropolis,il.
Top

Re: counter height

Postby devigata » Sun Mar 01, 2009 4:32 pm

kevin57 wrote:the countertop is about 38 in. off the ground...


I see. I did notice the platform ~ good idea. Our countertop is set the same as the kitchen. When I stand on the ramp it just feels right.

We looked at Northern Tools for the Atwood stabilizer jacks, but they don't stock them. I'll google for them later.

Too cold, windy, and rainy to do much today. Lazy Sunday!
Last edited by devigata on Wed Mar 11, 2009 6:49 pm, edited 1 time in total.
User avatar
devigata
Donating Member
 
Posts: 282
Images: 82
Joined: Sun Apr 13, 2008 12:01 pm
Location: Orlando, Florida
Top

Postby Steve_Cox » Sun Mar 01, 2009 6:34 pm

:thumbsup:
Image
Steve
User avatar
Steve_Cox
4000 Club
4000 Club
 
Posts: 4903
Images: 196
Joined: Sun Apr 03, 2005 8:46 am
Location: Albuquerque New Mexico
Top

Postby devigata » Fri Mar 06, 2009 5:07 am

Let there be LIGHT! Not quite finished - there's the AC roof unit to spring for and install, but the wire is there. Also, the outside porch light still needs installation, as well as the light for the inside of the galley wall.

Here's how John did it - the outside plug, passenger side. There's another on the driver's side. We have a heavy duty extension with two male plugs and one hooks up at the campsite and one goes in here:

Image

This is a look at it from the inside:

Image

And a peek at it in the dark:

Image

Another sheet of plywood is needed to cover the wiring on the inside wall. A plug will go there (you can see an unconnected wire). There's more pics in the album. I cannot WAIT for the time change this weekend - I'll be able to help!
User avatar
devigata
Donating Member
 
Posts: 282
Images: 82
Joined: Sun Apr 13, 2008 12:01 pm
Location: Orlando, Florida
Top

Postby devigata » Wed Mar 11, 2009 5:14 am

I think we need to go camping before we make more changes... I'm not sure how everything will "feel", so we loaded up most of the galley and will do a trial run this coming weekend.

On the to-do list for the galley is:

-dropping the stove (can't decide if it should go in the center or not)
-building a shelf above the stove
-and painting, of course

Image
User avatar
devigata
Donating Member
 
Posts: 282
Images: 82
Joined: Sun Apr 13, 2008 12:01 pm
Location: Orlando, Florida
Top

Postby MikeIA » Wed Mar 11, 2009 7:44 pm

devigata wrote:
Here's how John did it - the outside plug, passenger side. There's another on the driver's side. We have a heavy duty extension with two male plugs and one hooks up at the campsite and one goes in here:

Image

Not to be a killjoy, but what happens when a kid at the campground accidentally trips over your shore power line, pulls out the plug from your tear, and touches those (now) exposed live conductors? :(

Mike
MikeIA
Teardrop Inspector
 
Posts: 12
Images: 2
Joined: Mon Dec 18, 2006 8:41 pm
Top

Postby devigata » Thu Mar 12, 2009 2:39 am

MikeIA wrote:Not to be a killjoy, but what happens when a kid at the campground accidentally trips over your shore power line, pulls out the plug from your tear, and touches those (now) exposed live conductors? :(

Mike


I asked my "Master Builder" about this and it's evidently a temporary situation. There will eventually be a twist/lock plug thingie. Thanks for the head's up!

I'll put that at the top of my to-do list because it never occurred to me (obviously). Electrical and plumbing are things I don't worry "my purty little head about" because they make my brain hurt.

:?
User avatar
devigata
Donating Member
 
Posts: 282
Images: 82
Joined: Sun Apr 13, 2008 12:01 pm
Location: Orlando, Florida
Top

PreviousNext

Return to Cargo Trailer Conversions

Who is online

Users browsing this forum: No registered users and 15 guests