Page 2 of 207

Windows installation question

PostPosted: Mon Mar 07, 2016 9:34 pm
by flboy
I have a question about installing the windows. I hope someone can answer... maybe save me some time. The trailer has 1" wide square tubing (studs) 16" on center in the walls like most trailers. A few of my windows are wider that 15" and I will have to cut through at least one stud for each window. Given the plywood and the window frame itself, do I really need to weld a frame for the window? Given the roof carries no real weight and the plywood walls holding everything together (structural), I am thinking it may not be necessary? Thoughts? :thinking:

Re: 7'*18' V-Nose Cargo Trailer Toy Hauler Conversion

PostPosted: Wed Mar 09, 2016 10:26 pm
by flboy
Here's a schematic of my Electrical System I will be installing. Sorry it is not a better schematic. I had to draw with Powerpoint. This is very similar to my last build: The Automatic transfer switch will cutover automatically from the invert-er output to the generator or line in if it senses power available.

The batteries charge in sunlight and will also charge automatically if plugged in to shore or a generator. The fridge runs of 110VAC from either the solar/inverter or shore power/generator. In any case.. it will run 24/7 off the batteries and leave plenty of capacity even if only on solar.

Image

Re: 7'*18' V-Nose Cargo Trailer Toy Hauler Conversion

PostPosted: Thu Mar 10, 2016 8:08 am
by KCStudly
I think you meant to label the batteries in "series", as shown for two 6v cells in a 12v system, not "parallel".

Re: 7'*18' V-Nose Cargo Trailer Toy Hauler Conversion

PostPosted: Thu Mar 10, 2016 9:21 pm
by flboy
KCStudly wrote:I think you meant to label the batteries in "series", as shown for two 6v cells in a 12v system, not "parallel".
You are correct. I had this same schematic for my previous toy hauler that used 2 12V is Parallel for more capacity. Tx. (Edit... updated schematic.. going with 3 12v in Parallel)

Re: 7'*18' V-Nose Cargo Trailer Toy Hauler Conversion

PostPosted: Fri Mar 11, 2016 10:16 pm
by flboy
We'll this is farewell to my first CT Build. I have enjoyed it for 5 years now and tomorrow it is being delivered to it's new owner that will use it like I did taking dirtbikes to offroad/camping type rides. It is like burning a bridge.... I have no camper now... so it is 100% on to this build if I am going to go camping anytime soon. I'll use the cash from the sale for the conversion. It is all good... especially for Amazon, Ebay, and Home Depot where I'll source all the remaining material needed except for the metal tubing needed for welding the bed, window frames, and etc.. which I'll buy locally. :thumbsup:


Pic of the interior of my old CT :cry: going to miss it... my new build will be significantly different and larger.

Image

Re: 7'*18' V-Nose Cargo Trailer Toy Hauler Conversion

PostPosted: Sat Mar 12, 2016 6:52 pm
by flboy
Started working on the new trailer today after I delivered my old CT Conversion Toy Hauler to its new owner. I have fitted the grey water tank. The Blackwater tank is the same size and they fit perfectly between the 16" beams. I am glad I salvaged these from the Truck Camper. They fit exactly up in the frame, and with the top ledge on each tank, All I am going to need to do is cut and bolt up two cross member under each tank to hold them. I am not going to need to remove the floors like I previously thought. :-) (updated after I mounted the tanks: I did take out the floor... much easier to work on and with the sding off inside.. it only took about 10 minutes to take out the screws and lift out the floor. The key is being able to remove them and service the tanks if ever needed without removing the floor which cannot be done when the trailer is finished without total destruction. )


Image

Re: 7'*18' V-Nose Cargo Trailer Toy Hauler Conversion

PostPosted: Sun Mar 13, 2016 4:44 pm
by flboy
In no particular order, I have been busy ordering most of the remaining items needed for the conversion this weekend. Still have the awning, Fridge, A/C, Shower Pan, Golf Cart batteries and all the insulation, wood, paint and hardware needed... I'll be real close to my budget... I'll make some building progress next weekend. I only have Saturday's and part of Sunday's to put in any serious labor.

When I am all done, I'll post the costs for everything if anyone is interested. My budget is ~ $10,000. It is going to be real close , and not possbile without the items I already have from the donor camper.

    Qty 4 Renogy 2 Piece 100W Monocrystalline Photovoltaic PV Solar Panel Module, 12V Battery Charging ( already received )
    Islandoffer 5 Pairs of MC4 Male/ Female Solar Panel Cable Connectors
    bayite DC 6.5-100V 0-100A LCD Display Digital Current Voltage Power Energy Meter Multimeter Ammeter Voltmeter with 100A Current Shunt
    Absolute USA ANL200-4 4 Pack ANL 200 Amp Gold Plated Fuse
    Db Link ANLFH01 0-Gauge ANL Fuse Holder
    P3 P4400 Kill A Watt Electricity Usage Monitor ( already received )
    Marinco 701 Battery Disconnect Switch ( already received )
    ParkPower 150BBIW.RV 15 Amp Power Inlet, White
    JR Products 11371 White 8 foot Elixir Style Screw Cover
    qty 3 DB Link RT4 4-Gauge Ring Terminal (2 Red and 2 Black)
    Camco 40431 RV Roof Vent Cover (White)
    Ventline (V2111-13) Polar White Horizontal Exterior Wall Vent
    Pyramid RPB425 Ground Wire 4-Gauge, 25 Feet, Flexible, OFC Cable Wire, Translucent (Black)
    Pyramid RPR425 4 Gauge Power Wire 25 feet OFC (Clear Red)
    Thetford 12524 Aqua Magc IV Closet Bolt Package
    Dicor (BT-1834-1) 1/8" x 3/4" x 40' Butyl Seal Tape
    Dometic 385345892 3" Socket Floor Flange
    Dometic 310 Series Standard Height Toilet, White
    E2 by Scoshe EWFH Single ANL Fuse Holder
    Powermax 110 Volt to 12 Volt DC Power Supply Converter Charger for Rv Pm3-55 (55 Amp)
    Custom Roto-Molding 93 RV Tank Grommet
    Parallax Power Supply FB9 Fuse Block
    Install Bay MANL30 - 30 Amp Mini ANL Fuses (2 Pack)
    Camco 40033 Replace All Plumbing Vent Kit (Polar White)
    LAVA RVHD-2015 OmniPro RV & Marine HDTV Antenna
    PowerMax PMTS-30 30 Amp Automatic Transfer Switch
    Tonsiki Motor Car Truck Boat DC Digital Voltmeter Three Hole Panel DC 12V Cigarette Lighter Power Socket Dual USB Port GPS Port
    Reliable - Pure Sinewave 1500W Inverter ( already received )
    LCD 40A 12V/24V MPPT Solar Panel Regulator Charge Controller &USB Three Timer KJ ( already received )
    New Waterproof Four-in-one T-shape Bottom Bracket MC4 Solar Panel PV Connector
    3 x RV LED 12v Fixture Ceiling Camper Trailer Marine Double Dome Light
    Atwood 91447 ECO Thermostat Front Mount Water Heater RV G6A6E Spark Electrode
    Wholesale 5M 3528SMD 60LEDs/m LED Strip Light Non Waterproof Flexible 12VDC Lamp
    Stove / Range Grate Rubber Grommets - Set of 4 - Black for Camper Motorhome RV ( already received )
    RV Atwood Water Heater Switch # 91859 ( already received )
    Atwood Main Burner 6 GA Pilot Service Kit #92615 ( already received )
    RV Atwood Hydro Flame Furnace Thermostat, 12V /HYDF 36684/38453 ( already received )
    Quick Probe for RV / Camper / Trailer / Motorhome Tank Monitoring System ( already received )
    RV KIB 4 Tank Monitor Panel - New KIB # M28VWFW ( already received )
    7*14' Rubberized flooring for Garage Area
    RV Trailer White Plastic City / Gravity Water Fill Dish Lockable Hatch Cover

Re: 7'*18' V-Nose Cargo Trailer Toy Hauler Conversion

PostPosted: Sun Mar 13, 2016 8:57 pm
by m.colley
Looks good fl boy. What part of Florida are you from? I've got family and property in the Green Cove area.
BTW, thanks for the confirmation on the window AC being more then enough to cool your last and this new build. Have you decided where your going to install the AC in this build? We got similar uses for our conversion builds.
I haul a full dresser 2011 Harley Roadking to events as well as two 4wheelers several times a year to ATV parks. I rode Enduro & dual sports for years prior. I'll have to keep a watch on your build here.


Martin

Re: 7'*18' V-Nose Cargo Trailer Toy Hauler Conversion

PostPosted: Mon Mar 14, 2016 5:32 am
by flboy
m.colley wrote:Looks good fl boy. What part of Florida are you from? I've got family and property in the Green Cove area.
BTW, thanks for the confirmation on the window AC being more then enough to cool your last and this new build. Have you decided where your going to install the AC in this build? We got similar uses for our conversion builds.
I haul a full dresser 2011 Harley Roadking to events as well as two 4wheelers several times a year to ATV parks. I rode Enduro & dual sports for years prior. I'll have to keep a watch on your build here.


Martin


Hi Martin, I am in the Central Florida area on the east coast near Cape Canaveral. Best of luck with your build also. I am just starting the real work on mine. I have my old one sold, the new empty cargo trailer in my backyard, and I have ordered a lot of what I need to get started. I'll be posting pics as I go. My main goal was to be able to use the self contained toy hauler without taking out the bikes. That is why I got a 7.5 foot high trailer and am building the loft bed that can lower and raise to the ceiling in the back. I'll be able to lower it over the bikes if we stop overnight in a parking lot somewhere or etc. and can deploy the bed.

I have a Kawasaki Vulcan Custom Cruiser and a KTM 450 dirt bike (dualsport) I'll be hauling in my CTC. So I'll be able to take the KTM out for all the off roading and National Forests and the Vulcan out for nice cruises on paved roads with my wife. I enjoy motorcycles and camping, so this is perfect for me. :-)

I'll be installing the AC in a cabinet near the ceiling about mid ship. I am going with a 5,500 BTU and will have a remote control so I will not have to climb out of bed if I need to adjust it or shut it down. I want to get the AC in relatively soon so I can have it on while I am working inside.. but because it needs to be in the cabinet... it may be a while as cabinets will go in relatively late in the process.

Re: 7'*18' V-Nose Cargo Trailer Toy Hauler Conversion

PostPosted: Mon Mar 14, 2016 9:10 am
by Rainier70
I liked what you did with your previous build, so I am really looking forward to seeing this new one develop. Keep up the good work.

Re: 7'*18' V-Nose Cargo Trailer Toy Hauler Conversion

PostPosted: Mon Mar 14, 2016 3:50 pm
by aggie79
Rainier70 wrote:I liked what you did with your previous build, so I am really looking forward to seeing this new one develop. Keep up the good work.


I did too! :thumbsup:

Started The Insulation Process

PostPosted: Thu Mar 17, 2016 6:06 pm
by flboy
I started taking down the paneling after work today so I can start insulation and wiring this weekend after I bolt up the grey and black water tanks. I also received my TV Antenna, electrical transfer switch, the Water Inlet, and DC Fuse Terminal. I had received my Toilet on Tuesday, but they sent an almond color and I ordered white. They replacement will be here Friday. Amazon is so easy to work with!

I'll get some pics of the insulation going in. I'll need to caulk along the bottom rail and paint a few spot welds that were not painted. They will eventually start to rust inside the walls due to moisture condensation. A few $3.00 cans of Rustoleum Paint is worth its weight in gold for preventing issues later.

Image

Re: 7'*18' V-Nose Cargo Trailer Toy Hauler Conversion

PostPosted: Fri Mar 18, 2016 7:56 pm
by flboy
Amazon and Home Depot made deliveries today. :thumbsup:

I received the correct color toilet today along with my Camco vent cover, Omnidirectional TV Antenna (rcvd. yesterday), and the rubber flooring for the back 8 feet (garage area) of the trailer. The roll is 14*8 so I will do about 6' of the ramp in this also and then put some diamond plate trim on the bottom ~2 ft.


I'll be posting up some pics of the insulation and the holding tank installations as I do them this weekend. :)

Image

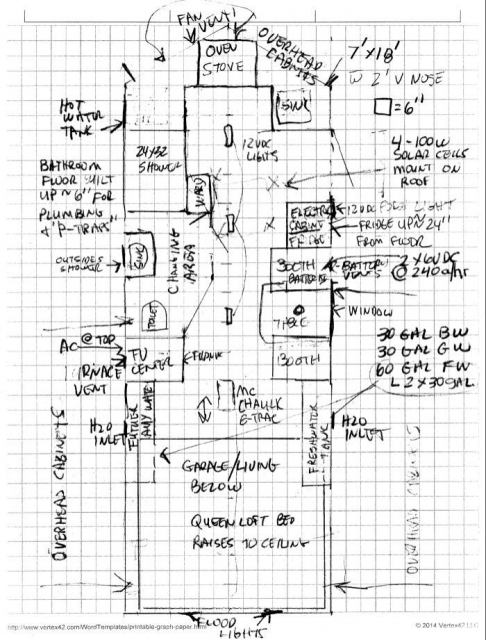
Re: 7'*18' V-Nose Cargo Trailer Floorplan

PostPosted: Fri Mar 18, 2016 9:00 pm
by flboy
First.. let m apologize for not having a 3D and CAD layout, but 1) I don't have Engineering Drawings for the Trailer with Beam Locations and etc., also, 2) I do not have all the appliance with exact measurements and etc. or CAD Object Library. This is obviously a very rough pencil sketch that gives the basic layout. Exact dimensions and locations will depend on the precise fit of the holding tanks and other "landmarks". The Toilet has to drop right into the BW tank. I have more flexibility with the shower in relation to the GW Tanks since I am building up the floor for the trap and etc..

Also, there are several key items that will have to be set like the HW Tank, AC Mount Location, Windows placements and etc. I will then build/frame around them as needed to make things fit. Up front in the kitchen may vary where the appliances go. I need to fit a 3 burner stove and oven along with the sink. I may move the sink to the other side for ease of plumbing. The Microwave will mount in overhead cabinetry. The Fridge will be mounted up off the floor a few feet with all the electrics in the cabinet below and some above.

We'll see how it all fits, that will be the fun part. Following is a very rough idea. You have to picture 7.5" ceilings and 24' High by 18" Deep cabinets along much of the roof-line ( except where loft bed will raise to the ceiling) with recessed and LED lighting. Cabinetry will be white with the brushed metal hardware and I will trim with a diamond plating. They actually sell a cheap chrome looking PVC trim.. not too expensive either. :thumbsup:

The kitchen counter tops will be either Corian or Formica.. Depends how the budget holds out. I will be putting a very contemporary multi-color tile back splash (gray, black, chrome) in the kitchen area and have a darker wood grain laminate flooring throughout except the 8" garage area where I will have a rubber floor with a raised diamond plate pattern. I may tile the bathroom floor.... haven't decided. I know laminates don't like too much water..
Image

Started onLayout

PostPosted: Sat Mar 19, 2016 4:15 pm
by flboy
I worked on the tanks some today and held off from mounting them. I need to drill holes for the fluid level sensors and install them before I mount. I am having an issue with doing it on the long sides due to the trailer frame, so I need to do this on the short ends, but the end are not aligned flush (graduated). Hopefully that will still work as intended. I don't have any other options.

I also did some taping off of the floor plan since I have the Black water Tank in its position. You can see where everything up front will go. I am having trouble with the Fridge since it is 22" wide and 22" deep. I don't want to take any more hall space coming in the front door, so it will go directly behind the toilet. It will be mounted off the floor with cabinets and the furnace below. In that same spot, I'll mount the Air conditioner at the roof line. That little triangle nook by the shower stall will have a cabinet door on the bottom and shelving for towels and etc.. I made the bathroom jet out some to give room in there to get dress and actually bend over. Also, the toilet will be at the angle see so knees are not up against the vanity cabinet.


Image

Image

Image