Page 20 of 21
Re: Don & Karen's 6 x 12 Deep Vee Front CT

Posted:
Sat May 14, 2016 9:12 amby MtnDon
Good question Hank.
Two years ago a friend converted a "skoolie" (school bus) to an RV. He used the Sikaflex 252 to glue his panel mounts to the painted roof. He tested beforehand to ensure the 252 had no bad effect on the paint. He used 2" angle aluminum stock . That was 2 years, thousands of miles with 70 mph speeds plus winds and all 10 panels are still well affixed to his roof.
So I tried scrapping the roof sealant I had applied. It was well adhered, but could be scrapped with a good paint scrapper. Therefore I did a 50/50. I marked the positions of the mounts and scrapped away strips of paint. Then laid the Sikaflex over painted and non painted surface. The mounts were screwed to the panels and the whole thing pressed into place. First the forward panel, then the rear one.
The charge controller behaved as it should yesterday. After being in absorb for the preset 2 hour time it switched to float at 3:30 PM. I then tried a manual equalization charge. That is another 2 hour timed event. At the end of the EQ it went back into float and stayed there until the sun got low enough to quit. I then started the fridge and let it run overnight. This morning when I got up (7 AM) the charge controller was already awake and in bulk. No direct sun at that time so it was only 0.95 amp. But it works.
Re: Don & Karen's 6 x 12 Deep Vee Front CT
Posted:
Sat May 14, 2016 8:27 pmby hankaye
MtnDon, Howdy;
Thanks for the answer. Bet you are what is also referred to as a "Safety Man" ie. one who wears both a belt and suspenders.
The "skoolie" was perhaps sprayed at the manufacturer's and the finish 'baked on'. When I was painting aircraft for the Navy we were
taught that the bond was only as good as the surface you were bonding to. So, most of the stuff we 'stuck on' various aircraft was
applied to a very well prepared surface. Our Corrosion shop would take everything off to the bare skin and have a water-brake-free
surface then alodine was applied as a cold anodizer, then a layer of sealant was sprayed on then primer followed by a top coat. If we
had to bond something then we would do so atop the alodine, seal the edge then go about the rest as described above. One F-14 per
night ... every night when at sea.
hank
Re: Don & Karen's 6 x 12 Deep Vee Front CT
Posted:
Sun May 15, 2016 11:06 amby Gettin Started
MtnDon wrote:Good question Hank.
Two years ago a friend converted a "skoolie" (school bus) to an RV. He used the Sikaflex 252 to glue his panel mounts to the painted roof. He tested beforehand to ensure the 252 had no bad effect on the paint. He used 2" angle aluminum stock . That was 2 years, thousands of miles with 70 mph speeds plus winds and all 10 panels are still well affixed to his roof.
So I tried scrapping the roof sealant I had applied. It was well adhered, but could be scrapped with a good paint scrapper. Therefore I did a 50/50. I marked the positions of the mounts and scrapped away strips of paint. Then laid the Sikaflex over painted and non painted surface. The mounts were screwed to the panels and the whole thing pressed into place. First the forward panel, then the rear one.
The charge controller behaved as it should yesterday. After being in absorb for the preset 2 hour time it switched to float at 3:30 PM. I then tried a manual equalization charge. That is another 2 hour timed event. At the end of the EQ it went back into float and stayed there until the sun got low enough to quit. I then started the fridge and let it run overnight. This morning when I got up (7 AM) the charge controller was already awake and in bulk. No direct sun at that time so it was only 0.95 amp. But it works.
Hey Don, thanks for taking up my entire weekend with your house thread on countryplans.com. That is what I want to do when I retire in @ 6-7 years. Have a lot of work to do convincing the wife. Thanks for all the great documentation on your experience.
Re: Don & Karen's 6 x 12 Deep Vee Front CT
Posted:
Sun May 15, 2016 11:50 amby bdosborn
Don,
Keep us updated on the Midnite Brat. It looks like a great option for exterior installations. That wasn't available when I bought my controllers but it looks interesting.
Bruce
Re: Don & Karen's 6 x 12 Deep Vee Front CT
Posted:
Sun May 15, 2016 1:50 pmby MtnDon
bdosborn wrote:Don,
Keep us updated on the Midnite Brat. It looks like a great option for exterior installations. That wasn't available when I bought my controllers but it looks interesting.
Bruce
Will do Bruce. Yes, I like the fact that the housing is weather sealed quite well. I know someone who has one working in Nicaragua. On an exterior wall.
Re: Don & Karen's 6 x 12 Deep Vee Front CT
Posted:
Sun May 15, 2016 1:58 pmby lrrowe
MtnDon wrote:bdosborn wrote:Don,
Keep us updated on the Midnite Brat. It looks like a great option for exterior installations. That wasn't available when I bought my controllers but it looks interesting.
Bruce
Will do Bruce. Yes, I like the fact that the housing is weather sealed quite well. I know someone who has one working in Nicaragua. On an exterior wall.
MtnDon, this is the one you recommended to me earlier. Why would you want it outside versus inside close to the battery?
Re: Don & Karen's 6 x 12 Deep Vee Front CT
Posted:
Sun May 15, 2016 2:16 pmby MtnDon
Inside or outside my wire run would be about the same. As it is installed the output from the Brat runs down and through the lower rear wall corner, under the floor. Then up inside the trailer and to the batteries. If the Brat was inside I could drop the wires directly through the roof and shorten up the wire length. However I decided to not go through the roof. I figured that part of the reason I was using the glue on mounts was to avoid roof penetrations so I didn't want any at all.
Keeping the wires short would mean having the Brat inside to the trailer rear. To access the Brat that would mean crawling on the bed or having to open a rear door. A trailer with a different interior layout could differ on that. Also I didn't want the light from the LED's inside as a distraction. They don't illuminate at night so that is not a big deal. A minor consideration is that an exterior mount keeps whatever heat the Brat may produce outside.
FWIW I used tamper resistant fasteners to mount the Brat. I now have tamper resistant screws to secure the cover too. I think I'll do a paint job next week and leave a clear strip across the top to see the LED indicators. The paint will slightly disguise or make the unit less obvious. A truly determined thief will steal the trailer.
Re: Don & Karen's 6 x 12 Deep Vee Front CT
Posted:
Sun May 15, 2016 2:29 pmby hankaye
MtnDon, Howdy;
When you say "A truly determined thief will steal the trailer." they may also just need one of these
http://www.harborfreight.com/100-pc-sec ... 68457.htmlhank
Re: Don & Karen's 6 x 12 Deep Vee Front CT
Posted:
Sun May 15, 2016 3:29 pmby MtnDon
Exactly. Nothing is fool-proof. But I still prefer to have the Brat outside.
Re: Don & Karen's 6 x 12 Deep Vee Front CT
Posted:
Sun May 15, 2016 4:24 pmby lrrowe
I understand, especially since I recall your wiring being in the back part of the trailer. Since my batteries and such are 1/2 of the length forward, I probably cannot dodge the longer wire length if I too,want "no" holes in the top. So I guess I need heavier gauge wire.
Re: Don & Karen's 6 x 12 Deep Vee Front CT
Posted:
Sun May 15, 2016 6:29 pmby wtcreaux
Bob,
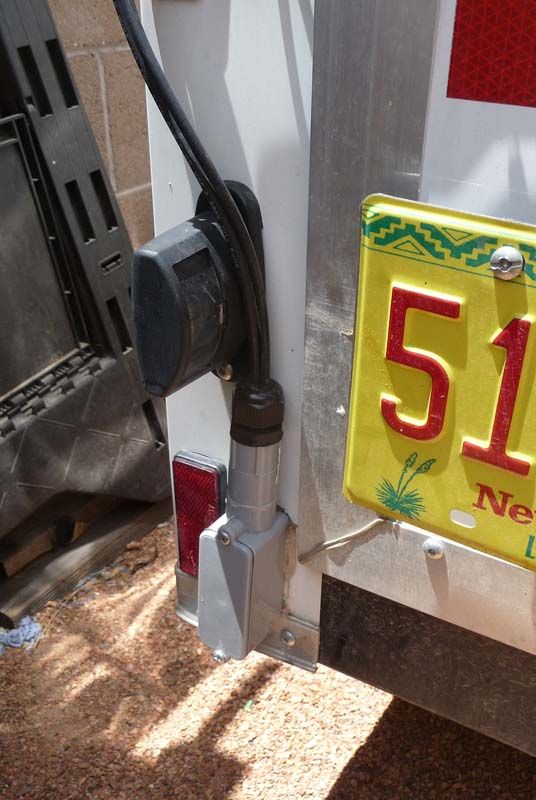
I ran mine down the side and then up from underneath.......
Re: Don & Karen's 6 x 12 Deep Vee Front CT
Posted:
Sun May 15, 2016 6:53 pmby lrrowe
That is an idea. Going to try and keep the sides clean, but this one would work. What is the stain on the side coming from?
Re: Don & Karen's 6 x 12 Deep Vee Front CT
Posted:
Sun May 15, 2016 8:27 pmby Rainier70
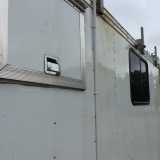
Bob, I didn't want to put a hole in my roof eithter, so I ran my solar wires through the side of my air vent. Then under its trim ring and the roof panels until I got over to the side and could run it through that space to my controller.
Since the wires go up to enter the vent hole water can't travel along the wires to come in. I did put a sleeve over the wires where they go through the hole, and then I caulked it well.
Re: Don & Karen's 6 x 12 Deep Vee Front CT
Posted:
Sun May 15, 2016 8:38 pmby MtnDon
The 10 gauge USE-2 wire I used is a shade over 5 mm in diameter (almost a 1/4 inch) so I would think that could be difficult to sneak past trim rings.
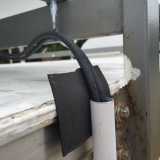
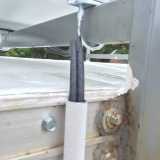
Here's a shot of my wires when they pass through the lower wall to under the floor. The black fitting has a rubber sleeve that gets compressed when the nut is tightened. In case it is not 100% water proof there is a weep hole at the bottom.
Re: Don & Karen's 6 x 12 Deep Vee Front CT
Posted:
Sun May 15, 2016 10:00 pmby Rainier70
Good point. You have almost 3 times the power of my small panel and the wires to prove it!

Still there is a surprising amount of room between the inner trim on my air vent and the outer cover...better than a quarter inch on all sides. Especially if you come in close to a corner then run the wire diagonally down along the inside to go under the panel. That way you don't have to make any sharp turns with the wires. Might work for some.
I like your weep hole for any moisture that might get in.

