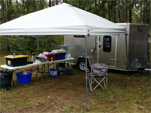
So it's been about a year since I started this project and finally camped in it for the first time. Worked out well, and found a few issues I'll need to address. As far as useful updates for other builders go:
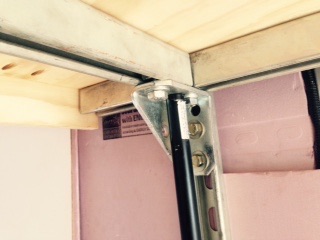
Bed: used 4 50 lb gas struts that have an 18" length of throw to extend it. I had used the thin electrical uninstructed vice the 1.5" standard size which caused binding when one end was higher than the other. I think if I had used the full sized struts with their trolley wheels I wouldn't have had and issue. I solved this by 'floating' the bed off the frame and only have it physically connected by the struts, but resting on movable brackets attached to the uni strut.
- image.jpg (19.76 KiB) Viewed 4504 times
note this pick was pre-final solution and it would bind where the angle iron nuts attached to the wall.
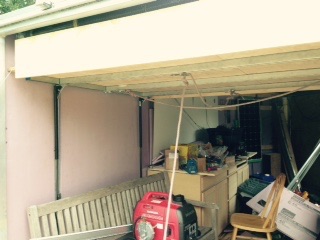
After sleeping I think I may need to move from a vertical gas strut design to a angled setup to give me more room, I felt like 3 more inches would make all the difference. *update*Decided to go out and see if I could make it happen and shock surprise my subconscious strategically placed my original cross brace to allow the struts to line up perfectly on an angle. Old...
- image.jpg (24.69 KiB) Viewed 4504 times
; new...
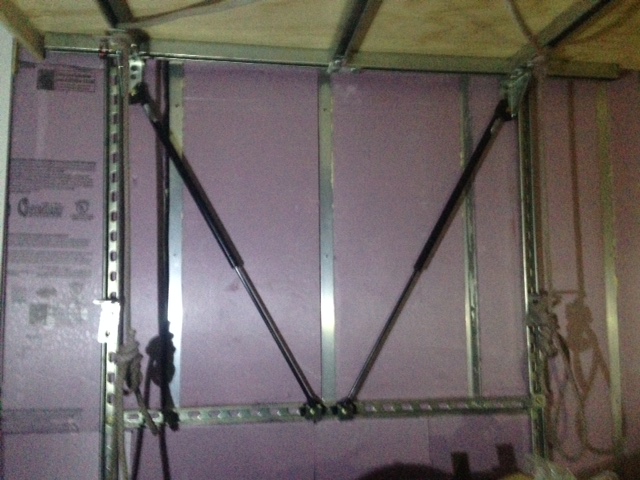
- bed
- IMG_0037.JPG (120.17 KiB) Viewed 4482 times
You can see the bracket got moved to the inside of the vertical 'rails' which allows them to float, but prevents fore/aft movement by rubbing on the sides of the rails. I'll slide the 2nd attached bracket up to the bottom side of the bed in the desired position to secure in place. I haven't used the bed enough with the struts at an angle to confirm that it won't cause a secondary problem, but I doubt it will. It does however give me close to the 3' of total throw of the struts, which is significantly more than I'll need in the end, and solves any concerns from my first camping outing. It does however prevent a perfectly 'clean' wall in that spot, and eliminates one layer of insulation, but I think that will be an ok tradeoff in the end.
AC: as previously noted I went with a 9k minisplit. I have the interior side mounted and had the exterior in place but pulled it to reinforce the brackets. Even without it fully operational I'd recommend going this route over the rooftop if you have space on the nose to fit it in your design.
Weight. I weighed it and tip the scales at ~3600 lbs wih tools and most things in it. I figure after I'm done with the remaining items I'll end up around 3800-4k. I had hoped to be less than 3.5, but elected on thicker insulation, and heavier materials for the bed, cabinet etc. Towing with the sequoia yielded 10 mpg over 1000 miles. My older diesel jeep had averaged ~18 mpg fully loaded with it. Factory the trailer weighed just shy of 2k for reference.
I've bought the counter, and sink which were the final layout obstacles (coupled with the shower) and now have the end in sight, albeit far off. Once I get the counter in and it cleaned up I'll try to upload a few photos. Which should hopefully be this week if all goes well. I'm using ikea butcher block for the counter and their dual bowl sink with drainer mounted as an inset. I'll cover up the drying drain and 2nd large bowl with the cutout from th butcher block to maximize counter space.
I had planned on using an old piece of 6" pipe as a grey water tank turns it since it's well casing not dwv pipe is doesn't marry up easily with box store fittings, so I reconsidered buying an actual grey tank. After much internal angst I've elected to make the pipe work, just at a smaller volume than originally intended (~1.5 gal/lf). I had planned a u shape with 2 90 bends, but after adding up the costs I'll be sticking with a single straight pipe which should yield about 7 gals of storage, equivelant to 1 'cube' of my freshwater portable tanks. Should still work out for most needs.
Anyway thanks all for the inspiration, even if it's sucked unintended time and money (I was oringally thinking a hammock sleeping bag and camp chair!) it will no doubt be worth it.