CTH reset - High Country Cargo Toy Hauler Conversion

Converting Cargo Trailers into TTTs

Postby Itsdoable » Mon Apr 04, 2011 1:11 pm

That's what the - and + lights are for on my probe tester! I never read directions :(

All 3 fixtures tested OK +


More info to confuse everyone.

With battery-to-ground hooked up and the fixtures touching the trailer (all lights on), the meter shows no amp draw.

With battery-to-ground hooked up and the fixtures NOT touching the trailer (all lights working correctly), the meter DOES shows a amp draw (~1.5amp per light), and is the same if the battery-to-ground is unhooked.
Last edited by Itsdoable on Mon Apr 04, 2011 4:37 pm, edited 3 times in total.
User avatar
Itsdoable
Teardrop Builder
 
Posts: 41
Joined: Wed Feb 09, 2011 7:36 pm
Location: Colorado

Postby Jo » Mon Apr 04, 2011 1:17 pm

Itsdoable wrote:That's what the - and + lights are for on my probe tester!

All 3 fixtures tested +


Your probe tester is a test light? or a voltmeter with Red and Black leads?

When you're saying that the fixtures are "+" you checked it between the "+" wire of the fixtures and the ground?

Or between the back of the fixtures and the ground?
User avatar
Jo
Teardrop Advisor
 
Posts: 55
Joined: Sat Oct 16, 2010 10:29 am

Postby Itsdoable » Mon Apr 04, 2011 1:29 pm

My probe tester has + / - lights. I tested it on the 12V battery. If I touch the + probe and - probe correctly to the battery terminals, it lights +. If I touch the + to - and - to +, it shows -.

That said, I tested the fixture by touching the + probe to the black wire (inside of bulb socket), and the - probe to the rivet (that white wire is attached to). All 3 tested +, which is OK.

As a double check, I switched probes (- to bulb socket, + to rivet) and it lighted the -.

So current is flowing in correct direction regardless if battery is grounded or not.

See edited comment in above post about amp draw thru meter.
User avatar
Itsdoable
Teardrop Builder
 
Posts: 41
Joined: Wed Feb 09, 2011 7:36 pm
Location: Colorado
Top

Postby Jo » Mon Apr 04, 2011 1:35 pm

Keep it simple
Image


I know that you installed a Turnigy wattmeter between the battery and the Fuse box. You have to be sure that it's not twisted there too.

TURNIGY
The Red wire of the Load side (right) go to the bottom of the fuse box. (Red)
The Black wire of the Load side (right) go to the top of the fuse box. (White)

The red and black wires of the Source side goes to the + and - of the battery.

Easy checkpoint, remove the fusebox cover and check between the Red and the white wire. Which one is positive?
User avatar
Jo
Teardrop Advisor
 
Posts: 55
Joined: Sat Oct 16, 2010 10:29 am
Top

Postby Jo » Mon Apr 04, 2011 1:42 pm

Itsdoable wrote:My probe tester has + / - lights. I tested it on the 12V battery. If I touch the + probe and - probe correctly to the battery terminals, it lights +. If I touch the + to - and - to +, it shows -.

That said, I tested the fixture by touching the + probe to the black wire (inside of bulb socket), and the - probe to the rivet (that white wire is attached to). All 3 tested +, which is OK.

As a double check, I switched probes (- to bulb socket, + to rivet) and it lighted the -.

So current is flowing in correct direction regardless if battery is grounded or not.

See edited comment in above post about amp draw thru meter.


Sorry, I read that after my last post...

Look like your fixtures are wired correctly.

That's really strange can you do the same test with battery and fixtures grounded to chassis and switches OFF?

We have to find out were the power is coming from when the switches are OFF
User avatar
Jo
Teardrop Advisor
 
Posts: 55
Joined: Sat Oct 16, 2010 10:29 am
Top

Postby Itsdoable » Mon Apr 04, 2011 1:59 pm

I think I got it ...

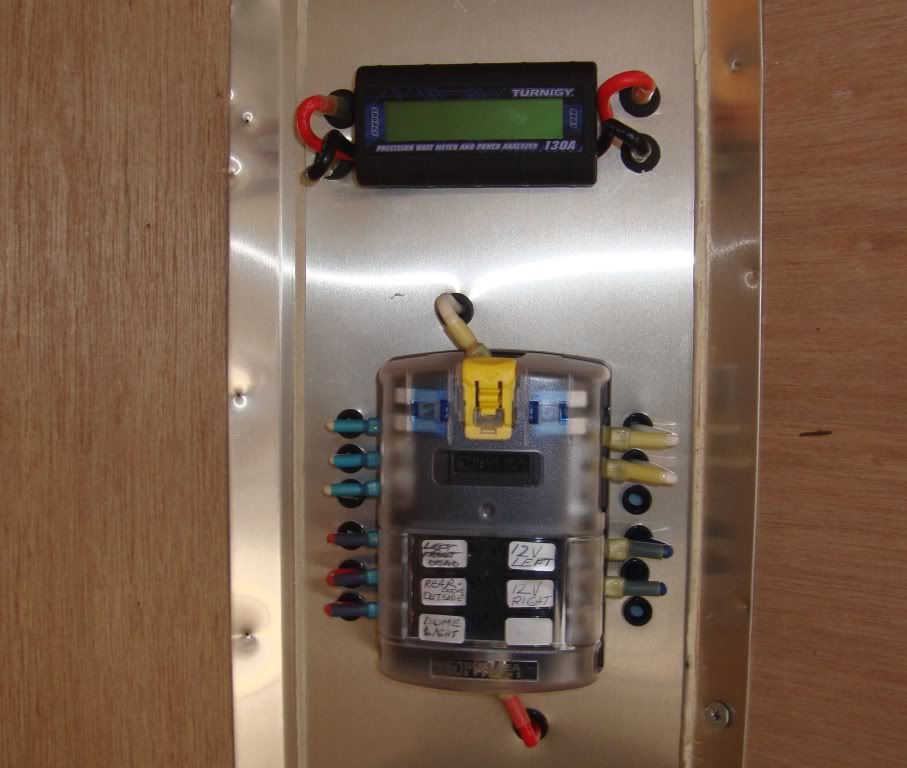
NEW INFO, just checked ... for some reason I wired the ground (-) wires thru the light switches on this circuit only.

So, if there is NO battery-to-chassis ground. Turn switch on, light comes on. Flow thru ground wire.

When battery on/off switch is on, there is always a live hot wire to all 3 fixtures regardless of light switch position (which are on ground wire). Just needs a closed ground to battery for lights to turn on. When there is a battery-to-chassis ground, the lights turn on because ground side of the circuit is closed via fixture-to-chassis / chassis-to-battery connection.

Testing bears this out...

With battery-to-chassis ground connected,

1) touch the + probe to the fixtures hot wire(black) and - probe to chassis (with the fixture not touching the trailer), you get a + light. Connection made via chassis.

2) touch the + probe to the fixtures hot wire (black) and - probe to the rivet (white) ground wire (with the fixture not touching the trailer) and no test light. No closed connection.

3) touch the + probe to the fixtures hot wire (black) and - probe to the rivet (white) ground wire (with the fixture touching the trailer), you get a + light. Connection made via chassis.

With NO battery-to-chassis ground, probes work as expected .. flowing through ground wire, not the chassis, switches work.

Am I right this time ???

Moderator is going to kill me for all these posts and pictures .. :x
User avatar
Itsdoable
Teardrop Builder
 
Posts: 41
Joined: Wed Feb 09, 2011 7:36 pm
Location: Colorado
Top

Postby Jo » Mon Apr 04, 2011 2:31 pm

for some reason I wired the ground (-) wires thru the light switches on this circuit only.

That is the problem.

Is it easy to wired the (+) wires thru the switches and not the (-)?

If you isolate the fixtures from the chassis it will work, but that's not the CLEAN way to do it. If your isolation fail you will drain your battery.

Hint:
1- You can use the (-) wires (The one thru the switches) and plug it to the (+) of the fuse box and to the black wire of the fixtures (+).
2- Scrap the actual (+) wire and ground properly your fixtures to the chassis.
User avatar
Jo
Teardrop Advisor
 
Posts: 55
Joined: Sat Oct 16, 2010 10:29 am
Top

Postby Itsdoable » Mon Apr 04, 2011 3:44 pm

I can remove a few panels to get at the wires I need to. If it was behind the fuse box/meter I'd have to rip out the whole front cabinetry.

Oui .. for a while there I though I was going to have to name it the 'Tesla Coil'. But side business at rock concerts would have been awesome! :shock:

Double checked Meter to Fuse Box, they are wired correctly.

Since I'm leaving in a few days, I've pulled the fuse and will deal with it when I get back.

Bed pics .. they are a-coming. :thumbsup:
User avatar
Itsdoable
Teardrop Builder
 
Posts: 41
Joined: Wed Feb 09, 2011 7:36 pm
Location: Colorado
Top

Postby Jo » Mon Apr 04, 2011 3:47 pm

Problem solve!

Have a good one! :thumbsup:
User avatar
Jo
Teardrop Advisor
 
Posts: 55
Joined: Sat Oct 16, 2010 10:29 am
Top

Postby Itsdoable » Mon Apr 04, 2011 4:14 pm

Bed stuff ..

Here's the full size (54x75) bed folded against the wall. Note the rachet strap across the frame. My dirtbike does just fit in front of the folded down bed. Nice for when you get into camp late on a Friday evening after work and don't want to unpack and lockup everything to a tree.
Image

Close up of one of the corners. Small hook to keep strap in place, reinforced corner brackets, and folded up legs. The bungy across the mattress is so I can lift and hold it seprately from the frame.
Image

Bed lowered. The 1x8 pine board against the wall was just the right width for the $175 mattress I got at a local store. Main bed frame is a 1/2" premium plywood with 1x3 framing. Construction adhesive and a few drywall screws did the trick. As an afterthought, doing it again I would have used interior house door hinges instead of the ones I did. That way, I could just remove the hinge pins to take the frame out for when I load the snowmobile in winter.
Image

Heated 12V mattress pad for my old bones. Used this in my tent last year and never had it above #2 setting. Wrap it around a dutch oven on #10 setting and who needs a gas oven! :lol:
Image

Under bed contruction. 1in x 6ft aluminum angle is not cheap!
3 of the 5 legs are situated above floor frame members for strength. Can anyone say "storage project"?
Image

Here's a pic of the Wave heater I put in, the window covering, and clothes hanger under the cabinet. For now, I'm just going to fish a flexible gas hose from a tank in thru the window. Next year a RV heater is gpoing in that corner (wire already hidden behind the wall).
Image
User avatar
Itsdoable
Teardrop Builder
 
Posts: 41
Joined: Wed Feb 09, 2011 7:36 pm
Location: Colorado
Top

Postby Itsdoable » Mon Apr 04, 2011 4:43 pm

Thanks for all the electrical help today.

When friends come over to check on the build progress, they inevitably ask "where'd you get 'that' idea and learn how to do it". Most of it comes from you folks!
User avatar
Itsdoable
Teardrop Builder
 
Posts: 41
Joined: Wed Feb 09, 2011 7:36 pm
Location: Colorado
Top

Postby pete42 » Mon Apr 04, 2011 4:51 pm

Question remains with everything in it's proper place and battery ground unhooked to chassis do all the lights still come on when you turn on any switch?

I wonder if when you plug in your matteress heater the lights will come on?


nice build you will surely enjoy camping
Last edited by pete42 on Tue Apr 05, 2011 6:57 am, edited 1 time in total.
User avatar
pete42
Super Lifetime Member
 
Posts: 2203
Images: 13
Joined: Sat Nov 07, 2009 11:52 am
Location: SouthWest Ohio
Top

Postby bdosborn » Mon Apr 04, 2011 6:52 pm

One thing I learned with the clothes hanger in our trailer is that the hooks bounce off as you go down the road. Wrap a rubber band around the hook and it keeps them on.

Bruce
2009 6.5'X11' TTT - Boxcar
All it takes is a speck of faith and a few kilowatts of sweat and grace.
Image
Boxcar Build
aVANger Build
User avatar
bdosborn
Donating Member
 
Posts: 5512
Images: 778
Joined: Wed May 05, 2004 11:10 pm
Location: CO, Littleton
Top

Postby Jo » Tue Apr 05, 2011 5:35 am

Nicely done bed, thanks for pics and details!
User avatar
Jo
Teardrop Advisor
 
Posts: 55
Joined: Sat Oct 16, 2010 10:29 am
Top

First trip

Postby Itsdoable » Fri Apr 15, 2011 9:28 pm

First trip to Moab and the trailer worked out perfectly. Need a table and the vanity and I'll be all set.

Image

Image

Image

Image
User avatar
Itsdoable
Teardrop Builder
 
Posts: 41
Joined: Wed Feb 09, 2011 7:36 pm
Location: Colorado
Top

PreviousNext

Return to Cargo Trailer Conversions

Who is online

Users browsing this forum: No registered users and 16 guests