7'X24' Vnose Toy Hauler

Converting Cargo Trailers into TTTs

Re: 7'X24' Vnose Toy Hauler

Postby 8ball_99 » Sun May 06, 2012 9:46 pm

Thanks guys! Yeah I'll admit its probably a touch over built. Its not to bad though. The top frame is 1.5"x1" 16 gauge on 3 sides and 1x1 on the front. I wanted the top frame to be pretty stiff since I was cutting out one of the floor joists. The rest of the frame is 1.5" 1/8" Angle iron. The sheet metal is just 16 gauge. Results is a pretty strong box but its lighter then if I would have just made the entire box out of thicker steel plate. Also when cutting holes in it for vents, wires, ect is much easier since I'm just drilling through sheet metal. Can't wait for the next camping trip. The box will work great for camping chairs, drop cords and what ever else fits in there. I plan on sticking a small box on the tongue of the trailer where the battery box use to be for small odd and ends. Even with that the tongue should be much lighter with out that 60lb battery hanging out there on the end.

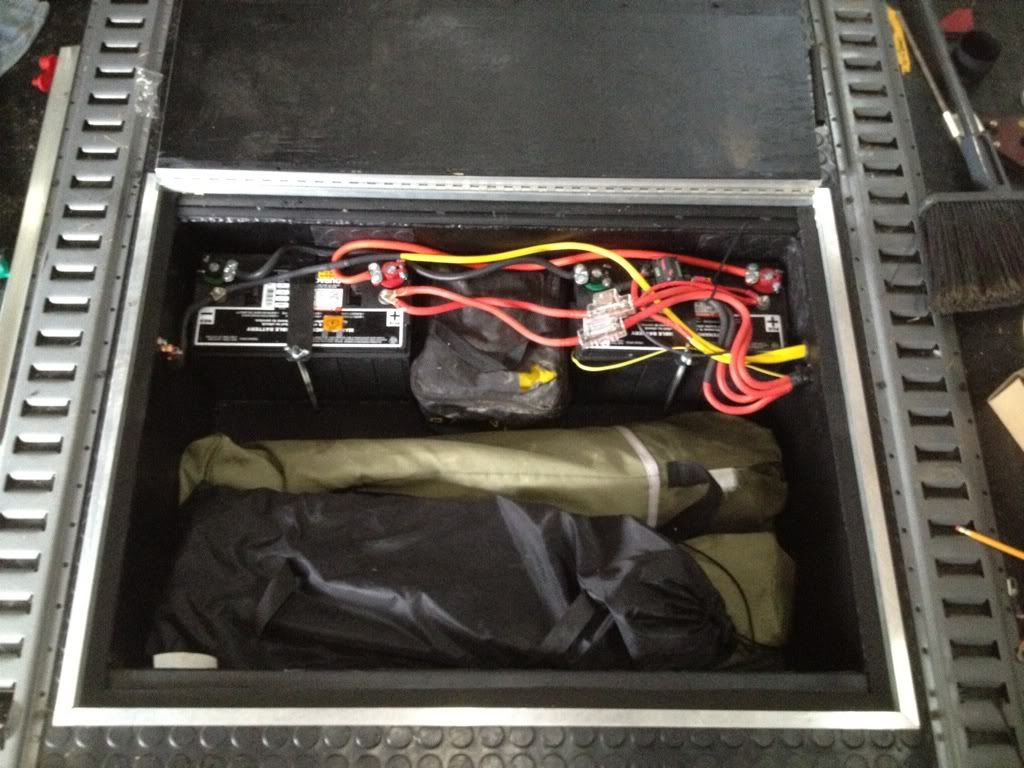
I do have a question for the electric gurus out there.. I'll probably post over in the electric forum to since might get a little more traffic. Now that I have the two batteries I moved the charge wire from the converter back to the cargo box. Now my plan was to connect the 8 gauge wire from the converter to one of the batteries and then run a short piece of 4awg from that battery to the other battery to connect them. Then the plan was to run connect the solar charger to the other battery. Then connect the inverter to which ever battery. Both the inverter and the solar charger is going to be mounted between the batteries right there in the box so your talking 15-24" of wire to run to one battery..

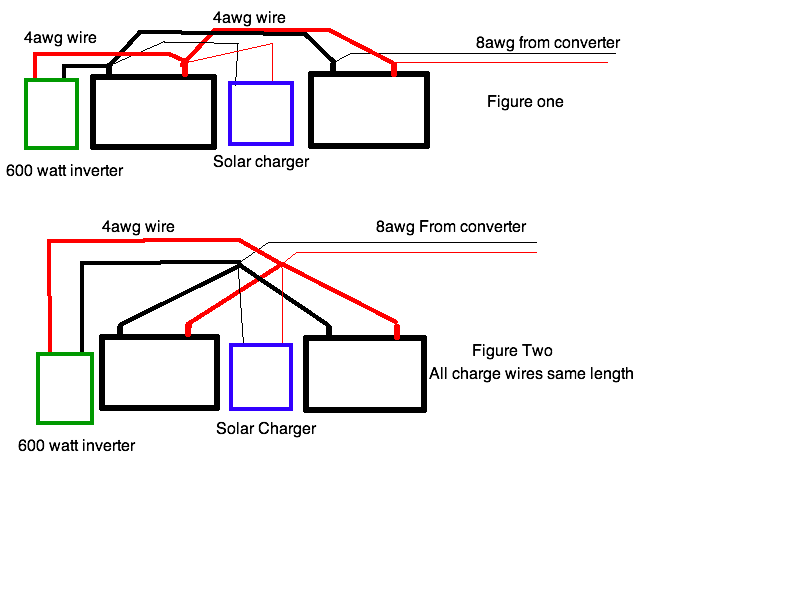
Now after reading up on chargers, multiple battery setups ect. It seems its recommended to have the exact same length of wire between the charger and the batteries. So for me to do this with my setup I would need to have some kind of terminal where everything connects to. As in have say 30" 4awg wire running from each battery to this terminal then also have the wires from both the power converter and the solar charger connect to the same spot. And I guess probably connect the inverter to this spot also. Now this doesn't seem ideal to me because I would have a little more wire between the batteries and chargers. It also would add more connections to the setup. I can't see one battery having an extra 30" of wire between it and the charger causing that much of an issue. Even more so if I go with a large wire like 4 gauge. But who knows it might. I'm just a little unsure whats the best way to go about it. :?

Here is a picture to show what I mean.. Don't laugh it was a quick mac paint scribble
Image
8ball_99
500 Club
 
Posts: 623
Joined: Sun Mar 07, 2010 12:34 am

Re: 7'X24' Vnose Toy Hauler

Postby Partsman » Mon May 07, 2012 11:21 am

I don't think a couple feet of difference in length is going to matter especially when you are using 4 gauge wire.
Most of the equipment I deal with at work has multiple batterys and they are all basically wired like your top picture.
Partsman
Teardrop Advisor
 
Posts: 53
Images: 0
Joined: Thu Apr 05, 2012 4:17 pm

Re: 7'X24' Vnose Toy Hauler

Postby skin » Mon May 07, 2012 12:45 pm

I would go with the first one also. I would only worry about that if you were to run a much longer distance.I think it is refered to as conductive
Resistance.
skin
Teardrop Inspector
 
Posts: 19
Images: 14
Joined: Wed Sep 21, 2011 6:45 am
Location: wisconsin
Top

Re: 7'X24' Vnose Toy Hauler

Postby 8ball_99 » Mon May 07, 2012 3:11 pm

Both my solar charger and my inverter should be in today so now I atleast have all the pieces to the puzzle. So far I'm leaning to figure one just because its the easiest and cleanest setup. I have been reading up on it and it seems another method to even out the batteries besides using a bus bar for all the connections is to connect the load to the postive of one battery and the negitive of the other. The idea is what ever you pull or charge to the batteries goes through both evenly. Kind of makes since to me, but again this would be a pita to wire in my case. If the batteries were back to back It wouldn't matter so much. With them being side ways the terminals aren't super close to each other.. LoL I'm probably over thinking it and should just hook the stupid things up and be done with it.....
8ball_99
500 Club
 
Posts: 623
Joined: Sun Mar 07, 2010 12:34 am
Top

Re: 7'X24' Vnose Toy Hauler

Postby Mark519 » Mon May 07, 2012 5:27 pm

As you have noted, ideally with two 12v batteries in parallel you want to take positive off one battery and negative off the other battery so that the voltage at both batteries is identical. There are arrangements for bigger battery banks also that do not require bus bars, just clever routing. See http://www.smartgauge.co.uk/batt_con.html

I think the key point is that large charge or discharge currents can be a problem. In the article, the numbers and setup was a lot more extreme than yours. So you may be fine with Fig 1. If you are going to add more batteries in the future you may want to take that into consideration now.

A more important consideration is fusing, and you have probably already thought about it but it is always worth mentioning. In general each wire coming off the battery needs its own properly sized fuse - at the battery. If the solar charger and inverter are right next to the battery and have their own built in fuses you do have some protection. But ideally each segment of wire should be protected in case it pulls loose or shorts out somehow.
Mark519
Teardrop Master
 
Posts: 103
Joined: Mon Aug 08, 2011 1:07 pm
Location: North Georgia
Top

Re: 7'X24' Vnose Toy Hauler

Postby Engineer Guy » Mon May 07, 2012 6:44 pm

Many of us have read 'Handy Bob' Entries. He's a trip, but makes some germane points. And, he has plenty of Fans who swear by his results.

Check out his thoughts on Battery Charging, and on putting Controllers near the Batteries. FWIW...

Handy Bob's Solar
~Reality proceeds with or without your consensus~
User avatar
Engineer Guy
The 300 Club
 
Posts: 480
Images: 118
Joined: Wed Mar 17, 2010 5:19 pm
Location: W. CO
Top

Re: 7'X24' Vnose Toy Hauler

Postby 8ball_99 » Tue May 08, 2012 2:50 am

Engineer Guy wrote:Many of us have read 'Handy Bob' Entries. He's a trip, but makes some germane points. And, he has plenty of Fans who swear by his results.

Check out his thoughts on Battery Charging, and on putting Controllers near the Batteries. FWIW...

Handy Bob's Solar


I have read a lot of his posts over on other forums. I have not read his entire sight yet though. I plan to do so before I wire up the solar. I have read his thoughts on having the charge controller and inverter mounted in the same compartment as the batteries. Mind you I read this after I had already built my cargo box and mounted the batteries in it. I understand the batteries vent hydrogen gas during charging and had planned on cutting vents up high in the box on both sides above the batteries because of this. I probably should have mounted the batteries in some of those sealed battery boxes with vents that people use when placing the battery inside cabinets and what not. As of now I have a feeling the inverter and solar charger will go in the box with the batteries. The compartment is decent sized and will be well vented. I realize this might not be Ideal but given the space I have in the trailer thats sorta of what I have to work with. If I move the inverter and charge controller under the cabinets which is already cramped for space. I would be adding about 8 foot of wire between them and the batteries. Not a huge deal I just figured them being closer to the batteries would be better then moving them that far away. Its also cheaper and easier on me having them close since large wire is needed to make the connections. The only other option would be to install them under the trailers floor out side of the storage box inside of some type of enclosure. This would expose them both to the elements a little more and would make access to either much harder for me. Devil is always in the details I guess..
8ball_99
500 Club
 
Posts: 623
Joined: Sun Mar 07, 2010 12:34 am
Top

Re: 7'X24' Vnose Toy Hauler

Postby 8ball_99 » Thu May 10, 2012 12:33 pm

Alright, New plan. I've read some more on handy bobs sight as well as on a few other forums about solar, running inverters, voltage drop, ect.. Also after poking around in the trailer this afternoon I've now mounted the solar charger and the inverter in the cabinet under the power converter. Once I really got to looking in there and had the two pieces of equipment in my hands I was able to find pretty decent spots for them and was even able to secure both of them to the metal framing up off the floor. This is bitter sweet. Now I do not have to worry about them being in the same compartment with the batteries as far as corrosion goes from the fumes. I also don't have to worry about water getting in the compartment when I clean the trailer or park wet machines in the trailer. The bitter part is now both pieces will have about an 8-10 foot run of cable from the batteries. So I ended up running 4 gauge wire to both the inverter and the solar charger. I used 2 gauge to connect the two batteries together. I connected everything a little different then the drawings. But its very close to the first drawing. Only difference I made all the connections to both batteries.. As in I used the ground from one battery and the positive from the other for each wire.. Have not got the solar up yet..
8ball_99
500 Club
 
Posts: 623
Joined: Sun Mar 07, 2010 12:34 am
Top

Re: 7'X24' Vnose Toy Hauler

Postby 8ball_99 » Mon May 14, 2012 8:53 am

Got most of my new add ons in now. The hatch is all done, Both batteries are in and wired. I got my 600 watt True sine wave inverter in as well as a remote power switch for it. Its hardwired into one circuit with a transfer switch. So its very simple to use.. No moving plugs around or flipping breakers on and off.. Just push the button and the inverter comes on and powers what ever is plugged into that circuit. Again main reason for getting it was to power the TV and to power some of the various chargers we have that are only 110v AC. I almost wish I would have went ahead and gotten the 1000 Watt one so we could run the microwave for a min here and there with out needing to run the generator. But that inverter was almost twice the price and from what I've read pulling that much power off of just two batteries even for a short time isn't a great idea. I have the solar charger wired and installed. I also have wires ran from a junction box on the roof down to the charger. The only thing I like is getting the panels mounted on the roof. I'm waiting because I ordered 2 more 80 watt panels. They should be here in the next few days. Plan on installing all 4 at the same time. I was going to just mount the two I have and see how it goes. But the more I think about the numbers I don't think two would do what I wanted. Besides with the way I plan on mounting them it will be easier to mount all of them at the same time vs trying to add the other two later.
Inverter mounted under the cabinet
Image
Inverter power switch
Image
Solar charger with the cover off,
Image
Hatch with the two batteries all wired up. And some camping chairs, fold out grill table and my leveling blocks. With all that there is still room for more in the box!
Image
Hatch closed
Image
8ball_99
500 Club
 
Posts: 623
Joined: Sun Mar 07, 2010 12:34 am
Top

Re: 7'X24' Vnose Toy Hauler

Postby Gadget Man » Mon May 14, 2012 7:02 pm

The trap door storage area is awesome. :worship:
I built one in my first tiny trailer, with two doors I hinged it in the center, so you could lift up half the lid from either side doorway.
I'm going to start measuring my Adventure Trailer for a "trunk" right away. I think I'll size it to fit my favorite lawn chairs.

The aluminum trim is the only way to go. :beer: :thumbsup:

Gadget Man
My kids may be smarter than me,
But I know more.
User avatar
Gadget Man
Teardrop Master
 
Posts: 298
Images: 23
Joined: Tue May 10, 2005 4:41 pm
Location: Elk River MN
Top

Re: 7'X24' Vnose Toy Hauler

Postby 8ball_99 » Mon May 14, 2012 8:14 pm

Thanks I'm digging the hatch. My only issue is I'm going to have to change the hinge.. The screw holes being all random is driving me nuts every time I look at it.. :( 
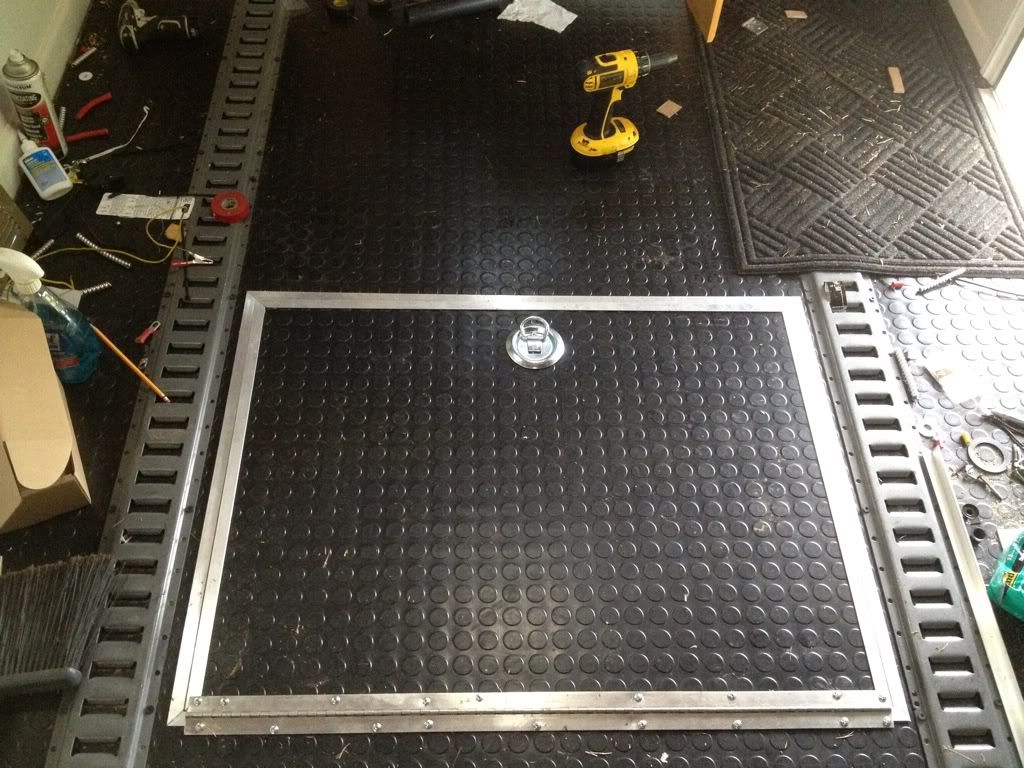
My ramp door from the factory has a flap made of plywood. This was the hinge that use to hold it on. Its just a thin aluminum and is only about 2" wide. I replaced it with a much stronger stainless steel hinge thats about twice as wide. This one has been setting in a corner of my shop ever since. When I decided to add the hatch I thought hey I'll use that hinge that was on the ramp. Once I was ready to mount the lid. I grabbed the hinge dusted it off, cut it to length and started screwing it down.. lol as soon as I stood back and looked at it I was a bit bumped. I was just running screws in the existing holes had not paid any attention to the fact the holes were all random.. Oh well
8ball_99
500 Club
 
Posts: 623
Joined: Sun Mar 07, 2010 12:34 am
Top

Re: 7'X24' Vnose Toy Hauler

Postby 8ball_99 » Sat Jun 02, 2012 12:19 am

Just thought I'd give a little update on how the upgrades worked. We had a three day trip this past holiday weekend. The panels along with the the two batteries worked Great! Infact they worked so well that one of my buddies that camped with me said if he were me he would cancel my order on the other two panels.. Running both the fans day and night along with using all the other odd and ends here and there was NP at all. I never needed the generator over the 3 days. The batteries never got below 75%. And they were easily charged up the next day pretty early. I do not know exactly how long it took to charge them because like I said before we tend to get up and leave camp till afternoon. But every single time I checked the charger and the volt meter the batteries were charged. The TV did not get any use, But I did run my awning lights off the inverter for several hours each night. With so much extra power I kinda of wish I would have went with the 1000 watt inverter so I could power the microwave. At any rate the couple hundred dollars worth of solar panels and the 85 dollar charger were very worth it IMO.. It was great not having to worry with power usage and at the same time not having to run the generator.
8ball_99
500 Club
 
Posts: 623
Joined: Sun Mar 07, 2010 12:34 am
Top

Re: 7'X24' Vnose Toy Hauler

Postby SusanG » Tue Jul 03, 2012 8:52 pm

Hello;
Where did you get the fold down bench seats?
SG
Susan G
SusanG
Teardrop Inspector
 
Posts: 13
Images: 1
Joined: Thu May 03, 2012 10:31 pm
Location: Tacoma, Wa
Top

Re: 7'X24' Vnose Toy Hauler

Postby bdosborn » Wed Jul 04, 2012 8:20 am

Where are the pictures of the solar panels? Got to have pictures of the panels!

Bruce
2009 6.5'X11' TTT - Boxcar
All it takes is a speck of faith and a few kilowatts of sweat and grace.
Image
Boxcar Build
aVANger Build
User avatar
bdosborn
Donating Member
 
Posts: 5594
Images: 806
Joined: Wed May 05, 2004 11:10 pm
Location: CO, Littleton
Top

Re: 7'X24' Vnose Toy Hauler

Postby 8ball_99 » Wed Jul 04, 2012 4:18 pm

SusanG wrote:Hello;
Where did you get the fold down bench seats?
SG


http://www.blazinbelltech.com/furniture.html
8ball_99
500 Club
 
Posts: 623
Joined: Sun Mar 07, 2010 12:34 am
Top

PreviousNext

Return to Cargo Trailer Conversions

Who is online

Users browsing this forum: No registered users and 8 guests