Page 1 of 2
Please help me understand cabinet/shelf attaching to walls.

Posted:
Tue Feb 03, 2009 11:28 pmby digimark
OK. I've placed my order for a custom-built Pace CargoSport trailer. It's coming fully insulated, set up with 110V and 12V circuitry, and I'll be ready for the next step -- cabinets and shelves -- when it arrives.
Here's what I don't know -- how do you screw things into the side and front walls of a trailer? Do you generally screw into the metal frame bows? Just into the 3/8 plywood? I want to build in a lower and upper cabinet across the front of the trailer (6'x10') along with a counter top. I imagine the lower cabinet will just be a face frame, doors and shelves with the counter top support braces. I'll also be putting up some independent shelves.
Could anyone walk me through the ways things get screwed or bolted to the side and front walls of the trailer? Any great attachment ideas I should know about? Thanks.
fastening cabinets
Posted:
Wed Feb 04, 2009 11:24 amby kevin57
try to mount the cabinets to the metal studs with metal screws anywhere you can. if you can't put a litte construction adhesive in spots and use wood screws to hold them until it dries. well i hope this helps you out.
Posted:
Wed Feb 04, 2009 1:40 pmby bobhenry
If it looks as if you will have a hard time locating the metal studs run a 1x3 or 1x4 horizontal and mount it to the wall top and bottom of the cabinet run. With this done you are sure to hit wood everytime. Beats the devil out of hit and miss drilling thru the cabinets and missing the metal studs leaving a cabinet mounting rail looking like swiss cheese. While a few extra holes in the 1x will never be seen.
Posted:
Wed Feb 04, 2009 11:31 pmby digimark
Sounds good -- generally into the metal studs then. Any idea what length screws I should be using? Absolutely I don't want to drill through the outer skin!
Also, it doesn't weaken the stud/trailer frame to screw holes into them? The studs are usually 16" apart, right? If I find one stud, and measure over 16", that should be the same place in the next stud, right? I know they're simple questions, but I could use the confidence-building.
Are there specific metal screws I should be using, or any self-tapping screws should work to hold the cabinet? I'd like them to hold up under the increased vibration of a moving trailer at speed?
I could really use a book called "How To Install Cabinetry Into Trailers Made Easy" right about now.
Posted:
Wed Feb 04, 2009 11:42 pmby Steve_Cox
Just a thought. My business has an old U-haul truck with an assortment of things attached to the inside walls. I used 1/4" stainless steel carriage bolts with the heads on the outside of the box. Works for me.

Posted:
Thu Feb 05, 2009 5:52 amby angib
It would be good if you knew what the structure of the trailer looked like before the inner skin got put on. It might be worth asking Pace if they would send you some digital photos of the same model trailer under construction so at least you know what you were looking for.
Knowing how/where they run the wiring would be helpful too - it would be a shame to drill into that when fitting your cabinets.
Andrew
Posted:
Thu Feb 05, 2009 7:54 amby digimark
angib wrote:It would be good if you knew what the structure of the trailer looked like before the inner skin got put on. It might be worth asking Pace if they would send you some digital photos of the same model trailer under construction so at least you know what you were looking for.
Knowing how/where they run the wiring would be helpful too - it would be a shame to drill into that when fitting your cabinets.
I'm pretty sure it's the outer skin, the metal ribs spaced 16" apart, the R7 polystyrene sheets between them (and whatever wiring there is), then 3/8" plywood on top of it. Perhaps some of the people who have removed the plywood to add insulation can comment, but that tells me right there that the real strength will be in the studs (probably obvious to most!). It would seem to me that the only magic is hitting the ribs without hitting wiring or going in too far.
Posted:
Thu Feb 05, 2009 9:29 amby madjack
...I would do something similar to what BobHenry suggested...they are known as cleats and when used in conjunction with an adhesive, the necessity of hitting the ribs are more or less eliminated...as is the need for fasteners that go thru the ply...we use 3/4 or 1"x1/16th(or 1/8th) aluminum angle for cleats and Gorilla Glue(follow directions on label for best results) for an adhesive(scuff the AL first)...the use of AL for cleats gives a cleaner look...IMO...than wood...use a #8x1/2" screw(w/adhesive) to attach the AL to the walls and sit/fasten the cabinets on them (w/appropriate fasteners) and you should be good to go..........
madjack

Posted:
Thu Feb 05, 2009 12:19 pmby digimark
To be sure -- the horizontal cleat (ledger board?) that will support the upper cabinet (using a 1" thick by 3"/ 4" wide pine board the width of the trailer? Cabinets will be wooden and the walls are plywood now.). Gluing this with Gorilla Glue will be strong enough? (I mean, following the directions and allowing it to set up properly first.) And I should probably use a ledger board for the bottom of the upper cabinet too?
Thanks again for the advice.
Posted:
Sat Feb 07, 2009 10:15 pmby Trackstriper
digimark,
I have a 6x12 Pace trailer with the interior wall skins currently off. I'll post some photos for you when I get home in a day or two. The wall "studs" are basically a "Z" section, if you know what that is. They are a little over 1" on each leg, as I recall.
One thing to consider is to simply use a lot of screws, maybe sheet metal type, and not worry about hitting the studs. The 3/8" plywood is not junk, it's just not very thick. Depending upon how much weight you're going to put in the cabinets this scheme might work. So maybe twenty or thirty cheap screws per cabinet? Look at #10's or #12's with enough length to penetrate the plywood 3/4" from the inner face. You do the math to be on the safe side.
Just an alternate thought.
Bruce
Posted:
Sat Feb 07, 2009 10:42 pmby digimark
Thanks TrackStriper. I'm sure this will all be more obvious when the trailer is delivered than what I can imagine. I'll look forward to the pictures though.
Posted:
Tue Feb 10, 2009 8:52 pmby Trackstriper
digimark,
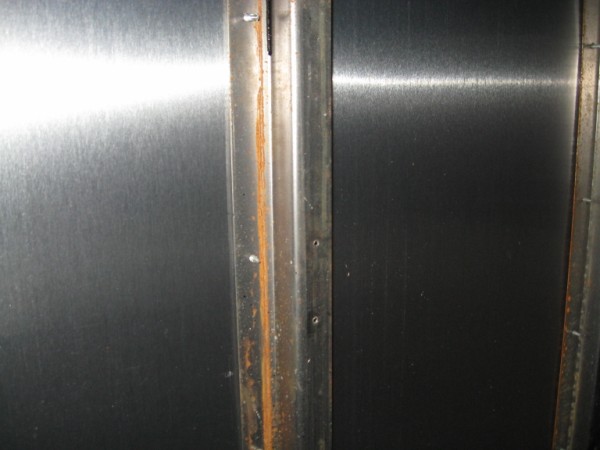
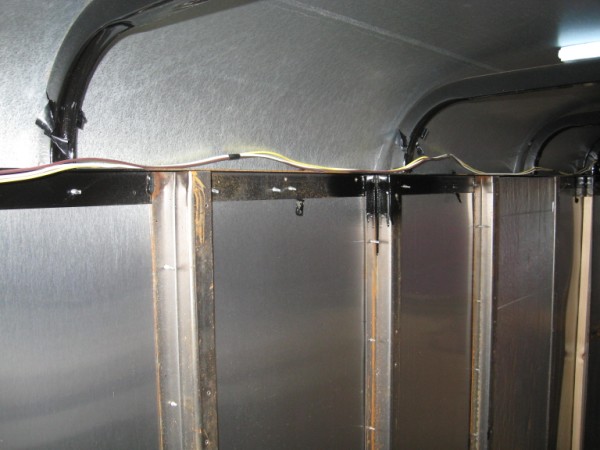
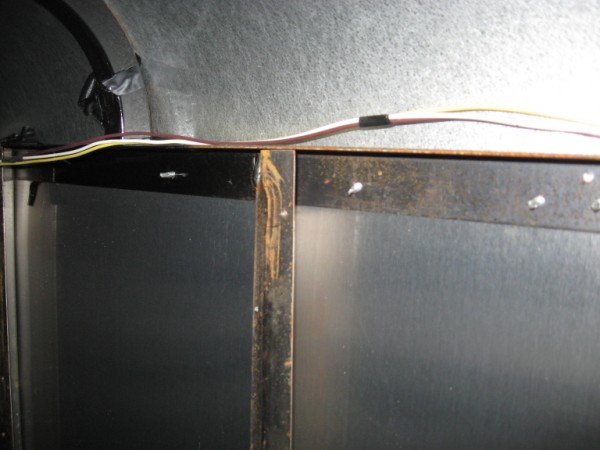
Here are some photos of what the upper section of the interior wall structure looks like on my Pace Journey trailer. Your Cargosport is a little heavier duty trailer with some nicer features. Getting one with the insulation pre-installed is a good deal. I had that done on the walls of a Cargosport that I owned several years ago. Mine did not have the roof insulated however....did you get some sort of package for that? Having had the wall paneling of my Cargosport open I think that the wall structure is exactly the same for these two models with 16" centers on the studs. Note the "Z" section of wall studs. This allows the insulation to be tucked behind the interior flange.
Note that the tail light wiring was taped with electrical tape to the roof bows above the interior wall. I cut through the tape to be able to see how some aluminum sheeting will fit inside the curve of the bow and the wires were in the way for that fitment.
Hope these photos will let you see what you'll be getting.
Bruce
Posted:
Thu Feb 12, 2009 8:53 pmby MikeIA
FYI: My CargoSport has a curved front wall, and the 2 metal ribs that form the curve run horizontally.
Posted:
Thu Feb 12, 2009 11:20 pmby Trackstriper
MikeIA,
Looks like you'll be keeping some of us on our toes!
The photos I posted were of the sidewall only...I wasn't even thinking about the front wall when I took these photos. It does have ribs somewhat similar to the roof bows place horizontally to create a bit of a rounded corner on the front of the trailer body. I'll post some of the nose of the trailer soon.
Posted:
Thu Feb 12, 2009 11:34 pmby ARIZONA GUIDE
What i did in mine when i used it for a work trailer. Was i took strips of ply wood that i cut as long a the shelf i wanted to hang and made them about a foot wide. So say like a 1 foot by 3 foot length. Liquid nails on the back. slap it in place a screw the heck out of it. Then just screw your shelf to that fur out length. I never had a shelf come off. But on the other hand you beter make sure that is the location that shelf will stay or you will tear heck out of the trailer trying to remove it after the liquid nails has dryed.