Conversion begins....

Converting Cargo Trailers into TTTs

Conversion begins....

Postby TexasShadow » Tue Nov 10, 2009 10:21 pm

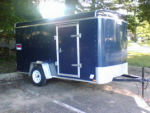
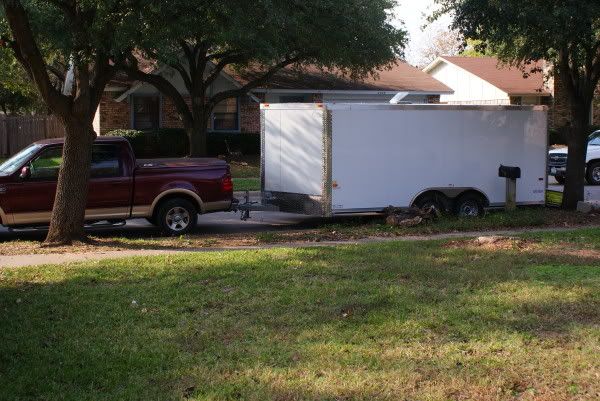
We've tossed this idea around now for months and now it's a reality. Or, a beginning, work-in-progress, whathaveyou. It began last Friday with a 8'x16' V-nose cargo trailer. The goal is to convert it into a 'Toy Hauler' for two motorcycles and two people to camp, perhaps live in.

Simple is our guide. Light, simple, basic, no frills. Yet provide basic amenities; place to sleep, shower, sip coffee, tinker on laptop, pop a cold one, etc.

A few ideas thus far are:
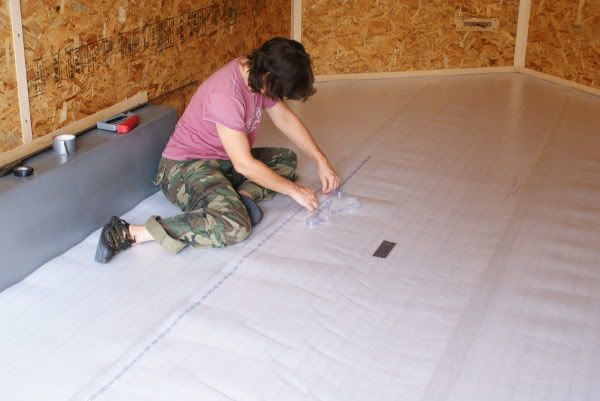
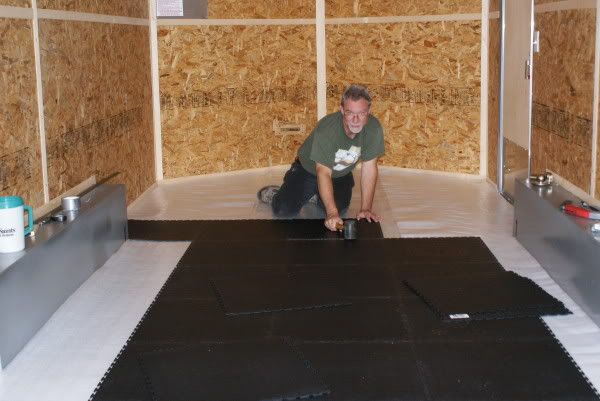
1. Using rubber mats, like the light version of horse stall mats, for the rear floor where the bikes will be. Easy to clean, resistant to oil, mud, sand, 'stuff'.
2. V-nose seems perfect place for a 'bathroom'. Given the configuration, conventional fiberglass/plastic toilet/shower combo pans won't fit. We're thinking of making our own with wood and fiberglass resin.
3. Basic and compact kitchen: small sink with cover, portable propane two-burner stove, fresh water tank below sink/cabinet, overhead cabinets.
4. Need to add windows and overhead fan.
5. Thinking of how to make a portable mesh screen with middle zipper for rear when ramp is down.

Later considerations: insulating, wiring, solar power, AC, fridge, bed arrangement (convertible bed/couch), etc.

It's first excursion will be to Big Bend area in southern Texas, desert country, for two weeks. We'll start out putting a futon in for temporary sleeping and see what ideas pop up while actually using it. I expect the mats and removable wheel chocks will be the first items installed.

We'll be with two other friends, one whose cargo trailer is bike hauler, sleeper, and chuckwagon. Meanwhile, I've been lurking here for a few months and reading what the rest of you are doing. It's inspirational. (and motivating!)

I hope we can post questions and use y'all as sounding boards for ideas and suggestions.

Regards.
TexasShadow
Teardrop Inspector
 
Posts: 6
Joined: Tue Nov 10, 2009 9:55 pm
Location: Central Plains Texas, sorta

Postby TexasShadow » Wed Nov 11, 2009 1:09 pm

Any one here ever made their own mesh/screen for the back of a trailer? I'm considering designing and making a screen to cover the opening when the rear ramp is down, preferably with a zippered center opening. Heavy duty webbing for the edges and zipper. The hard part is configuring attachment system.
Anyone have ideas? Industrial velcro? Magnets? :thinking:
TexasShadow
Teardrop Inspector
 
Posts: 6
Joined: Tue Nov 10, 2009 9:55 pm
Location: Central Plains Texas, sorta

Postby bobhenry » Wed Nov 11, 2009 1:20 pm

Nitroxjunkie made a light wood frame with a wood screen door made in it.

Image

It is completely removable ! It has seen a lot of use in the 2 years we have been fellow campers and still looks and works great.
Growing older but not up !
User avatar
bobhenry
Ten Grand Club
Ten Grand Club
 
Posts: 10355
Images: 2617
Joined: Fri Feb 09, 2007 7:49 am
Location: INDIANA, LINDEN
Top

Postby TexasShadow » Wed Nov 11, 2009 8:45 pm

bobhenry wrote:Nitroxjunkie made a light wood frame with a wood screen door made in it.
It is completely removable ! It has seen a lot of use in the 2 years we have been fellow campers and still looks and works great.
That is very neat! However, for us compact and light are the dictators.

I found rolls of vinyl screen mesh and began thinking of construction when I came upon this ramp screen kit. I don't think I can make it cheaper than this after labor and materials.
TexasShadow
Teardrop Inspector
 
Posts: 6
Joined: Tue Nov 10, 2009 9:55 pm
Location: Central Plains Texas, sorta
Top

Postby edcasey » Wed Nov 11, 2009 10:49 pm

Here's another company that custom makes screens. http://www.toyhaulerscreens.com/index.html

Sounds like you have put a great deal of thought into this. Please keep us updated with pictures. This is a great site and you'll get plenty of help and ideas if you need it.
User avatar
edcasey
Teardrop Master
 
Posts: 146
Joined: Sat Nov 15, 2008 11:54 pm
Top

Postby Curtis in Texas » Fri Nov 13, 2009 12:44 pm

Hey TS, glad to see you guys have taken the jump.
The Toy Hauler screen looks like it will work for your application.
I have mine planned out simularlly. Here's some ideas from my design you may like.

I am planning on making a bi-fold lightweight frame with a screen door with window, in one of the sections. It will hinge against one side of my rear opening just inside of the rear barn doors. Latching it in place will be a no brainer. My kitchen will be made to hang on the bi fold frame just inside the barn doors. This will allow me to close up the trailer up for security, with the kitchen in place while I go riding, and in foul weather I can place the kitchen on the inside of the bf door. The bi fold sections will will have one side larger than one with the door/ window section.

If you remember when you guys were over looking at my trailer I kept hitting my head on the ceiling ribs. My plan is to raise the entre roof and wall structure up 3 inches. I'll cut the walls loos from the floor and add the 3 inches of extra tubing to the floor and then set the walls back on top of the tubing. This will make sealing up and covering over a piece of cake.
I know this won't be a problem for you guys, but I get tired of hitting my head!

With the bi-fold doors I may have to stagger the bikes when parked inside the traler, but that will help with the weight distribution.? The bf doors won't be that thick.

My shower and toilet will be in the front of the trailer on the forward left side across from the side access door. This way I can build a cabinet for the AC, microwave and pantry next to it on the shower side. That will keep the weight near to the axles center to keep the balance optimum. And the microwave can be slid out and placed at the rear with the rest of the kitchen.
Clothes closet and storage drawers will fill the nose and right side to the side access door.

My sleeping area will consist of Cabella's Cots and Therma Rest matteress. This will allow as much room for the bikes and gear as possible without limiting my storage area.

TS, feel free to contact me if you need some help or to use the shop tools.

I'll be at the BB tonight for ice cream, you going to make it?

Later,
Curtis


ps, here's how I did a screen for my Expedition Rig when I was sleeping in it for my Moab Trips. We sewed in elastic shock cord in in the rim and it has two sections that overlap in the center. It fit around the back of the truck like a fitted bed sheet. Over the back glass and under the tail gate. With the rear back glass raised it kept the opening opened up. It kept the bugs out realy well, and getting in and out was easy. You just devieded the sections and crawled through the made sure the flaps overlapped again once you were on the other side.
Image
Also, for cross ventilation We made netted sleeves for the rear side doors that slide over the top of the door like socks. That way we could roll the window up or down as needed and open and close the doors with the screen socks over the entire top of the doors. You can see my stove haging on the inside of the spare tire rack. I had a sinck and cutting table that hung next to the stove, but unfortunitly I don't have any pictures ot where you can see the detail.
Cleaver Huh? :D
Curtis in Texas
Teardrop Advisor
 
Posts: 51
Joined: Thu Aug 06, 2009 5:18 pm
Top

Postby B52 » Fri Nov 13, 2009 7:15 pm

Take a look at the Harleyhauler that Sonetpro built. His false wall/door rig is pretty sharp. :D
http://tnttt.com/viewto ... highlight=
Jim

Stumble through life; fat, dumb and happy!!
User avatar
B52
Teardrop Master
 
Posts: 242
Images: 19
Joined: Sat Jan 22, 2005 11:47 am
Location: Grant Parish, La.
Top

Screen

Postby drcurran » Fri Nov 13, 2009 7:42 pm

Just my .02, but a door vs. a zipper (like in a tent) is 100 times better. But maybe that is just me.

Dan
"I'm not as good as I once was, but I'm as good once as I ever was."
TK
User avatar
drcurran
Teardrop Master
 
Posts: 167
Images: 20
Joined: Wed Jul 23, 2008 3:59 pm
Location: Springfield, PA
Top

Postby bc toys » Fri Nov 13, 2009 8:27 pm

i'm going to take a screen bug tent cut out a piece of it with the zipper sew a piece of material around it then sew velcrow on it tack some velcrow on the inside of back door that is gonig to be my screen door
bc toys
2000 Club
2000 Club
 
Posts: 2217
Images: 42
Joined: Sun Jun 28, 2009 2:45 pm
Location: LAS VEGAS NV
Top

Postby TexasShadow » Sat Nov 14, 2009 10:08 am

A zippered screen is more compact than a door for the rear. It will be more like a large screened 'picture window' than a regular door. The side door will be the primary access (need to build a screen door for that!).

Bi-folds are the way to go for interior doors; they require less space to open and close. That will be the ticket for the bathroom.

We don't plan to separate the interior. Two bikes will be inside only for transportation. Once at our destination, the entire interior can serve as 'living' space with the bikes stationed outside. Regardless, all furnishings will be designed as modular and/or compact (folding, etc) except the bathroom and galley kitchen. Still working on designs for folding bed/couch and table. Who knows; one or both of us might actually be living in it for awhile.

We saw these at an RV accessory place last weekend and we like the modular concept. The table and counter can be used inside and outside, attaching to the 'anchor pod' hardware. The surface material is light and easily stored on their sides. They're spendy, so I was wondering about fabricating our own but using their mounting hardware. Would have to find a source for the support hardware (adjustable legs, etc).

With the V-nose, there's no room on the front for propane tank(s). we're also trying to come up with a solution for that.
TexasShadow
Teardrop Inspector
 
Posts: 6
Joined: Tue Nov 10, 2009 9:55 pm
Location: Central Plains Texas, sorta
Top

Postby Curtis in Texas » Sat Nov 14, 2009 10:44 am

E, I would just plan on carrying one of those rental 5 gallon propane tank inside and setting it outside next to your kitchen when you arrive.
I bought some long hose for mine so I can set the tank anywhere I want it and it has a "T" so I can run two appliances at once.
I found it a real hassle to have to take my Motothome into town to refill the built in propane tank. Most Propane Trucks wouldn't come out to a campground to refill a 30 gallon tank. I did talk a truck into coming out once when we had two neighbors that needed refills too!

And if you go with something like the Blue Rino Rentals you can exchange the tanks at any Home Depot, Albertsons or Lowes.
I eventually went this way with my Pop Up Camper with two tanks rather than the one big one, so I'd have a backup and take the pressure off of not having enough gas. And I could carry one in and exchange it while still using the other. That big one I owned and it had to be refilled at a certified popane dealer. A hassle because they were usually closed on weekends.

Plus you don't have to worry about replacing them when they get old. Another hassel. Next time younr out here I'll show you my collection of old tanks.

I learned this the hard way.
Curtis in Texas
Teardrop Advisor
 
Posts: 51
Joined: Thu Aug 06, 2009 5:18 pm
Top

Postby TexasShadow » Sat Nov 14, 2009 11:21 am

Thanks for the tips, Curtis. Ed is considering making a compartment under the sink/counter area with an external access door. It would house a small portable propane tank and other mechanical items. The issue is installing an external door.

I'm also toying around with ideas for compact storage. Cabinets above the kitchen sink and fold-out bed/couch are the most obvious, but then there's riding gear for two people.

I am considering designing an expandable 'closet' on one side of the interior wall; maybe two. Conceivably, it could lay flat against the wall when not in use, expand into the interior when in use, easy access, light, and stabilized to the wall along the length and/or bottom. I think some type of poly material, such as that used for tarps, with a full-length zipper for access might work. Like a large expandable garment bag with velcro straps that will attach to the sidewall and accommodate expansion.

Since I am a free-lance writer, I also want to eventually configure the trailer for Internet access. I have no idea what that will involve :thinking:
Sometime in the future, we hope to be workcampers!
TexasShadow
Teardrop Inspector
 
Posts: 6
Joined: Tue Nov 10, 2009 9:55 pm
Location: Central Plains Texas, sorta
Top

Postby ed29 » Sun Nov 15, 2009 8:58 pm

Thanks for the tip Curtis. We will be starting out with the small propane tank, probably just grabbing the two that I rotate through my grill for the first trip. Been looking at hatches for an external compartment, so far nothing that looks like a real good fit.

I have seen a 'J- bracket' that hangs a single small tank on a vertical surface. I might consider hanging that on a wall stud in the front. This trailer uses 1"X1" square tube instead of pressed steel, so it would bear the weight of one tank.
ed29
Teardrop Inspector
 
Posts: 8
Joined: Sun Nov 15, 2009 8:44 pm
Location: Arlington, TX
Top

Postby TexasShadow » Sun Nov 15, 2009 10:03 pm

Today was flooring day. Ed purchased the interlocking tiles a few days ago and we decided to add some underlayment for a bit of cushioning. That consists of thin foam sandwiched between two layers of plastic film on a roll. The film extends beyond the edges of the foam on one side and the other has a strip of tape. Thus two sheets can be laid side by side while self-sealing. We decided to use two layers, which will also confer some insulation as well as cushioning.

First, the new Moby Dick (it does remind me of a huge white whale).

Image

The process of underlayment.

Image

And now the rubber tiles.

Image

It was an unusually warm day in north Texas (82 degrees F) and we quickly learned that the one top vent will not be adequate for venting, even with the rear ramp down. So added to the priority list is a vertical window with slider for the side door. Not any real choices on where to put it except in the middle between two studs, whereas the future side windows will require thorough planning before they can be chosen and placed.

Also, a small fan in the vent would help circulate air. I've seen the fan that runs on a small solar panel; that might be a good candidate.

Now, with the floor in, the next priority items (other than the door window) are:
1. removable wheel chocks and tie down rings for bikes,
2. basic and temporary shelf for gear, jackets, boots, etc. For now, a plastic-coated wire shelf attached up on one side wall will do. Later, as plans and designs come together, that will be replaced by something more permanent.

This morning at Lowe's we perused options for insulation, paneling, ceiling, sink, even small refrigerators. But one step at a time......
TexasShadow
Teardrop Inspector
 
Posts: 6
Joined: Tue Nov 10, 2009 9:55 pm
Location: Central Plains Texas, sorta
Top

Postby Curtis in Texas » Sun Nov 15, 2009 11:18 pm

E, You guys remember that I have a tubing bender and have all the popular round tubing dies and a set of 1" square tube dies, if you guys decide to get creative and want to make some fancy brackets and braces for tables and such. I also have a table saw and band and chop saws out here too.
I'll be happy to help or let you guys have at it, your welcome to come out.
Oh, and I have a mig welder to use too. Give me a call when you get ready to cut in some windows. I use to build camper trailer in MAnsfield before I worked for the ELectric Company.
Can you tell I'm excited for you two?????

That is a sweet trailer. Plenty wide and should make for a nice work camper.

Curtis
Curtis in Texas
Teardrop Advisor
 
Posts: 51
Joined: Thu Aug 06, 2009 5:18 pm
Top

Next

Return to Cargo Trailer Conversions

Who is online

Users browsing this forum: No registered users and 17 guests