Wells Cargo 5x10, Wander Waggin - 20101011 update

Converting Cargo Trailers into TTTs

Wells Cargo 5x10, Wander Waggin - 20101011 update

Postby Nathan N » Sun Feb 14, 2010 8:47 am

While we have a very nice Pleasant Valley teardrop there are a couple things that could be better addressed. I've been pondering this for some time and have taken the initial steps on our new cargo conversion.

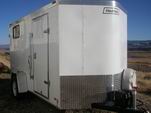
While I have a 6x10 cargo it is very much like pulling an anchor due to the height. I opted to go with a smaller 5'x10' with a 5' headroom for the profile. We don't plan on square dancing in it, just sleeping or getting in out of inclement weather. I stumbled upon this and bought it.

Image

It tows wonderfully behind our current tow vehicle and it's pretty well tucked behind the truck.
Image

While it doesn't have brakes on it, it does have the mounting brackets on the axles and that is on the agenda. The wells cargo 5' wides do have double doors on the rear unlike most others that only have a single door. I wasn't looking for the nose cone but it came with it.

The vision is of a double sided chuck wagon type galley. This would be accessible from both inside or outside. Again this would be for morning coffee or inclement weather. Here is a rough idea (there will be an opening in the center area).

Image

Initially was going to try to build an actual box that could be removed. However due to the rear stabilizer jacks - again they were included - and the door frame I would lose around 3 inches on each side. So now the mental plan is to utilize cleats on the outside walls with notches to center the horizontal panels. I hope to use mortise and tenons for other intersections to allow disassembly. We have an old wardrobe that is constructed like that.

Image

The yellow area is the front cabinets/shelving that hasn't been finalized yet. The metal interior has been cut out behind the nose cone.

The dark gray are two 15x30 crank out windows from Grant.

The green is the side door.

Two benches (with storage underneath) with a filler that will convert them into a bed. The light gray by the door is a foldup support to extend the bed in front of door a bit. Hey it's a 10' long trailer.

Image

The top row of plastic totes are accessible from inside only.

The box with gray round item on top is a pot.

Both the inside and outside will have a drop down counter that will cover the galley totes when up. The hinge will be located under the main counter. Due to required height (roughly 29") they may be split into two pieces with a piano hinge. Support will be a leg similar to the old chuckwagons however it probably will terminate against trailer instead of ground.

Ideas? Suggestions? I've more thoughts but this has rambled on so I will stop here.

Thanks,
Nathan
Last edited by Nathan N on Mon Oct 11, 2010 2:39 pm, edited 13 times in total.
User avatar
Nathan N
Lifetime member
 
Posts: 587
Images: 153
Joined: Mon Mar 24, 2008 6:55 pm
Location: mid-Missouri

Postby mdvaden » Sun Feb 14, 2010 11:31 am

This is interesting to watch someone plan the project in detail.

I just put mine together and changed it a couple of times since I had not looked online first to realize how many variations there can be.

It looks like your weight balance will be rather nice.

A question about the "nose cone" - what's the purpose for them? Looks? Aerodynamic?
User avatar
mdvaden
Teardrop Master
 
Posts: 102
Joined: Tue Aug 26, 2008 4:45 pm

Postby Nathan N » Sun Feb 14, 2010 11:49 am

mdvaden wrote:This is interesting to watch someone plan the project in detail.

I just put mine together and changed it a couple of times since I had not looked online first to realize how many variations there can be.

It looks like your weight balance will be rather nice.

A question about the "nose cone" - what's the purpose for them? Looks? Aerodynamic?


Aerodynamics. Here is a page from the manufacturer:
http://www.nosecone.com/aepull.htm

They also have a video that is interesting:
http://www.nosecone.com/trailer.html

I'm sure I will make changes along the way. Just pondering the possibilities and thought I would throw it out there to see if I am overlooking something.

Thanks for visiting.
User avatar
Nathan N
Lifetime member
 
Posts: 587
Images: 153
Joined: Mon Mar 24, 2008 6:55 pm
Location: mid-Missouri
Top

Postby Prem » Sun Feb 14, 2010 2:24 pm

Nathan,

I like it. Good design. Nice that the trailer is 10' long.

What about the roof? Vent? Skylight? Raise the center section in a front-to-back, aerodynamic curve for standing head room? 8) :D
My goal...

_____________________________________________
...is to live in a trailer.
User avatar
Prem
Gold Donating Member
 
Posts: 3222
Images: 144
Joined: Thu Aug 21, 2008 11:25 am
Location: State of Jefferson (Oregon side)
Top

Postby Nathan N » Sun Feb 14, 2010 6:38 pm

Prem wrote:Nathan,

I like it. Good design. Nice that the trailer is 10' long.

What about the roof? Vent? Skylight? Raise the center section in a front-to-back, aerodynamic curve for standing head room? 8) :D


Thank you. On the roof.... Reluctant to cut into it. I have to double check the garage door clearance which is another consideration.

Where did you purchase your skylights?
User avatar
Nathan N
Lifetime member
 
Posts: 587
Images: 153
Joined: Mon Mar 24, 2008 6:55 pm
Location: mid-Missouri
Top

Postby Prem » Sun Feb 14, 2010 7:19 pm

Nathan,

The story of my skylight and vent are on the first blue link below ("My 12 ft. Cargo Conversion"). There another story of a mini roof vent on the "ROUND TAIL" link, also below.

You could use 3/16th inch thick acrylic Plexiglass/Lexan for a skylight on yours without having to worry about going in and out of the garage. I put two of them (circles) on the roof of my former teardrop. I lined the cutout with shiny aluminum foil (like a Solatube for a house) and put clear pick-up truck, back-up light lenses for the inside cap on each. Looked good. Worked great.

Prem :thumbsup:
My goal...

_____________________________________________
...is to live in a trailer.
User avatar
Prem
Gold Donating Member
 
Posts: 3222
Images: 144
Joined: Thu Aug 21, 2008 11:25 am
Location: State of Jefferson (Oregon side)
Top

Postby Nathan N » Sun Feb 28, 2010 5:13 pm

So it begins....

Image
Getting window positions figured out.

Image
Before removing the plywood.

Image
I followed others on the forum on protection while cutting the windows.

Image
I opted to put outdoor receptacle and a table bracket on the passenger side.

Image
The furnace vent/intake and the shore power inlet. Due to clearances I removed the side marker light to make room for the furnace vent. I have to replace the side marker as the retaining pins broke while removing them. I will relocate it probably between the vent and shore power depending on inside clearances.

Image
A peek inside after I got the exterior penetrations completed. I still have to reroute the wires to the fender marker lights. I either have putty tape or plywood between the supporting steel angle/flats that I added and the aluminum sheeting. I welded in supports for the fenders instead of putting the plywood blocks between the aluminum sheeting and interior plywood back. I also added supports for the outdoor receptacle and table bracket.

Image
Now I need to finalize my design for the front end. Figure out the locations of the WFCO converter and GFCI in incoming feed.
User avatar
Nathan N
Lifetime member
 
Posts: 587
Images: 153
Joined: Mon Mar 24, 2008 6:55 pm
Location: mid-Missouri
Top

An update

Postby Nathan N » Wed Mar 24, 2010 8:37 pm

I have been plugging away when the weather isn't too nasty. We have made some progress. I'm trying to adopt Gage's strategy on thinking things through rather than rush down the wrong path. So far, so good... I think.

Got the CFCI, converter, and front receptacles mounted and wired:
Image

Made a decision and ordered the fantastic fan from vintage trailer with the flat top cover. Got it installed.
Image

Ran the wiring and then insulated the walls.
Image

Reinstalled the factory plywood on the walls. Insulated the roof and installed beadboard paneling.
Image

I don't have a photo of it but then installed a layer of the folded 1/4" blue insulation for another barrier between the steel studs and us. Then we installed more beadboard paneling. Also started work on the outhouse. Sawed up some of our rough sawn red cedar for some trim and routed it into shape for the corner trim.
Image

Installed the thermostat and lights.
Image

Still have to finalize the plan for the front shelves, complete the outhouse, install the windows, trim the windows and door, build the benches/bed and galley.

Oh, and I have to change the name.... the boss wants something different. :roll:
User avatar
Nathan N
Lifetime member
 
Posts: 587
Images: 153
Joined: Mon Mar 24, 2008 6:55 pm
Location: mid-Missouri
Top

Postby Ageless » Wed Mar 24, 2010 10:54 pm

Where did you get that panelling? That's beautiful!!!
Strangers on this road we are on; we are not two, we are one - Raymond Douglas Davies
User avatar
Ageless
Platinum Donating Member
 
Posts: 1603
Images: 8
Joined: Tue Aug 04, 2009 8:34 am
Location: Pt. Orchard, WA
Top

Postby Nathan N » Thu Mar 25, 2010 5:29 am

Ageless wrote:Where did you get that panelling? That's beautiful!!!


Believe it or not, Lowes. I wandered down their paneling/trim aisle looking for what they had that was wood ply (versus the pressboard backing). I think they call it birch something or other.

Thanks for looking.
User avatar
Nathan N
Lifetime member
 
Posts: 587
Images: 153
Joined: Mon Mar 24, 2008 6:55 pm
Location: mid-Missouri
Top

Postby Nathan N » Wed Mar 31, 2010 8:44 pm

Still plugging away. I've not been as faithful reporter as Sir Joey.

Since I last reported in: the windows were installed, plowed my way through the front shelves, finished up the outhouse, installed the flooring, made some more cedar trim and got that finished and installed.

Image

I've got to get started on the benches/bed and then tackle the galley. Some things are falling into place and others take a bit of pondering. At this point I'm not sure if my original thoughts on the galley are going to work out... but I will come up with something.
User avatar
Nathan N
Lifetime member
 
Posts: 587
Images: 153
Joined: Mon Mar 24, 2008 6:55 pm
Location: mid-Missouri
Top

Postby madrider » Wed Mar 31, 2010 10:53 pm

Nathan N wrote:Still plugging away. I've not been as faithful reporter as Sir Joey.

Since I last reported in: the windows were installed, plowed my way through the front shelves, finished up the outhouse, installed the flooring, made some more cedar trim and got that finished and installed.

Image

I've got to get started on the benches/bed and then tackle the galley. Some things are falling into place and others take a bit of pondering. At this point I'm not sure if my original thoughts on the galley are going to work out... but I will come up with something.


WOW! That looks great!! I hope to be starting on mine here in a few weeks. If mine come out half that good I will be happy! LOL
You do great work.
madrider
Teardrop Inspector
 
Posts: 19
Images: 6
Joined: Fri Mar 26, 2010 8:03 am
Top

Postby Nathan N » Thu Apr 01, 2010 5:16 am

madrider wrote:
Nathan N wrote:snipped


WOW! That looks great!! I hope to be starting on mine here in a few weeks. If mine come out half that good I will be happy! LOL
You do great work.


Thank you. Good luck in your conversion.
User avatar
Nathan N
Lifetime member
 
Posts: 587
Images: 153
Joined: Mon Mar 24, 2008 6:55 pm
Location: mid-Missouri
Top

Postby SirJoey » Thu Apr 01, 2010 10:06 am

Nathan N wrote:Still plugging away. I've not been as faithful reporter as Sir Joey.

Maybe so, but your work is VASTLY superior! Truly outstanding! :thumbsup:

That thing is just beautiful, & you sir, are a master craftsman! :bowdown:
When all is said & done...
a lot more gets SAID than DONE!
User avatar
SirJoey
Teardrop Master
 
Posts: 131
Joined: Tue Dec 08, 2009 2:10 pm
Location: Aboard a UFO, hovering over South Carolina
Top

Postby Gonefishin » Thu Apr 01, 2010 2:05 pm

Maybe so, but your work is VASTLY superior! Truly outstanding! :thumbsup:

That thing is just beautiful, & you sir, are a master craftsman! :bowdown:
[/quote]

I couldn't put it much better than that. Agreed. Great work.
:thumbsup: :thumbsup: :thumbsup:
User avatar
Gonefishin
Donating Member
 
Posts: 528
Images: 119
Joined: Sat Oct 03, 2009 7:38 pm
Location: NE Utah
Top

Next

Return to Cargo Trailer Conversions

Who is online

Users browsing this forum: No registered users and 8 guests