Build: 6*12 Enclosed Travel with Ramp and Side Door!

Converting Cargo Trailers into TTTs

Build: 6*12 Enclosed Travel with Ramp and Side Door!

Postby Sngleman » Fri May 21, 2010 1:00 pm

So 2nd times a try! Just tried to make this thread and didn’t log in first so it cleared it all out!!! Doh! :x

Anyways Im new here obviously by the first post heehee but I have been viewing your guys builds for a while now and can’t believe the things you have done with the little space you have to work with! So I commend you all for that! I thought I would be flying solo at the time when I had my build idea thinking I could be a original I tell you I was wrong and I couldn’t happier for it!

So just a little heads up im going for the Weekend Warrior / Cheapest I can possible be! (Because I have priced some cab over’s and small trailers as well as tent trailers and nothing is close for what you get! As well I would like to keep this as a cargo trailer as much as possible for toys!

So I’ll try to give a total tally of cost at the end of my adventure as a budget build if all possible! Hopefully it will help someone as you all have helped me with inspiration as well as knowledge!

Please also feel free to pick me apart as to I have minimal knowledge! Always nice to get criticism or suggestions!

Here I am so far! I have a pretty busy life but ill do my best to update until the end! *** Also sorry for some of the crappy cell phone pictures
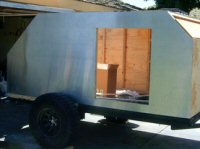
 :cry:

The trailer!
Image

Trailer inside! – Had to patch a hole on the back right side..
Image

Front inside Gutted and ready for insulation!
Image

Out the back Gutted! – Please don’t mind the garage! It’s a war zone in there..
Image

Small cut out I made for my power! (measure twice cut once!!!)
Image

Trailer inside put back together and floor bed liner (though wasted $50 on this.. floor had oil on it and most is peeling up as to I guess I didn’t prep enough), but I have a back up flooring in the works.
Image

Small door problem.. someone wanted something more than I did.
Image

Door fixed!

New handle!
Image

New Hinges I made.. not the best but they are strong and work. Though could use a few more screws.
Image

So my start to the inside!

Made a Murphy’s style bed! - Though tested it and needs a bit more cross bracing.
Image

The start of my counter and cabinet’s im making’! (Front wall)
Image

*** Sorry thought I had a shot of the electrical.. (it’s nothing special mostly a full 12v system with a battery retainer)

Another shot of the Cabinets / Counter (left wall)
Image

This Left side is going to have a open compartment for bedding storage.
Image

New full view of the Trailers inside!
Image

This is where I am so far im looking to get it done by the end of the month or at least camp able as to im planning on going to the ocean on the 2nd week in June and then become the weekend warrior I want to be! Thank you for looking! Hope to have some updates over the weekend!


Goals to finish the Cabinets as well as add a upper cabinet!
Im looking to add a collapsible table on the opposite side of the Murphy’s bed.
Also looking to insulate / cover the roof and add lighting as well as add a exhaust fan in the vent.
Then redo the flooring.. / Paint to Suit!
Sngleman
Teardrop Inspector
 
Posts: 22
Joined: Fri May 21, 2010 11:37 am
Location: Centeral California

Postby Eskimo » Fri May 21, 2010 2:15 pm

Welcome to the site. I'm like you, thought I was doing something new, found this site well after I started my project. Good luck and keep up with the pictures.
Eskimo
Teardrop Inspector
 
Posts: 8
Images: 8
Joined: Fri Mar 19, 2010 10:31 am
Location: San Antonio, TX

Postby Sngleman » Fri May 21, 2010 2:40 pm

Eskimo wrote:Welcome to the site. I'm like you, thought I was doing something new, found this site well after I started my project. Good luck and keep up with the pictures.


Thank you! :D

Always nice to be welcomed!
Sngleman
Teardrop Inspector
 
Posts: 22
Joined: Fri May 21, 2010 11:37 am
Location: Centeral California
Top

Postby vtx1029 » Fri May 21, 2010 3:27 pm

Keep up the good work! :thumbsup:

Couple suggestions

If your hooking up to power in a campground I believe the electrical and water service is always on the left or drivers side of your camper.

Are you planning on venting the battery box with fresh air? They give off fumes when charging/discharging.
User avatar
vtx1029
Teardrop Master
 
Posts: 251
Images: 70
Joined: Fri Apr 23, 2010 11:42 pm
Location: MN
Top

Postby pete42 » Fri May 21, 2010 3:53 pm

super start I will agree lots of good ideas here on this site.
2 more hospital visits and maybe just maybe I'll be able to start my own.
keep going it looks great.
User avatar
pete42
Super Lifetime Member
 
Posts: 2203
Images: 13
Joined: Sat Nov 07, 2009 11:52 am
Location: SouthWest Ohio
Top

Postby Sngleman » Fri May 21, 2010 4:02 pm

vtx1029 wrote:Keep up the good work! :thumbsup:

Couple suggestions

If your hooking up to power in a campground I believe the electrical and water service is always on the left or drivers side of your camper.

Are you planning on venting the battery box with fresh air? They give off fumes when charging/discharging.


Thank you!

Yes totally slipped my mind when i did it and it would have worked much better on the Left side.. :cry: Ill just make sure i have a good long cord with me!

It will be vented im looking to get a dryer type vent.. to let air out but not in.

pete42 wrote:super start I will agree lots of good ideas here on this site.
2 more hospital visits and maybe just maybe I'll be able to start my own.
keep going it looks great.


Best wishes with your hospital visits!
and Thank you again!!
Sngleman
Teardrop Inspector
 
Posts: 22
Joined: Fri May 21, 2010 11:37 am
Location: Centeral California
Top

UPDATE for you guys from over the weekend.

Postby Sngleman » Mon May 24, 2010 11:05 am

So its not much i was pretty busy sad to say.. but got a little bit done :twisted:

So got my sink and facet installed... Not sure if i like the placement but it will work!
Image

Also got my counter top elctrical done. I ran a 110v thats conected to the inverter as well as outside power... also got 2 12v plugs in place.
Image

I got my corner storage completed all wrapped and ready for sanding and paint
Image

Here is a inside look.. Needs to be cleaned. IN the back corner will house all of my water needs.
Image

Here is a idea of what my cabinet doors will look like.. The rest are done just need to sand and install.
Image

Also if you happen to be like me and make a hole to large for your screws to grip into the wood.. Here is a cheap way i thought up to still use the same wood screws.
Image


So everyone this is where i am now! Thanks for looking.
Sngleman
Teardrop Inspector
 
Posts: 22
Joined: Fri May 21, 2010 11:37 am
Location: Centeral California
Top

Postby Sngleman » Tue May 25, 2010 12:15 pm

New post with small update.

Got my cabinet doors on.. they need to still be cleaned up. and i put my switch panel there because i had a nasty imperfection in the ply wood that I didn’t notice until it was too late i had already put my border half way on so figured why not just roll with it..

Image

I need to put in some of those magnet backing plates to hold them tight and from opening..

Thanks agian for looking.
Sngleman
Teardrop Inspector
 
Posts: 22
Joined: Fri May 21, 2010 11:37 am
Location: Centeral California
Top

Postby michiganflipper » Tue May 25, 2010 8:30 pm

great job keep the pic's coming
User avatar
michiganflipper
Teardrop Master
 
Posts: 129
Joined: Sun Jul 05, 2009 4:28 pm
Location: belding mich
Top

Postby Sngleman » Thu May 27, 2010 5:31 pm

michiganflipper wrote:great job keep the pic's coming


Thank you!!!

Working on my Electrical and over head lights they will just be in a temp position for now since i will need a while longer till i can finish the roof.. but its getting there :?

Thanks again for looking!
Sngleman
Teardrop Inspector
 
Posts: 22
Joined: Fri May 21, 2010 11:37 am
Location: Centeral California
Top

Postby rebapuck » Sat May 29, 2010 11:57 am

Aren't dryer vents opened by forced air? A battery wouldn't have that.

My propane tank is inside a cabinet and has a perforated floor. Maybe you could do something like that.
Judy
1966 VW camper
1967 VW singlecab
Image
User avatar
rebapuck
.
 
Posts: 2243
Images: 1
Joined: Thu May 14, 2009 1:55 pm
Location: Chapel Hill NC
Top

Postby vtx1029 » Mon May 31, 2010 6:46 am

nice idea on the water spout, I may steal that idea :thumbsup:
User avatar
vtx1029
Teardrop Master
 
Posts: 251
Images: 70
Joined: Fri Apr 23, 2010 11:42 pm
Location: MN
Top

Postby Sngleman » Tue Jun 01, 2010 10:53 am

rebapuck wrote:Aren't dryer vents opened by forced air? A battery wouldn't have that.


Yea i thought about incorporating a fan with it.. but they that would not work as to it would just re drain the battery.. :? So im thinking of a open vent with slats.
Or maybe something like this:

Image

vtx1029 wrote:nice idea on the water spout, I may steal that idea :thumbsup:


Thanks! Yea i got it from another member ive seen a few people using them. As well as using the mixing bowl as a Sink much more cost saving. Especially since for the time being im cold water only.
Last edited by Sngleman on Tue Jun 01, 2010 11:01 am, edited 1 time in total.
Sngleman
Teardrop Inspector
 
Posts: 22
Joined: Fri May 21, 2010 11:37 am
Location: Centeral California
Top

Postby Sngleman » Tue Jun 01, 2010 10:59 am

No no real update this weekend.. Was busy with the kids. Also went to a concert and did some :guzzle:

Just got the lights wired in as a temp as to still need to finish the roof.. also got my splash guard up for my counter top and cabinet trim done.. and braced the bed much better! So looking to get some work done tonight = cleaning and paint prep! Hopefully!

My camping deadline is coming up fast! Got about a week and a half before our test trip for the year :applause:
Sngleman
Teardrop Inspector
 
Posts: 22
Joined: Fri May 21, 2010 11:37 am
Location: Centeral California
Top

Postby Sngleman » Thu Jun 03, 2010 11:47 am

So small update:

i decided to be cheap and made my own vent fan :twisted:

So i started and purchased a Car 12v radiator fan 14"
also cut a piece of 1/2 inch plywood it was a 17x17 box.


Then i cut a hole in the 17x17 sheet of plywood.
Image

Then i put a frame to strenghthen the plywood as well as give some cleareance from the vent crank as to it was the easiest way i could think of to still utiliez it.
Image

Fan Installed
Image

Here is it installed over the vent. on the back side i just added 2 hindges and on the front i added 2 locking clamps to pull it up snug to the roof. This will allow me to secure it to the roof as well as be able to open it easily to open or close the vent.
Image

here is a picture of it openned. Also im going to install a forward and reverse switch as well as a dimmer to controll the fans speed.. because as of now it pushes a lot of air..
Image

Thanks for looking!

Also! this will cost me about $25 once i get the switches vs similar fans i have seen upwards to $100-$150.. Ouch! :BE
Last edited by Sngleman on Fri Jun 04, 2010 10:54 am, edited 1 time in total.
Sngleman
Teardrop Inspector
 
Posts: 22
Joined: Fri May 21, 2010 11:37 am
Location: Centeral California
Top

Next

Return to Cargo Trailer Conversions

Who is online

Users browsing this forum: No registered users and 12 guests