Don & Christi's 6 x 10 Cargo Conversion

Converting Cargo Trailers into TTTs

Re: OH Galley Cabinet Nearly Finished

Postby d30gaijin » Sat Jul 07, 2012 12:27 pm

pmowers wrote:I understand the comment completely. My wife keeps asking me if I am going to live in my trailer..I am not sure if it is a question, a hint or a threat. :thinking:

I have a deLonghi 12,000 unit in my garage similar to your Heier. As I was going back over your thread (trying to steal, errr... adapt more ideas) I was struck by the idea used on some computer cases where the case has a duct to the cpu fan built into the side panel. What if you mounted the portable a/c unit as b/c did for transport, but put a access hatch on the ramp and a collar lined up to the air intake on the side of the a/c unit. When you ran the unit, you would just open the hatch on the outside, so the air would be sucked in, go through the evaporator and then out through the floor duct. If I can figure out a drawing I will have to post it. The ramp would still be usable as in your original idea.

I may have missed it, can you tell us a little more about how you did your ceiling?

Pat


Pat,

Only problem is I don't have a ramp, I have barn doors, and our bunks run crosswise up against the barn doors. The a/c unit won't fit under the bunks, which is OK since we use that space for our storage bins. I've got a 14" x 14" x 2" cake baking pan that will fit over the air intake area on the back of the a/c unit completely. I'll cut a 4" hole in the bottom of the pan then install a standard dryer vent outlet, probably put a standard 4" dryer vent in the sidewall of the CT and duct the two together. That way all incoming air for the a/c unit will come in through the standard 4" dryer vent and exhaust through the a/c unit's 5" vent pipe and through the floor. It sounds good... in theory. :lol:

As to our ceiling; I first installed 1" blue foam board then cut Luan paneling to fit. I spaced the Luan paneling so the ends would meet on one of the CT's overhead frame rails. I then held the Luan paneling in place and drilled 1/8" holes through the paneling, through the frame rail, and then used an aluminum pop rivet to attach the Luan panel to the frame rail. I have yet to decide what I will do about the seams, or should I say sealing/covering them but figure I'll come up with something, or steal... errr... adapt more or less. :FNP

Don

Image

Image
User avatar
d30gaijin
Titanium Donating Member
 
Posts: 594
Images: 139
Joined: Sat Jun 12, 2010 9:27 pm
Location: Boise, Idaho

Re: Don & Christi's 6 x 10 Cargo Conversion

Postby d30gaijin » Sat Jul 07, 2012 8:54 pm

it's 100 degrees outside, a Thunderstorm is moving in, the wind is blowing crazily, lightening strikes off in the distance, and I'm outside practicing grilling chicken kabobs on my portable Volcano grill because that's the grill I plan to take with us when we leave Boise (compact and much lighter than my beloved Lodge Hibachi). Oops, charred the first side, hope I can save the other sides. The Volcano is a nice portable BBQ but it ain't the Lodge Hibachi. ;) I'm rapidly learning that different BBQ grills cook differently... a whole lot differently. :duh

Good thing I practiced tonight considering my 87 year old mother will suffer no fools when it comes to cooking. She is a middle state Oklahoma (Minco, Caddo County) farm girl, born and raised on the farm. I, on the other hand, am city born and raised so I have had to learn a lot. Mom taught me the basics but she figured the Army would take care of me, teach me, or maybe I'd find a good wife to take care of me, which I did except Christi refuses to take care of me. She says I'm an Army guy so I have obviously learned to fend for myself. I'm glad I married a smart woman... I think... uh oh. :surrender:

Don
User avatar
d30gaijin
Titanium Donating Member
 
Posts: 594
Images: 139
Joined: Sat Jun 12, 2010 9:27 pm
Location: Boise, Idaho

Re: Don & Christi's 6 x 10 Cargo Conversion

Postby d30gaijin » Sun Jul 08, 2012 9:05 pm

Here's a shot of our CT emptied out for use in a CT role i.e., hauling stuff. We emptied it to haul a hide-a-bed couch we bought used. Didn't have to remove the generator or porta potty to get the couch in. It took us about 15 minutes to remove the majority of stuff (bunks, storage bins, table, chairs, a/c unit, etc.) to open the CT for hauling stuff. Our dual use CT works! :thumbsup:

Don
Image
User avatar
d30gaijin
Titanium Donating Member
 
Posts: 594
Images: 139
Joined: Sat Jun 12, 2010 9:27 pm
Location: Boise, Idaho
Top

Re: Don & Christi's 6 x 10 Cargo Conversion

Postby notoriouskelly » Mon Jul 09, 2012 5:24 pm

Looks like your foundational design has withstood the test of time! :thumbsup:
2013 Continental Cargo 8.5 X 16 trailer Model ORRM816TA2

VETERANS: Get the benefits you deserve!
Free help at Hadit.com
User avatar
notoriouskelly
Donating Member
 
Posts: 29
Joined: Sat Jul 07, 2012 7:37 pm
Location: Central Arizona
Top

Re: Don & Christi's 6 x 10 Cargo Conversion

Postby sportxlh » Mon Jul 09, 2012 6:53 pm

Your front cabinets ending up looking very nice!!!
sportxlh
Teardrop Inspector
 
Posts: 16
Images: 1
Joined: Mon Mar 19, 2012 5:43 pm
Top

Update On Portable A/C Unit, Improvements Made

Postby d30gaijin » Tue Jul 10, 2012 8:33 pm

OK, so we bought a Commercial Cool (Haier) portable 8k btu a/c unit via Home Depot. It is a single hose unit, meaning (once I did my research after I bought it... too typical of me :NC ) that apparently it isn't as efficient as a two hose unit. Apparently the difference between the two is that a single hose unit exhausts hot air that has passed over the condenser to the outside via a hose. Feed air is drawn in through the back of the a/c unit via a large open to the CT interior vent/grill. What that does is create a vacuum within the CT so that any nooks and crannies in the CT that are not adequately sealed, of which there are many no matter how water tight you think your CT is, well those nooks and crannies allow hot outside air to be sucked into the CT (because you have a vacuum created by the single hose a/c unit, making them less efficient than dual hose unit). As I understand, a dual hose unit exhausts hot air through one hose and draws in out side air from another, no vacuum is created within the CT so the CT is positively charged with cool air from the a/c unit and that creates a positive pressure within the CT pushing cool air out of those nooks and crannies. Makes sense to me now that I understand how both a/c unit types function.

OK, that said, so you, like me, plunked down your hard earned money for a single hose unit and find it struggles to keep your CT cool because all those nooks and crannies are letting hot outside air sneak into our CT and making your a/c unit work harder, hence less efficient. What to do about that? :thinking: I believe I found the answer and the answer is "Fat Daddio's" baking pans.

I measured the back open grill area of my a/c unit and found that a 14x14 cake baking pan would cover the area. So I got on the internet and went in search a 14x14 pan with sufficient depth to meet my perceived needs. Bingo! Fat Daddio's sell multiple size cake baking pans. I found they had a 14"x14"x 2" deep pressed aluminum pan. Perfect! :o I ordered one for $15. It arrived today. With pan in hand now, my next trip was to Home Depot to find suitable flanges (standard 4" dryer vent stuff) to connect a 4" hose to the pan and then to an external inlet in the CT wall (or floor), along with a Milwaukee 4" hole saw. I found everything I needed at Home Depot.

The sequence of pics below are of the back of my portable a/c unit, and the Fat Daddio's cake pan vent fabrication. The fabrication will be described above each pic.

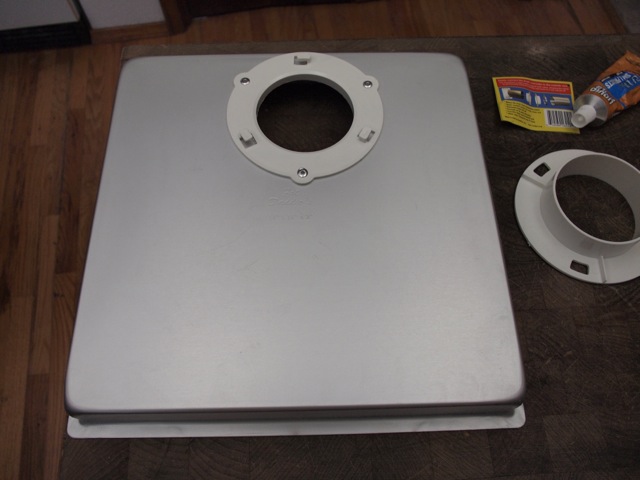
Back of the portable a/c unit showing the exhaust tube outlet (the round hole), and the inlet vent (the big square grill area) to be covered by the Fat Daddio's cake pan:

Image

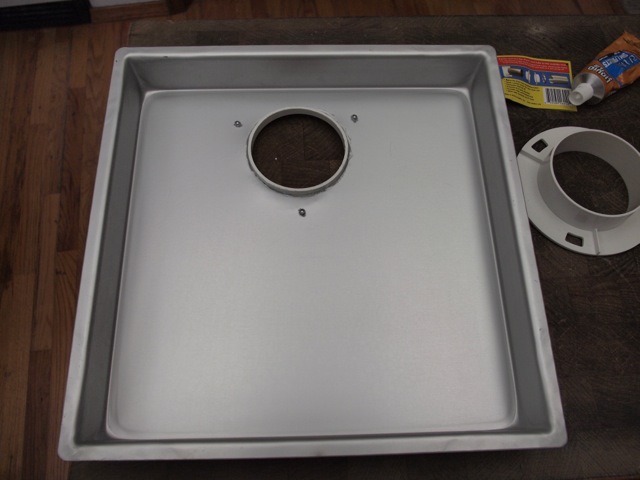
The Fat Daddio's cake pan after I drilled the 4" hole with the Milwaukee 4" hole saw, something I learned with this experience about cutting a 4" hole in a cake pan, make sure you have a solid backing such as a big chunk of wood underneath that you are cutting against.

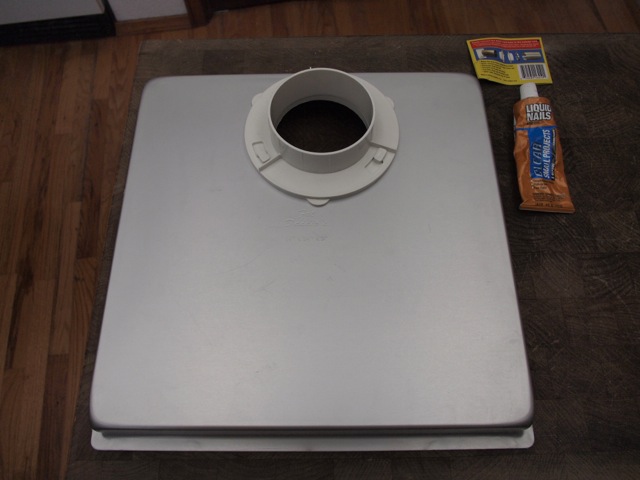
While at Home Depot wandering about trying to figure out what I needed to connect the inlet line to the "Fat Daddio's" cake pan I came across this item: "DryerDock, The Dryer Hose Quick-Disconnect" (made in the USA by VentPro, Inc.). Basically it is a very short turn quick-disconnect dryer hose adapter. It has a 1" long flange on both sides to attach a standard 4: dryer hose to. I cut the flange down to 1/4" with a hacksaw on the flange side that inserted into the "Fat Daddio's" cake pan. I drilled three 3/16" holes through the cake pan to match the flange attachment holes, then used liquid Nails clear adhesive to seal the flange to the cake pan then used 3/16" aluminum pop rivets to permanently attach the flange to the "Fat Daddio's" cake pan.

Image

By the way, yes I know the flange is not properly centered (left to right) on the "Fat Daddio's" cake pan. It was 100 degrees here in Boise today and seemed hotter in my closed garage. I was sweating bullets and wasn't too concerned with centering since it makes no real difference in efficiency and anyone that cares to get behind the a/c unit to look and tell me so, well they can kiss... uh oh. Be nice Don. :roll:

Image

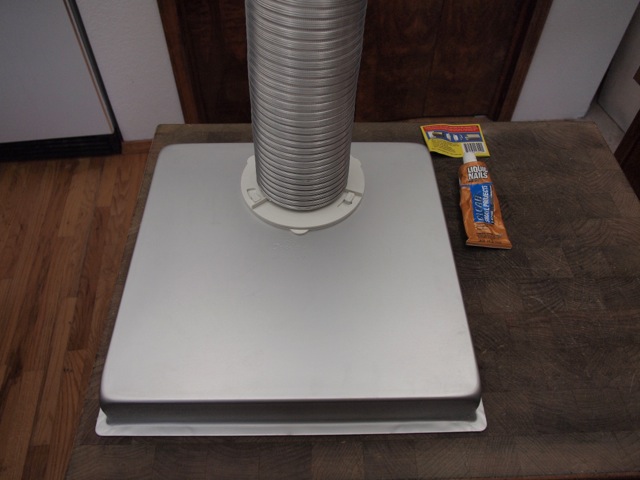
The next two pics show the air inlet tube quick-disconnet flange attached and the air inlet hose attached to the quick-disconnect flange (the tube will be clamped to the flange with a 4 1/2" hose clamp). The hole idea of the quick-disconnect is so we can detach the exhaust and inlet hoses and strap the portable a/c unit to the CT wall for travel.

Next up will be attaching the "Fat Daddio's cake pan to the back of the portable a/c unit and then cutting a hole in the CT sidewall or floor (I am undecided at this point where to take the inlet from i.e. through the sidewall of the CT or the floor). I would prefer the floor but am concerned about inlet air sucking in hot exhaust air if I go through the floor so am thinking going higher up through the sidewall would be better for a/c unit efficiency. Any thoughts would be appreciated.

Don

Image
Image
User avatar
d30gaijin
Titanium Donating Member
 
Posts: 594
Images: 139
Joined: Sat Jun 12, 2010 9:27 pm
Location: Boise, Idaho
Top

Re: Don & Christi's 6 x 10 Cargo Conversion

Postby roadinspector » Tue Jul 10, 2012 10:19 pm

Nice set up!!! Well thought out. I agree, I would prefer the intake being thru the floor. IMHO, I wouldn't be concerned with any exhaust getting in while traveling. It should blow right by without any problem. If it is a concern, you obviously have your Masters in Southern Engineering, rig up a cap that will lock into the flange to seal it off. Get another male flange and put a rubber boot over it with a clamp holding it in place. Or while you are at HD, take the male fitting over to the plumbing dept and test fit pvc caps till you find one that is close. Use the same adhesive and secure it to the flange. You probably have already thought of it but you will prob want to put a screen on your intake to keep unwanted critters and shtuff from getting in.

Good luck and really enjoying your build.

Earnest
Dadgum it! I cut that board 5 times and it's still too short!
2001 quad-cab Dodge Cummins 3/4 ton camper special, 16x7x7 CT work in progress toyhauler, 01 HD Ultra Classic, 98 HD Heritage Softail, 88 HD 1200 Sportster. viewtopic.php?f=42&t=51510
User avatar
roadinspector
500 Club
 
Posts: 599
Images: 127
Joined: Wed Mar 24, 2010 10:33 pm
Location: Texas
Top

Re: Don & Christi's 6 x 10 Cargo Conversion

Postby pmowers » Wed Jul 11, 2012 11:07 am

Thank you, thank you, thank you. I had never heard of the quick connect flanges. That just solved a big problem that I was working on, I did not want to use the galvanized collars from HD for my a/c mod. I thought that they were clunky, in the way and hard to attach. Those flanges are elegant, clean and just what I needed.

As for floor venting, what about making a small door (put the hinge toward the front) to cover the flange on the floor from below? If you got fancy, you could springload it, otherwise just attach a small bungee. You just reach down and hook the bungee when getting ready to travel. When you want to hook up the a/c, just release the bungee, door drops open, and attach your hose. If you used some of the elastic cord ( they have shoe laces made with the stuff at Target), you might be able to just insert the flange through the floor and open the flap, that way when you removed the flange, the flap would close automatically.

Pat

A penny for my thoughts is grossly overpaying.
Growing old is mandatory, growing up is optional.

Build log:http://www.tnttt.com/viewtopic.php?f=42&t=51193
User avatar
pmowers
Donating Member
 
Posts: 287
Images: 43
Joined: Wed Sep 14, 2011 2:44 pm
Top

Re: Don & Christi's 6 x 10 Cargo Conversion

Postby sportxlh » Wed Jul 11, 2012 4:45 pm

That's a nice explanation on the drawbacks of a single hose system. Other people have tried to describe one vs. two hose systems, but until your post, I don't think I really understand the downside. BTW, the front cabinet area looks fantastic!!!!
sportxlh
Teardrop Inspector
 
Posts: 16
Images: 1
Joined: Mon Mar 19, 2012 5:43 pm
Top

Re: Don & Christi's 6 x 10 Cargo Conversion

Postby d30gaijin » Wed Jul 11, 2012 7:38 pm

roadinspector wrote:Nice set up!!! Well thought out. I agree, I would prefer the intake being thru the floor. IMHO, I wouldn't be concerned with any exhaust getting in while traveling. It should blow right by without any problem. If it is a concern, you obviously have your Masters in Southern Engineering, rig up a cap that will lock into the flange to seal it off. Get another male flange and put a rubber boot over it with a clamp holding it in place. Or while you are at HD, take the male fitting over to the plumbing dept and test fit pvc caps till you find one that is close. Use the same adhesive and secure it to the flange. You probably have already thought of it but you will prob want to put a screen on your intake to keep unwanted critters and shtuff from getting in.

Good luck and really enjoying your build.

Earnest


Earnest,

Thank you so much for the kind words. Yep, I do now have a Masters in Southern Engineering, have studied for it all my life. Is there any better? 8) I majored (BS) in Home Ingenuity and went for my MS in Southern Engineering. :R

Thanks to you and others I believe I will go ahead and go through the floor for the a/c inlet. It fits with the stealth CT perspective we have been pursuing all along.

Don
User avatar
d30gaijin
Titanium Donating Member
 
Posts: 594
Images: 139
Joined: Sat Jun 12, 2010 9:27 pm
Location: Boise, Idaho
Top

Re: Don & Christi's 6 x 10 Cargo Conversion

Postby d30gaijin » Wed Jul 11, 2012 8:00 pm

sportxlh wrote:Your front cabinets ending up looking very nice!!!


SportXLH,

Thank you so much for the positive comments.

I have been a metal guy all my life. I can fabricate metal at home and be pleased with what I come up with. It goes back to my history with drag racing, motorcycles, working on airplanes, etc. But when it comes to woodwork I am flummoxed. There is no room for error because errors show up so quickly and are out of control before you know it. From my perspective wood working requires very specialized tools to do it right and achieve excellent results. With metal there is more room for error and correction, fudge factor to recover. That only speaks to home grown metal projects vs. home grown wood projects. This is no reference to precision metal machining, several of my friends do that for a living, and there is no margin for error in that field.

Don
User avatar
d30gaijin
Titanium Donating Member
 
Posts: 594
Images: 139
Joined: Sat Jun 12, 2010 9:27 pm
Location: Boise, Idaho
Top

Re: Don & Christi's 6 x 10 Cargo Conversion

Postby d30gaijin » Thu Jul 12, 2012 12:01 pm

pmowers wrote:Thank you, thank you, thank you. I had never heard of the quick connect flanges. That just solved a big problem that I was working on, I did not want to use the galvanized collars from HD for my a/c mod. I thought that they were clunky, in the way and hard to attach. Those flanges are elegant, clean and just what I needed.

As for floor venting, what about making a small door (put the hinge toward the front) to cover the flange on the floor from below? If you got fancy, you could springload it, otherwise just attach a small bungee. You just reach down and hook the bungee when getting ready to travel. When you want to hook up the a/c, just release the bungee, door drops open, and attach your hose. If you used some of the elastic cord ( they have shoe laces made with the stuff at Target), you might be able to just insert the flange through the floor and open the flap, that way when you removed the flange, the flap would close automatically.

Pat

A penny for my thoughts is grossly overpaying.


Pat,

I'm glad I could be of help. The two piece quick disconnect dryer hose coupling is a pretty slick unit. I went and picked up another this morning to use on the floor of the CT when I punch the a/c inlet 4" hole through the floor. I think I'll use your suggestion about a door and a bungie cord or something on the underside of the CT to seal off the hole when not in use. Thanks for that tip. :thumbsup:

Don
User avatar
d30gaijin
Titanium Donating Member
 
Posts: 594
Images: 139
Joined: Sat Jun 12, 2010 9:27 pm
Location: Boise, Idaho
Top

Re: Don & Christi's 6 x 10 Cargo Conversion

Postby d30gaijin » Thu Jul 12, 2012 12:13 pm

Bkcreation34 wrote:Wow Don your CT has been seen by so many I have never seen such a high number of vistors to your forum of 102564 people. Just imagine how many people around the world have been watching your build. Awesome job on your creative side and how you did your build. :thumbsup: :applause: :applause: :applause: :thumbsup: :thumbsup: :thumbsup: :thumbsup: :thumbsup: :thumbsup: :applause: :applause: :applause: :applause: :applause: :applause: :applause: :applause: :applause: :applause: :applause: :applause:


Keep up the good work, Maybe one day we will pass on the expressway or run into each other at a campsite down the road.


BK,

Thank you so much for the kind words. I too am surprised at how many people have viewed our build. I have no idea why when there are so many better build threads on this forum, so much better craftsmanship with so many of them than what ours is. We've been at it for just over two years now and our CT is still not done, but that is in part due to changes we've made from what we thought we wanted when we started it, death in the family, etc. Still, we just keep plugging along. :hammer:

I do hope we'll cross paths one day. It would be great to meet some of the wonderful people from this forum and see their CT builds in real time. :beer:

Don
User avatar
d30gaijin
Titanium Donating Member
 
Posts: 594
Images: 139
Joined: Sat Jun 12, 2010 9:27 pm
Location: Boise, Idaho
Top

Re: Don & Christi's 6 x 10 Cargo Conversion

Postby d30gaijin » Thu Jul 12, 2012 6:17 pm

Earlier today I glued the "Fat Daddio's" cake pan with 4" dryer quick-disconnect flange to the back of the portable a/c unit. The strap is to hold the cake pan in place while the "Liquid Nails" adhesive sets up. Later in the day I used bathroom white caulk around the edges of the cake pan to a/c unit edges to make sure there would be an air tight seal, especially on the left side where cake pan meets the a/c unit grill. You can see part of the grill on the left side but it isn't part of the airflow grill, it is faux to give the grill back a decorative look. I wanted to make sure all those grill appearing dips the cake pan is glued over were well sealed. I'll leave the cake pan strapped to the a/c unit overnight.

Tomorrow I hope to bore a 4" hole through the CT floor and use another quick-disconnect dryer flange for that hole screwed to the CT floor to seal it off then hook up the two hoses and try the a/c unit out to see if my "Southern Engineering" pays off in terms of better portable a/c unit efficiency. :R

It's 106 degree here in Boise as I write this, tomorrow should be a little cooler with a high of 100. I guess that's a good time to test for a/c improvements. ;)

Don
Image
User avatar
d30gaijin
Titanium Donating Member
 
Posts: 594
Images: 139
Joined: Sat Jun 12, 2010 9:27 pm
Location: Boise, Idaho
Top

Re: Don & Christi's 6 x 10 Cargo Conversion

Postby d30gaijin » Thu Jul 12, 2012 6:50 pm

d30gaijin wrote:Cooloohmoondooh! Received shipping notice today from Home Depot. The hammered tin we ordered for the galley backsplash area has been shipped and should arrive 12 July. Don


The hammered tin didn't make it today. Checked the FedEx Ground Tracking and the last update is July 7th that it had left NJ. No update since. WTH? I have no idea where our tin is or when it will get here. Thanks FedEx. :thumbdown:

Don
User avatar
d30gaijin
Titanium Donating Member
 
Posts: 594
Images: 139
Joined: Sat Jun 12, 2010 9:27 pm
Location: Boise, Idaho
Top

PreviousNext

Return to Cargo Trailer Conversions

Who is online

Users browsing this forum: No registered users and 16 guests