Page 1 of 4
Mitch's 7X16 (aka:Newbe with 7x16 conversion started)

Posted:
Sat Oct 30, 2010 7:00 pmby mskobier
Hello all,
I had heard about some people converting a cargo trailer to a camper/toy hauler, then I found this site!

I finally settled on a used 7X16 Haulmark. Got it for a good price and the fun has begun. I hope to have it serviceable by early spring.
My plans for this trailer is for it to be converted into a toy hauler with limited creature comforts. The wife and I do not need much in the way of creature comforts. Manly a warm, dry place to sleep after a day of ATV riding. The conversion will entail insulating, painting the walls, flooring, installation for a limited AC and DC electrical system, a furnace, windows, some counter space, small AC refrigerator, and a bed. We already have all the camping gear one could need, so the basics are already covered. I also already have a propane forced air furnace, power converted/distribution panel, small refrigerator and most of the other electrical supplies that will be necessary. I forgot to mention that I have also set the budget for this project (not counting the initial cost of the trailer) at $1500. So with that in mind, I plan on reusing or adapting as much as possible to keep the cost down. I am very mechanically and electrically inclined, so this should be a fairly easy and fun project.
Another requirement of this conversion is that it must be able to hold two full size ATV's. That is part of the reason for the limited ammenities. The bed will be a fold down system in the rear of the trailer that will also function as a sitting area. The sleeping pads we already use will be the matress. The bed has to fold up and out of the way so we can load the ATV's for transport.
I am really glad I found this group. The different ideas that different people have are really awsome. I am sure I will adopt some of them during the conversion.
Mitch
Posted:
Sat Oct 30, 2010 7:21 pmby GPW
MS, COOL !!! Please take pictures...!!!

Welcome to the forum !!
Posted:
Sat Oct 30, 2010 8:01 pmby TurboandMe
Welcome! WE LOVE PICTURES! Just thought I'd give ya a little hint.

7X16 conversion started
Posted:
Sun Oct 31, 2010 9:43 pmby mskobier
All,
It took me a bit to get some pictures uploaded to my album. Unfortunately I did not take pictures of the inside prior pressure washing the floor and removing the counter top and cabinets that were installed by a the previous owner. The floor plywood is actually in pretty good shape. The PO had painted the black and white squares then painted over that with some sort of clear finish. As I was pressure washing, the clear finish came up in splotches/sheets. I was able to remove 99% of the old clear finish. The floor had a yellow tint to it, now the white squares are actually white. The floor will get a couple coats of a light grey porch and deck paint that I already have.
The walls were painted a flat white. They show dirt really bad. I will scuff sand the painted plywood to remove the high spots, then paint it with a gloss white paint. That way it will be bright and the gloss finish should allow washing to remove dirt that is sure to accumulate. The ceiling will also be covered with a white paneling so that the foam is protected and hopefully it will look nice.
I will be insulating with 1" of R-Tech white foam insulation in the walls and 1-1/2" over most of the ceiling. I would have liked to use the blue foam, but at almost twice the price, it would have put a serious dent in my budget. Remember, I have set a $1500.00 limit for the cost of the conversion. The difference of 1 R-value will not make that big of a dent in the overall insulation value of the trailer. I am considering adding an extra 1" to the inside of the rear door since that is where our heads will be when when we sleep.
I already have a propane furnace that is way more than I expect to need. It is a 34,000 BTU Suburban that I had from an old motorhome I had. I had installed the furnace new in about 1995 and it never really saw much use. I have already tested it and verified it is working properly. It should bring the temp up in the trailer fairly quickly and be able to keep it toasty warm on the coldest of nights.
I purchased a WFCO 8725 power distribution center. I looked at the stand alone chargers, but once I purchased a DC fuse panel, an AC breaker panel and all the mics items necessary, it was almost as expensive. It is also much nicer having all the electrical together in one spot. Since the small refrigerator I already have is black, I purchased on with a black case. The counter top will also be covered in a black speckeled formica on 1/2" plywood. I am going t try and reuse as much of the existing cabinetry as I can, but they are in rough shape. I will probably end up building new cabinets.The one thing I am not going to reuse is the existing counter top. It is one of the molded partical board ones with the formica laminated to it. Darn that thing is heavy. Easily 50lbs!
Enough for now. Hope you enjoy the pictures.
Mitch
Re: NEwbe with 7X16 conversion started
Posted:
Fri Nov 05, 2010 3:57 pmby NineLivez2Go
mskobier wrote:Hello all,
I had heard about some people converting a cargo trailer to a camper/toy hauler, then I found this site!
I finally settled on a used 7X16 Haulmark. Got it for a good price and the fun has begun. I hope to have it serviceable by early spring.
My plans for this trailer is for it to be converted into a toy hauler with limited creature comforts. The wife and I do not need much in the way of creature comforts. Manly a warm, dry place to sleep after a day of ATV riding. The conversion will entail insulating, painting the walls, flooring, installation for a limited AC and DC electrical system, a furnace, windows, some counter space, small AC refrigerator, and a bed. We already have all the camping gear one could need, so the basics are already covered. I also already have a propane forced air furnace, power converted/distribution panel, small refrigerator and most of the other electrical supplies that will be necessary. I forgot to mention that I have also set the budget for this project (not counting the initial cost of the trailer) at $1500. So with that in mind, I plan on reusing or adapting as much as possible to keep the cost down. I am very mechanically and electrically inclined, so this should be a fairly easy and fun project.
Another requirement of this conversion is that it must be able to hold two full size ATV's. That is part of the reason for the limited ammenities. The bed will be a fold down system in the rear of the trailer that will also function as a sitting area. The sleeping pads we already use will be the matress. The bed has to fold up and out of the way so we can load the ATV's for transport.
I am really glad I found this group. The different ideas that different people have are really awsome. I am sure I will adopt some of them during the conversion.
Mitch
I'm looking at doing the samething and for the same reason. Althought unlike you you have no idea what I'm doing when it comes to wiring the trailer up for power.
I was hoping someone could point me in the right direction on what I would need to get some electric into the trailer be it from a generator, battery power or from an rv hook up at camp sites.
Posted:
Fri Nov 05, 2010 5:13 pmby GPW
9L2G, you may want to check out the Electrical secrets in the forum index... everything electrical , CT is almost the same as a TD to wire , but easier ... or you can resort to a long heavy duty GFI extension cord , for very Basic AC ... get a plug adapter for the campgrounds... (cheap)
The thing you have to consider is what you'll be using electricity for ... whether battery , or generator powered.. on or off the grid ....and for how long ..
Posted:
Sat Nov 06, 2010 10:56 amby Jo
I want a trailer for my ATV too, I will follow this thread for sure!
Thanks for sharing!
Posted:
Sun Nov 07, 2010 7:08 pmby mskobier
All,
I just added some more pictures to the album.
The pictures show the home made tools that I am using to cut the foam. The hot wire table is just a piece of 4x8 plywood with an arm mounted to holds the wire in tension. The power supply for the wire is basically a 12volt transformer rated at 20 amps fed by a variable transformer (Variac) The transformer allows me to vary the output voltage of the transformer from 0 volts to the max the transformer can deliver (around 15 volts AC). you couls use an old battery charger ( not voltage regulated type) and feed it with the variac to control the voltage. The wire just turns the current flowing through it to heat, like an electric heater, which cuts (melts) the foam. The maximun voltage available at the heating wire is approx 15 volts ac. Not enough to shock you, but it will definately burn you!
The slotting tool is just a cheap (<$10.00 on sale) HF soldering gun. It does exactly the same thing as the hot wire but with much more current. I replace the soldering tip with a piece of 12 gauge copper wire. It fits the clamp connections perfectly. the copper wire will get way too hot if the trigger is held too long. I just start the cut and release the trigger for a few seconds then squeeze it again when it coold down some to control the temperature. The purpose of this tool is so that I can run wiring in the foam and not against the aluminum skin of the trailer. It will also work nicely to cut the foam for any receptical boxes or light fixtures.
The remainig pictures are of yours truely hard at work on the conversion. Unfortunately, I only have an hour here and there to work on the trailer. So I can only get a little at a time done. If I keep at it, eventually it will be finished. Actually, I would have finished the walls today, but the wind and rain put a stop to that.
Enjoy the pictures. If anyone has any questions, I'll do my best to answer.
On another topic, has anyone used the reflective foil thermal barrier stuff between the plywood walls and the foam insulation? If so, was it worth the effort? I had originally planned on placing a sheet of 6mil plastic between the plywood and the foam insulation as a vapor barrier. I think now I will use the reflective material since it was actually made for that purpose. I figure it can't hurt either. I'm just trying to get as much bang for the buck as I can. Probably should have bought the blue foam.
Later
Mitch
Mitch
Posted:
Mon Nov 08, 2010 8:42 amby pete42
Mitch nice build I made a homemade airplane from foam and fiberglass.
we used a wire strung between what looked like a old fashion wooden bucking saw shaped kinda like a M we used a toy train transformer to control the temp of the wire to much and it will burn bigger to cool and it drags just right and it would leave "hairs" we used alum. patterns.
we cut the wings and body from 4X4X8 or 2X4X8 blocks of foam.
Posted:
Mon Nov 08, 2010 8:40 pmby sqweasel
Hi mitch,
I beleive that breathability is an important key to keeping the inside of your trailer warm. Non-porous materials (plastic or plastic foil) will trap moisture inside the trailer more easily raising the realitive humidity. People are terific humidity builders when they breathe. Humid air will conduct the cold to you more easily making it feel colder. Any swimmer will tell you that 75 degree water feels pretty cold. 50 degrees feels colder in San Francisco than it does in Wyoming (at least it does to me)

I just insulated my trailer and didn't even think of a vapor barrier (wish I had), but I think that a "house wrap" that is made to be a breathable moisture barrier would be your best bet. it's available at most any home improvement store.
Posted:
Sat Nov 13, 2010 8:11 pmby mskobier
All,
Thanks for the replies. I will look at the house wraps at the big box stores tomorrow.
I have a question that maybe someone can answer. The existing trailer lighting and interior lighting in my trailer has a lot of in line wire splices using a rather large size wire crimp. These are too large to fit in the wire loom I plan on using to protect the wires. I am considering using butt splices with the heat shrink/adhesive shell. the reason is they are much smaller and will fit in the loom I want to use. Here are some pics of the two type of splices. the color is not the same as the ones I have, these are just examples.
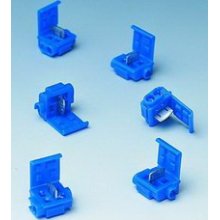
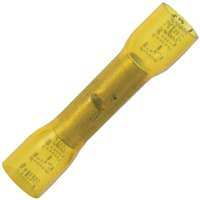
I may also just remove the existing crimps and use solder with heat shrink. A lot more work, but then there would be no doubt on the quality of the connections.
Any opinions or experiences will be greatly appreciated.
Mitch
Posted:
Sat Nov 13, 2010 8:24 pmby mskobier
I also added a couple of pictures to the album
Mitch
Posted:
Sun Nov 14, 2010 8:36 amby pete42
The different colors mean they fit different wire sizes.
the blue splices pictured work well but tend to come apart sometimes.
solder works very well, if you can stagger the splices so they fall into different places along the wiring loom kinda prevents lumps.
Posted:
Sun Nov 14, 2010 6:09 pmby vreihen
I believe that there was a thread debating the merit of soldering versus crimping in the electrical forum here a few weeks ago. It is worth a read.....
Edit: here's the link:
http://www.tnttt.com/viewtopic.php?t=40860
Posted:
Sun Nov 14, 2010 7:53 pmby mskobier
Vreihen,
Yes, I saw that thread. However, in my opinion, they never reached a definative conclusion. I have all the proper tools, strippers, and ratching crimpers to make good crimp connections as well as the appropriate soldering equipment. Today I worked on the wiring some and layed out the placement of the windows. Due to the large number of crimp connectors on the trailer lighting system and that some of the routing will need to be changed due to windows and such, I have decided to replace most of the wiring. What I do not replace, I will use solder and heat shrink. that way, I should never have to mess with the wiring again. The trailer is 10 years old already, and the existing wiring was working fine. I live in a relatively dry climate (SE Washington State), so corrosion from humidity should not be a problem. I imagine that good quality, properly crimped connectors would also work fine. Especially the type with heat shrink/adhesive. Not only do they make a good electrical connection, the heat shrink keeps the joint from moving due to vibration.
I also installed the entrance light today. It will be routed to a double switch. One switch controls the interior lights and one for the outside light. I have to move the existing interior lights as one is where the Fantastic Fan will be mounted and the other needs to be farther to the rear. I will also add another light to illuminate the mid section of the trailer. There will also be a set of LED lights mounted over the galley counter below the overhead cabinets. I'm still looking for the perfect light.
I'm still pondering the idea of adding a set of ramp lights to the outside rear of the trailer. In my thinking, they could come in handy trying to set up the ramps and such. I will probably use a set of off road driving lights mounted above the rear doors and pointing down. Two 55 watt assemblies should be more than enough. I will install a switch just inside the rear doors to control these lights. I thought about installing the switch beside the man door, but decided I wanted the ability to contol them at the rear.
Hopefully, I will complete the wiring mods late next week so I can finish installing the insulation. I really want to get that done before the weather turns too cold. That way I can set up a small heater and keep it warm inside while I work.
enough for now.
Mitch