5x8 shorty, multipurpose build...
I've had my eye out for a smoking deal on a toy hauler for some time now, but never could find something that satisfied both my minimum criteria and my budget. Inspired by several of the ct conversions here, I turned my attention to my neglected 5x8 ct sitting out beside the barn. For the last few years it has simply been a weatherproof place to store all of my camping gear, which would get packed in the bed of the truck for outings. Time to breathe new life into this little jewel!
I'm hoping to use this for camping, hauling my radio control planes/cars to local events, and still be able to fold and/or remove interior additions to allow the trailer to still serve as a cargo trailer.
It didn't take long to realize shoehorning all of my ideas into the 5x8 footprint was like fitting 10 pounds of sh... I mean potatoes in a 5 pound sack. Sleeping quarters would have to be outside the trailer. I love to tent camp, but it's often difficult to find smooth level ground to set up in the places we frequent. I stumbled across a Conqueror expedition trailer, and the seed was planted to build a folding roof rack to carry excess cargo and double as a sleeping platform. Several days later after learning my way around Google Sketchup, I came up with this:

I sent the design off to a friend and fabricator who was looking for a winter project to teach his son how to weld. For the cost of materials and a couple hundred bucks, we'll see how it turns out.
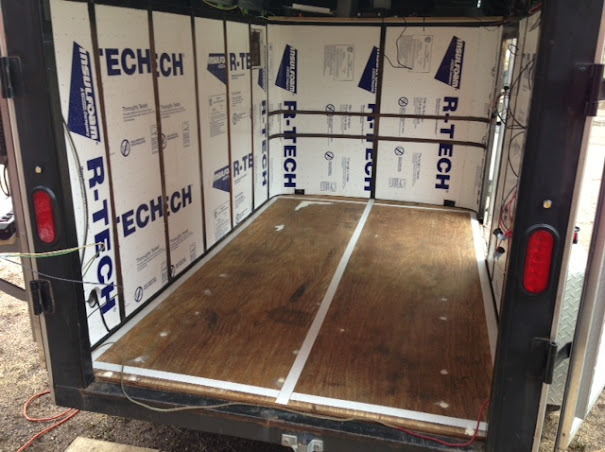
While waiting for the roof rack, I turned my attention back to the trailer. Electrical was the first order of business. I converted the trailer plug to 7 round to match my tow vehicle, then added a tongue box to house a few batteries, air compressor, small inverter and a shore power connector. All running lights were converted to led bulbs, and led reverse lights were added. Fender clearance lights were added to meet current DOT regulations. Interior lighting and a 7" stereo/dvd player were also wired in. 1" foam insulation was added to the ceiling and sidewalls. Enough of me jabbering, here's some progress pics:


A roof mounted vent wouldn't work with the roof rack, so the next best location was up high on the driver's side wall. The standard 13" vent seemed large for the small trailer so I opted for a 9" model. I couldn't find a power vent option for it, so I made one out of 4 clear pc power supply fans. They move plenty of air and still let light pass.


I found a linoleum remnant at a local flooring outlet that I thought was appropriate for the build. This is held in place with carpet tape for now, we'll see how it holds up. The walls were covered in 1/8" white masonite. More progress pics:


The shiny new walls made the wood doors look like crap, so I thought I would skin them in the same masonite material. During disassembly, my heart sank! This is what I found:


Simply reskinning the door interior turned into building all new doors. The old doors were hollow to save weight, but the new doors are solid to better support the stove and sink. New rear door blanks glued and clamped, then installed:


I still need to rebuild the side door, but I've had my fill of doors for now. Next order of business was the 'fridge. I found an 80qt Edgestar at openboxdirect.com, who deals in damaged freight and customer returns. This was a gamble, as reviews included success stories of units with minor scratches to irreparable damage. For less than half the price of new, I pulled the trigger, got lucky and received an operational unit with a few dings easily straightened with a soft mallet. The stove and sink will hang off the rear doors, and I wanted the 'fridge to cantilever out past the rear doors to make more room inside to work/hang out. Also, the 'fridge mounting system would either have to be removable or fold out of the way when in 'cargo trailer' mode. Here's what I came up with using 3/4" black pipe, tees, ells and floor flanges:


All threaded connections will be backwelded except for the three pivot points.
That's it for now, still have a long way to go but thought I'd share my progress to date and get some constructive criticism from the group!
I'm hoping to use this for camping, hauling my radio control planes/cars to local events, and still be able to fold and/or remove interior additions to allow the trailer to still serve as a cargo trailer.
It didn't take long to realize shoehorning all of my ideas into the 5x8 footprint was like fitting 10 pounds of sh... I mean potatoes in a 5 pound sack. Sleeping quarters would have to be outside the trailer. I love to tent camp, but it's often difficult to find smooth level ground to set up in the places we frequent. I stumbled across a Conqueror expedition trailer, and the seed was planted to build a folding roof rack to carry excess cargo and double as a sleeping platform. Several days later after learning my way around Google Sketchup, I came up with this:
I sent the design off to a friend and fabricator who was looking for a winter project to teach his son how to weld. For the cost of materials and a couple hundred bucks, we'll see how it turns out.
While waiting for the roof rack, I turned my attention back to the trailer. Electrical was the first order of business. I converted the trailer plug to 7 round to match my tow vehicle, then added a tongue box to house a few batteries, air compressor, small inverter and a shore power connector. All running lights were converted to led bulbs, and led reverse lights were added. Fender clearance lights were added to meet current DOT regulations. Interior lighting and a 7" stereo/dvd player were also wired in. 1" foam insulation was added to the ceiling and sidewalls. Enough of me jabbering, here's some progress pics:
A roof mounted vent wouldn't work with the roof rack, so the next best location was up high on the driver's side wall. The standard 13" vent seemed large for the small trailer so I opted for a 9" model. I couldn't find a power vent option for it, so I made one out of 4 clear pc power supply fans. They move plenty of air and still let light pass.
I found a linoleum remnant at a local flooring outlet that I thought was appropriate for the build. This is held in place with carpet tape for now, we'll see how it holds up. The walls were covered in 1/8" white masonite. More progress pics:
The shiny new walls made the wood doors look like crap, so I thought I would skin them in the same masonite material. During disassembly, my heart sank! This is what I found:
Simply reskinning the door interior turned into building all new doors. The old doors were hollow to save weight, but the new doors are solid to better support the stove and sink. New rear door blanks glued and clamped, then installed:
I still need to rebuild the side door, but I've had my fill of doors for now. Next order of business was the 'fridge. I found an 80qt Edgestar at openboxdirect.com, who deals in damaged freight and customer returns. This was a gamble, as reviews included success stories of units with minor scratches to irreparable damage. For less than half the price of new, I pulled the trigger, got lucky and received an operational unit with a few dings easily straightened with a soft mallet. The stove and sink will hang off the rear doors, and I wanted the 'fridge to cantilever out past the rear doors to make more room inside to work/hang out. Also, the 'fridge mounting system would either have to be removable or fold out of the way when in 'cargo trailer' mode. Here's what I came up with using 3/4" black pipe, tees, ells and floor flanges:
All threaded connections will be backwelded except for the three pivot points.
That's it for now, still have a long way to go but thought I'd share my progress to date and get some constructive criticism from the group!


