Page 1 of 2
7 x 14 Upgrade

Posted:
Sun Nov 10, 2013 6:25 amby jmayaa
Started upgrading my 7 x 14 2005 Danzer trailer on Saturday.
The upgrade will consist of built in cabinets, new lights, and a work bench area. I use this trailer for racing my vintage karts.
I managed to remove all the interior plywood in prep for insulation and running some 110v lines for receptacles and lights.
After I got it gutted out, I noticed that all of the 12v connections used those danged blue quick connect clips.
While I've never had an issue with the running lights or brake lights, I'm wondering if I should remove those clips and either solder or use regular crimp type wire connectors and put heat shrink over all the connections?
Also,
Can anyone on here tell me how to post pictures?
I've tried several ways, but I keep getting a message my files are to big.
I'd like to post pics as I go along with this little project.
Thanks everyone,
Jeff
Hagerstown, MD
Re: 7 x 14 Upgrade
Posted:
Sun Nov 10, 2013 11:55 amby Prem
 Jeff,
Jeff, There's a
How to Post Photos tutorial on the main menu. Basically all you do is import them into your personal album or post them to an online photo sharing site like Flickr and then in a post like this click on
URL right below the subject line of any post you create. The link to your photo goes in between the URL brackets. Like this [img]http:www.myphoto.com[img]. (I left out the forward slash so it appears as type and doesn't try to go to a link.) When you hit PREVIEW or SUBMIT the post appears with the photo in place. Cameras take photos with lots of pixels. Here, less pixels are required. Sometimes if you just create an account on a photo sharing site the site automatically reduces the size (number of pixels). Otherwise, you have to use photo editing software on your own computer to reduce their size before you can upload them to your personal album here. (I use GIMP for the free Ubuntu Linux operating system, not Microsoft Windows or Apple.)
Prem

P.S. Not to worry. It takes a little getting used to.
Re: 7 x 14 Upgrade
Posted:
Wed Nov 20, 2013 9:40 pmby jmayaa
Here are two pics of my progress. 1st pic is after I gutted the inside. 2nd pic is the insulation being pplaced. I ran two 110v outlets and a 4' T5 light. More pics as I progress with this project.
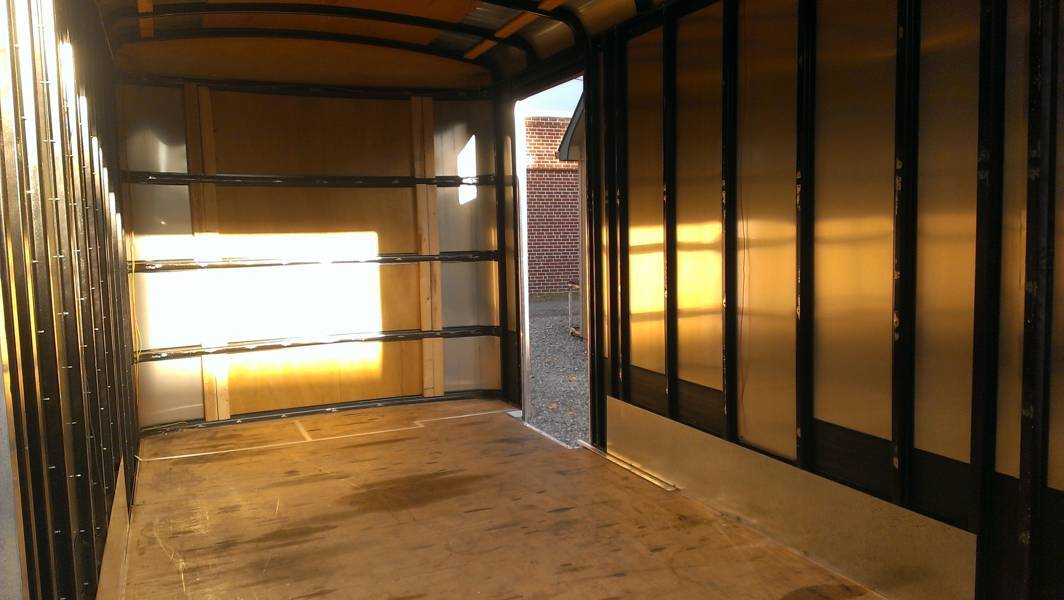
- IMAG0809 (FILEminimizer).jpg (66.79 KiB) Viewed 4917 times
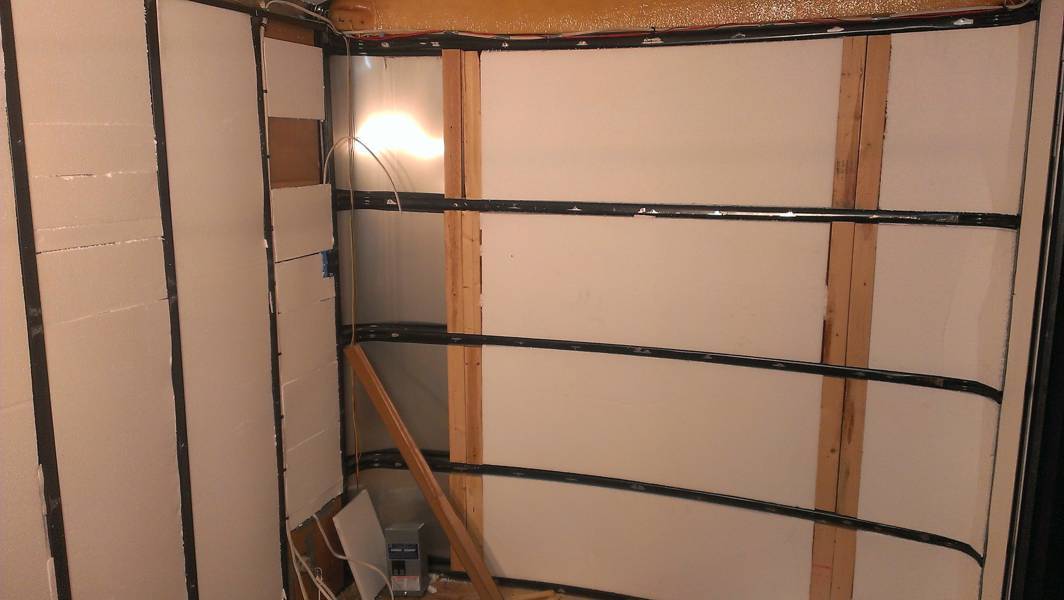
- IMAG0846 (FILEminimizer).jpg (52.02 KiB) Viewed 4917 times
Re: 7 x 14 Upgrade
Posted:
Sat Nov 23, 2013 10:59 amby bc toys
great start keep up good work
Re: 7 x 14 Upgrade
Posted:
Tue Dec 03, 2013 11:07 pmby jmayaa
Cabinets roughed in, ceiling and light installed.
Next is figuring out what to do with the transition from the walls to the ceiling.
Thinking of either using wood or metal flashing rolled into the corner.
Next is to finish the upper corners, finish the trim, installing a door on the shelf area, then paint.
More pics to come.
Re: 7 x 14 Upgrade
Posted:
Wed Dec 04, 2013 12:04 amby Rainier70
Nice build.
Re: 7 x 14 Upgrade
Posted:
Thu Dec 05, 2013 5:16 amby bc toys
Re: 7 x 14 Upgrade
Posted:
Thu Dec 05, 2013 12:01 pmby Gonefishin
Ooh, more building talent coming on display here.
I'm going to like watching this one.

Keep 'em coming.
Re: 7 x 14 Upgrade
Posted:
Sat Dec 14, 2013 6:23 amby jmayaa
Here are a few where the walls meet the ceiling transition.
I used aluminum flashing and carefully rolled it into the corner, used some screws and washers to secure in place.
Haven't had a lot of time to work on it between the regular job and danged snow and low temps.
Hope to get in it today with a small electric heater and finish installing the bench. After that, vacuum out and get it good and warm and primer everything. Of course, it's calling for another 3 to 5" of the white sh-t today.
Re: 7 x 14 Upgrade
Posted:
Sat Dec 14, 2013 9:31 amby lrrowe
Hi jmayaa,
Glad to see another CT converter from the East Coast....keep up the good work.
Re: 7 x 14 Upgrade
Posted:
Sat Dec 14, 2013 6:25 pmby jmayaa
Spent the day between the shop and trailer. Making up and installing the workbench.
I scribed the bench top to fit the curved section of the front wall of the trailer.
I had a heavy steel drawer unit that sits i the right side of the bench area.
Hopefully, I will be able to set an additional electric heater inside the trailer tomorrow and get a coat of primer on everything.
Re: 7 x 14 Upgrade
Posted:
Fri Dec 20, 2013 4:07 pmby jmayaa
I have a question concerning this remodel job, actually, advice.
Being this remodel will be to transport racing karts to events, I naturally would like to put the black and white checker board pattern on the floor.
I checked a few places today for square tiles and vinyl.
I hate to sound cheap, however, $300.00 to $500.00 for material to cover the floor seems a little excessive.
So,
My thoughts are to paint the floor white, allow it to dry and layout a pattern and tape it off and paint the black portion in.
Has anyone ever done or tried this approach?
Is there a way to mask it off so I don't have to mask it two different times?
Will post pics later this weekend of the progress so far.
Thanks,
Jeff
Re: 7 x 14 Upgrade
Posted:
Fri Dec 20, 2013 6:14 pmby MtnDon
Masking. That will be a good trick to get the pattern in only one taping. I don;t know if the following will help you any on this job, but here's how we make razor sharp changes from one color to another on walls where two colors are desired.
-Paint the first color, usually the top down to slightly below the color change line. Let dry.
-Use blue masking tape at the place needed. Get some high quality paintable latex caulk. Using a finger apply a very thin skin of caulk over the tape edge down over the lower tape edge and into the area that will be the second color. Smooth it out thin.Let dry.
-Paint the lower color. After a couple -three hours carefully lift the tape.
-Using the caulk leaves leaves a sharp line with no bleed under the tape edge, not even on the typical textured wall.
Re: 7 x 14 Upgrade
Posted:
Fri Dec 27, 2013 7:09 pmby jmayaa
Hey everyone,
Here are a few more pics of the remodeling job.
There are still a few things to be done, the floor needs painted, there needs to be strips added along the base of the wall where it meets the floor, and some touch ups.
I have a tool box that will be placed beside the desk area, a vice mounted on the bench, a tire rack on the wall and the jib crane put back in.
Jeff
Re: 7 x 14 Upgrade
Posted:
Thu Feb 13, 2014 9:35 amby jmayaa
Well, Here is my 7 x 14 Danzer remodel. Pretty much complete except for stocking the cabinets and placing the tools and support items for when I'm at the races.