Page 1 of 2

Perseverance Rover - 7x16 Cargo Conversion

PostPosted: Sun Apr 25, 2021 10:33 pm
by cwaet
I started a build journal in the "build journal" forum, but quickly realized that most of the cargo conversion builds are documented here. Tried to move it, but will just repost the intro, then keep it going here. Family finally named it, so the new build journal gets a new name.

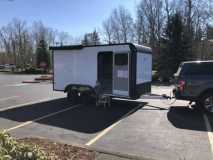
Hi all - Jumping in with both feet, thanks a lot in part to all of the great information and support on this site. After a year of looking at the various travel trailer options available and seeing nothing that met what we wanted (not to mention the build quality for the $$), I stumbled upon this forum and now am the proud owner of a 7x16 EZ Hauler. I added a few custom items to the build, so I've had 9 weeks to diagram, stress, buy stuff, ask a bunch of electrical questions, and re-configure the layout. Now that we have it, I'll be working through the usual first steps of insulation, roof vents, windows, wiring, and interior walls/ceiling steps. I'll try to post pictures along the way.

Trailer ordered:
7x16x7 Flat Front EZ Hauler
16" O/C walls/ceiling
RV door with window
axle flip
Cargo doors
rear stabilizers

Layout will be bunks up front, queen over the axles, bathroom in the middle on the passenger side, with galley in the back with pull-out drawers that slide under the bed.

164529

Re: Perseverance Rover - 7x16 Cargo Conversion

PostPosted: Sun Apr 25, 2021 10:46 pm
by cwaet
164933164532164526164525
Slowly making some headway on the build, although this Portland Spring weather is making it difficult to do much of anything. Even bringing materials from the garage to the trailer without them getting soaked is challenging. Since the trailer's framing is 1x1.5 aluminum tube, the layers of insulation will be as follows. I know there is a lot of discussion on the pros and cons of insulation, but the goal is to try to avoid having to put in air conditioning (less about retaining heat in winter) and control moisture, and just using the Maxxair fan to be installed.

Walls: 1" Polyiso between wall studs, horizontal 1/2 OSB furring strips, with 1/2 Polyiso between, then the final wall which is 1/4" Baltic Birch (R-value will range between ~1 - 10 in spots)
Floor: Inside, 1" Polyiso on top of OE plywood floor, covered with sheets of 1/2 OSB, screwed down (R-value ~7)
Ceiling: 1.5" Foamular XPS, horizontal 1/2 OSB furring strips with 1/2 Polyiso in between, covered by another layer of length-wise furring strips and polyiso, then some cedar 4" T&G (R-value range between ~4 - 14 in spots)

Ordered the windows which are double pane acrylic from Tern Overland, there will be one large on passenger side, one small on drivers side, and two in front for bunks (one of the reasons we went with acrylic). Going to frame them in with 1x1 aluminum tube, 90 deg brackets, and rivets (after reading Alaska Teardrop's Northern Lite Traveler build 100 times).

Awning will be going in next weather permitting, so I can finish up the ceiling. I'm a little concerned about the weight of it, as it will be 70 lbs on the drivers side from the back corner to about halfway down the length of the trailer. It is the OVS 270 deg awning to cover the RV door and the galley in the back, overall pretty impressed with the build quality and the brackets should work out nicely. There are three brackets that come with two ubolts each to go under the ceiling studs (actually meant for roof racks I'm told). I am going to try to put 1/2 flat stock aluminum to try to spread the weight out amongst all the studs that is spans. Then wiring in awning lights and backup camera.

Lastly, when I picked up the trailer, I was frustrated to see my tailgate would hit the jack, so I picked up a Jack-E-Up adapter. Overall looks like a neat design, but I'll report back on if it actually works as advertised once installed.

Re: Perseverance Rover - 7x16 Cargo Conversion

PostPosted: Sun Apr 25, 2021 10:51 pm
by cwaet
Jack-E-up worked great, and I have some pictures in my gallery if interested.

Update from where my last build journal left off:

Insulation completed
Wires run behind walls, wall sheathing up. I used a 1/4 BB plywood I had purchased luckily about 6 months ago.
Installed 4 awning Eurovision windows from Tern, 3 small and 1 large
OVS 270 degree awning installed
Installed the Maxxair fan in the main and a small one with a light in the bathroom (which is exhaust only)
Installed LED puck lights and finally have some working light in there when I have to close up when it's raining
1/4 "Cedar" T&G ceiling installed and sealed
Horizontal E-track for queen bed and bunk beds
LED awning lights for galley and side

Toughest part was ensuring I didn't snag a wire with a screw or nail when putting up the ceiling and walls. I marked it pretty well prior to install, just no way to verify now.

Currently using a bondo-type epoxy to fill the seams of the plywood walls and screw holes. Sanding that all is next then on to paint, interior bathroom walls, and electrical cabinet.
164934
164935
164932

Re: Perseverance Rover - 7x16 Cargo Conversion

PostPosted: Mon Apr 26, 2021 4:43 pm
by featherliteCT1
You are making great progress. Keep it up ... looks good! :thumbsup: :thumbsup:

Re: Perseverance Rover - 7x16 Cargo Conversion

PostPosted: Thu Apr 29, 2021 12:04 pm
by txen
This looks great! I really like how your ceiling came out.

Re: Perseverance Rover - 7x16 Cargo Conversion

PostPosted: Thu Apr 29, 2021 5:21 pm
by cwaet
Thanks! The "cedar" roof is pretty lightweight and, while kind of brittle to work with, turned out better than expected. Added a few coats of a flat sealant that will hopefully hold up well. I'll post another picture after the walls are painted.

We are in the process of framing out the bathroom, and have decided to have a more narrow shower due to space. We were going to go with a 32" square shower pan, but would like to have the width closer to 24". Does anyone know of a pan that could be oriented lengthwise? All of the 24x36" pans I'm finding have the threshold on one of the longer sides (which makes sense in most cases). I really don't want to go down to a 24" square or build my own. Otherwise I may try to waterproof the side without a flange which I worry about if i can actually accomplish... so I'm looking for ideas.

Re: Perseverance Rover - 7x16 Cargo Conversion

PostPosted: Fri Apr 30, 2021 2:13 pm
by flboy
This was my solution using a 24 in square pan and adding 8 inches up front and tapering to back. . I did not make a rectangular shower area. This gave space back to aisle way and Kitchen and added some angled walls to floorplan. Elbow room at front of shower is good. Used FRP to cover additional area and slanted slightly towards pan. Toilet is also in at an angle for good leg room. Sealed well with clear silicone sealer. Going on 5 years with 0 issues.


Image

Sent from my SM-N970U using Tapatalk

Re: Perseverance Rover - 7x16 Cargo Conversion

PostPosted: Mon May 10, 2021 11:47 am
by cwaet
flboy wrote:This was my solution using a 24 in square pan and adding 8 inches up front and tapering to back. . I did not make a rectangular shower area. This gave space back to aisle way and Kitchen and added some angled walls to floorplan. Elbow room at front of shower is good. Used FRP to cover additional area and slanted slightly towards pan. Toilet is also in at an angle for good leg room. Sealed well with clear silicone sealer. Going on 5 years with 0 issues.


Image

Sent from my SM-N970U using Tapatalk


This is great, thank you! We ended up going with a 24x32 pan, but are going to have a different layout for the bathroom. Appreciate the picture and the information.

Re: Perseverance Rover - 7x16 Cargo Conversion

PostPosted: Mon May 10, 2021 11:49 am
by cwaet
Wrapped up the filler, then moved to primer and paint. Really like how it turned out. I'll post a picture of the electrical cabinet soon, and the internal layout will start to take shape.

165152165153165151165149165150

Re: Perseverance Rover - 7x16 Cargo Conversion

PostPosted: Mon Sep 13, 2021 3:58 pm
by cwaet
Probably time for an update here. We're finally at a stage where we can start using it, with most of the interior work done. We still have the galley and flooring (along with a ton of little things) yet to do, but are starting to get it out this Fall. Took the first trip out to the Columbia, Puget Island, which made all of the hard work so far worth it as the kids had a blast playing in the sand. Overall really happy with how the layout is working. Next order of business will be to get it out to a scale to ensure I am not too overweight behind the axles. Here is a pic from the trip, along with the bunks/clothes drawers
167256

167252

167253

167247

Re: Perseverance Rover - 7x16 Cargo Conversion

PostPosted: Mon Sep 13, 2021 4:04 pm
by cwaet
Here are some pictures showing how we ended up laying out the bathroom. We went with a wet-bath style, with the shower in the center, diverting toilet on the right, and sink on the left. The sink has a 6 ft pullout handle that acts as a shower head for when we need it. Overall we wanted the option to take a shower if needed, but didn't want to take up too much space. This left a larger area of usable cabin room than we initially had planned. The sink and diverting toilet go to the grey water tank. We will probably end up adding a sink in the galley that I may connect or may use a 5 gallon blue jug there instead.

The shower "tiles" are dumawall, a super easy to use PVC product that my wife picked out. Not as lightweight as we could have gone, but pretty happy with how it turned out. Lastly, I added dual freshwater tanks (each about 20 gallons of usable space) that are held up by a steel frame right in front of the axles which along with the grey tank hopefully will help counterbalance the weight we are adding behind the axles with the kitchen.

167254

167248

167250

Re: Perseverance Rover - 7x16 Cargo Conversion

PostPosted: Mon Sep 13, 2021 4:08 pm
by cwaet
Lastly, we installed the plumbing using PEX and the Truma Combi water heater/furnace which will be nice here shortly as we are already seeing cooler temperatures at night here in the PNW. I'll post some pictures of that install shortly. The queen bed is in the middle of the trailer, then I left about 18" in the back for the kitchen. Here is a picture of the initial framing. On the left is our chest fridge on a slide, in the middle will be the sink, and then on the right will be a slide out kitchen/prep. All of this slides under the elevated queen bed, which I also have the electrical cabinet underneath, and eventually will have some more storage.

167246

Re: Perseverance Rover - 7x16 Cargo Conversion

PostPosted: Mon Sep 13, 2021 7:19 pm
by nsfr1206
I like the way it’s turning out. Ceiling looks great!


Sent from my iPhone using Tapatalk

Re: Perseverance Rover - 7x16 Cargo Conversion

PostPosted: Tue Sep 14, 2021 3:55 pm
by aggie79
Really nice build! :applause: :thumbsup: :applause:

Re: Perseverance Rover - 7x16 Cargo Conversion

PostPosted: Fri Apr 01, 2022 1:03 pm
by cwaet
Weather warmed up here in Oregon, so I was able to resume work on the trailer. The design of our floorplan is pretty fixed unlike most, which allows for some additional storage under the queen bed over the axles. Here are some pictures of the electrical cabinet and large storage drawers. Added some struts to be able to access under the bed if/when needed. Works alright with the foam mattress on top. Also installed the flooring which really made this feel completed on the inside. From the back there is a slide out chest fridge and eventually will be a kitchen slide out that slide under the other side of the bed.

168668168669168666