Page 1 of 2
Hard work but what a score!!

Posted:
Tue Oct 30, 2007 12:24 pmby Eunice
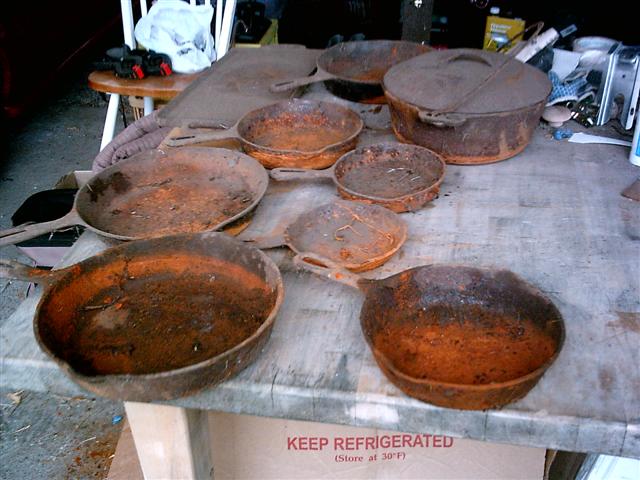
One of Kenny's clients had a stack of cast iron sitting in there yard just rusting away.
Kenny offered to "haul it off" for her. she kept one skillet but Kenny brought home 7 skillets, 1 flat bottom dutch oven and 1 griddle!
I am going to spend the day cleaning and seasoning to get rid of all the rust.
How cool is this!
Posted:
Tue Oct 30, 2007 12:44 pmby Ma3tt
pictures start to finish would be a great thing!
Posted:
Tue Oct 30, 2007 1:16 pmby Eunice
good idea. I will do that
rusty cast iron
Posted:
Thu Nov 08, 2007 12:36 pmby Eunice
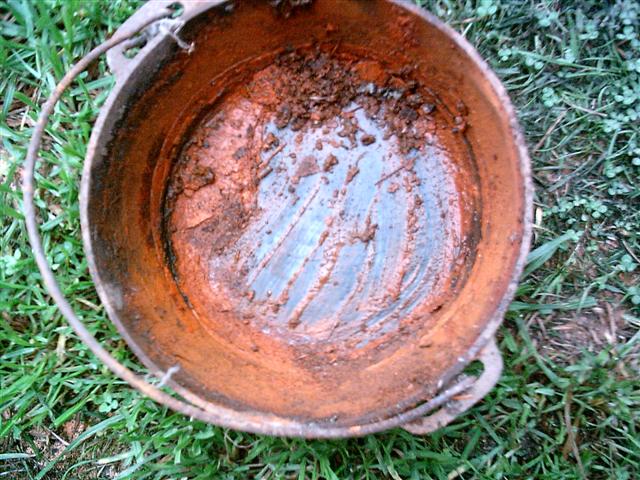
It is taking time but here is a couple of pictures. This is when I got them. I will post more pics after the first cleaning/seasoning later.
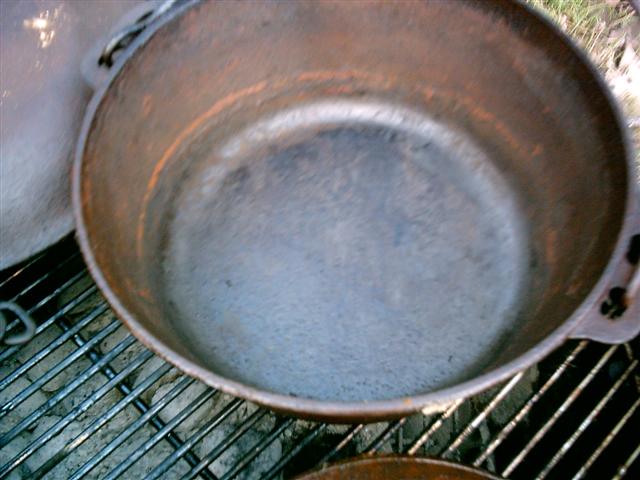
after one seasoning
Posted:
Thu Nov 08, 2007 12:55 pmby Eunice
This is the same dutch oven after just one cleaning/seasoning on the BBQ
Posted:
Thu Nov 08, 2007 1:21 pmby Mary K
A Sandblaster would make all that a lot easier.

That is a lot of Iron!! This will be fun to watch.
Mk
First Impressions
Posted:
Thu Nov 08, 2007 2:33 pmby The Teardrop Nanny

What a find, Eunice and Ken. Kind of made my eyes water when I first saw how serious of a clean up job you'll have. You might want to consider that blaster (ask Dean or Kevin about a quicker way to clean 'em up for you folks.) Hope to see the completed ones at a nearby gathering soon.
TDN

Posted:
Thu Nov 08, 2007 6:40 pmby Eunice
Kenny thinks I should have them blasted too. he has a small blaster and is willing to try.................nah I am being stubborn. there is a thread on here that talks about the different types of blasting and what pits and what doesnt.
At one of the classes at IDOS in LaPine Sue said dont do that........All you need is Crisco and keep working on it. I was talking to her about a bean pot I had that was in really bad shape. She said it would smooth out all the dings and get rid of the rust. I am happy with the bean pot so far. It went from "should throw it away to usable"
This will take awhile but it is working and its not like I dont have a dozen other skillets to use anyway.
Posted:
Thu Nov 08, 2007 7:54 pmby Mark72
http://antique-engines.com/electrol.asp
Eunice, Brick posted this link. I Didn't know if It was worth the trouble. Man am I glad I did it! The first pan was almost as bad as the ones you picked up. After 12 hours in the electrolysis Bath I was disappointed When I pulled out a still crusty pan. Then I realized the crust had been changed to soft mush. A quick once over with a wire brush revealed the results. WOW! After seasoning the pan looks like a brand new one! When I did my waffle iron It even removed all the old high temp paint someone had sprayed on it years ago. To say the least I am very pleased with this process it is very worth the effort! The best part is that it is really very easy.
Mark

Posted:
Fri Nov 09, 2007 12:00 amby Eunice
Dean also posted about electrolysis and that is why I joined IDOS was to get tlhe article they had on it.
I had not tried it since the Crisco repeated seasonings was working so well on my bean pot.
BUT there are so many I may go ahead and try this. If this doesnt do it I MAY let Kenny have a go with his sandblaster.
thanks for the post
Posted:
Sat Nov 10, 2007 1:31 amby Miriam C.
Eunice you did a great job with the rust. ARe you using steel wool. Used it one time with some Crisco also might try some dry salt to get the scale off then some Crisco.
Question about electrolysis
Posted:
Sat Nov 10, 2007 11:01 amby Eunice
I used a wire brush first then steel wool. Lots of Crisco. it is working and if it was just one pan I wouldnt mind but there are too many so I am going to try the electrolysis.
Question for those who have done this
The instructions that Mark posted state to bolt the piece being cleaned to a chain to hang in the bucket.
What if it is a lid with a solid handle and there is no way to bolt the chain to it? How do you suspend it in the bucket or can it sit on the bottom?
thanks for all the help
Posted:
Sat Nov 10, 2007 11:04 amby Ma3tt
You just need a solid connection for the battery charger, I have used a clamp, and on a small iron figurine I wrpped it with thick wire and it worked take pics during the process it is very fun.
Posted:
Sat Nov 10, 2007 4:41 pmby Dean in Eureka, CA
Eunice,
I wanted to keep my charger clamps from getting wet, so what I do is...
I just hang the sacrificial metal into the water and clamp the red lead to it above the waterline and I attach an old c-clamp to the cast iron and leave part of the c-clamp sticking up out of the water and clamp the black lead to the c-clamp where it is dry...
Posted:
Sat Nov 10, 2007 10:16 pmby cuyeda
I am learning how to process the electrolysis method, and sitting in the garage watching the water turn brown. I had a few questions listed in another recent thread, "Waffle iron, how to clean". I just had to say... I am a believer now! Electrolysis babe!
I have written instructions that was given to me at a electrolysis demonstration. If anyone is interested in it, I can post it from my other computer later. The pictures on the
www.idos.org web page is a good visual guideline as well.
Eunice... great find!