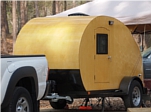
Scored my first 200A

Lanterns, stoves, etc... anything old!

Scored my first 200A

Postby Alan and Lianna » Mon Aug 16, 2010 1:33 am

Found this one at the flea market for $8
Image
After a wash
Image
I am looking forward to restoring this one, converting my stove back to liquid fuel(new generator), and being done with all the propane bottles.

Alan
Don't just dream about it!
Wake up and make it happen...
User avatar
Alan and Lianna
Teardrop Master
 
Posts: 120
Images: 389
Joined: Mon May 17, 2010 5:55 pm
Location: Pearland Tx

Re: Scored my first 200A

Postby starleen2 » Mon Aug 16, 2010 7:37 am

Alan and Lianna wrote:I am looking forward to restoring this one, converting my stove back to liquid fuel(new generator), and being done with all the propane bottles.
Alan


You're hooked now - nice looking coleman - should be fun to light 'er up!
User avatar
starleen2
5th Teardrop Club
 
Posts: 16272
Images: 224
Joined: Sat May 12, 2007 8:26 pm
Location: Pea Ridge ,AR

Postby Justin & Katy » Mon Aug 16, 2010 8:40 am

That is only the second reflector I've seen like that. Be sure to hang on to it.
Image
User avatar
Justin & Katy
Teardrop Master
 
Posts: 247
Images: 81
Joined: Tue Jan 05, 2010 3:26 pm
Location: Amarillo, Tx
Top

Postby High Desert » Mon Aug 16, 2010 11:52 am

Nice find! A Coleman classic for sure, may it give you years of service. Don't forget to let us see it when you're done.
Shaun

"it's not the years honey, it's the mileage"
High Desert
Platinum Donating Member
 
Posts: 8780
Images: 27
Joined: Wed Apr 08, 2009 1:46 pm
Location: SW Washington state
Top

Postby hotrod » Mon Aug 16, 2010 6:49 pm

welcome to the 200A club! :thumbsup:
Paul
Some people are like slinkys.. not much good for anything but they still make you smile when you push them down the stairs....
User avatar
hotrod
TILT
TILT
 
Posts: 16571
Joined: Tue Dec 12, 2006 10:04 pm
Location: northwest minnesota
Top

Postby Alan and Lianna » Mon Sep 13, 2010 8:38 pm

The frame was rusted up
Image
So, after reading about the electrolysis for rust removal in the cast iron thread, I had to try it out. I purchased some PH+ from Walmart, added 1 tablespoon per gallon of water and connected the Battery Charger and watched as nothing happened for the first day. The next day I added more PH+ since I am on well water and thought that might be the problem, still nothing. The battery charger I am using is an automatic one that also has a 100 amp start setting. I flipped it to 100A and the frame started bubbling, then when I set it back to automatic it would continue to bubble, it needed the higher amperage to get it started. Well after 3 to 4 days this is how it came out.
Image
Then after some sanding, priming, and several coats of paint and a trip to the oven. I reassembled the lantern.
Image
Now I just need a label and to fire it up...

Alan and Lianna
Don't just dream about it!
Wake up and make it happen...
User avatar
Alan and Lianna
Teardrop Master
 
Posts: 120
Images: 389
Joined: Mon May 17, 2010 5:55 pm
Location: Pearland Tx
Top

Postby hotrod » Mon Sep 13, 2010 8:48 pm

:thumbsup: :applause: :applause: :applause:
Paul
Some people are like slinkys.. not much good for anything but they still make you smile when you push them down the stairs....
User avatar
hotrod
TILT
TILT
 
Posts: 16571
Joined: Tue Dec 12, 2006 10:04 pm
Location: northwest minnesota
Top

Postby Wolffarmer » Mon Sep 13, 2010 9:09 pm

Beautyful job. :thumbsup: :thumbsup:

singing "Another one bites the dust"

Randy
"these guys must be afraid of the dark"
User avatar
Wolffarmer
Donating Member
 
Posts: 4612
Images: 309
Joined: Wed May 02, 2007 1:32 pm
Location: Idaho Rupert
Top

Postby Alan and Lianna » Thu Oct 28, 2010 4:38 am

Well, after the purdy paint job, I tried firing up the lantern and found that the check valve was stuck and the packing nut was leaking. I freed up the check valve by filling the tank with lacquer thinner and soaking over night. It actually only took about an hour to free up the valve, but figured letting it soak overnight wouldn't hurt. I was going to order the packing but found the instructions for replacing said to tighten until it stops leaking, so I tightened the nut and eventually it stopped leaking. Since the Lacquer thinner totally jacked up the paint job, I disassembled, repainted and installed a new generator and leather. Now that the lantern looks nice and works as it should I installed a label and its ready to go...

Image

Alan
Don't just dream about it!
Wake up and make it happen...
User avatar
Alan and Lianna
Teardrop Master
 
Posts: 120
Images: 389
Joined: Mon May 17, 2010 5:55 pm
Location: Pearland Tx
Top

Postby CliffinGA » Thu Oct 28, 2010 7:13 am

Alan I like the label!!! :lol: :lol:

Cliff
In God we trust, shoot the rest and he will sort out!

My Build:

viewtopic.php?f=50&t=42628
User avatar
CliffinGA
1000 Club
1000 Club
 
Posts: 1499
Images: 207
Joined: Sat Nov 14, 2009 1:29 pm
Location: Jefferson, GA
Top

Postby Zollinger » Thu Oct 28, 2010 5:14 pm

:thumbsup: :thumbsup: :thumbsup: I give it three thumbs up!
Dawn
____________________________________
'53 Zollinger "Va-Ka-Shun-Ette" and the boy's blog http://www.oscarthecampkat.blogspot.com/
Green Lantern Corpswoman
User avatar
Zollinger
1000 Club
1000 Club
 
Posts: 1027
Images: 64
Joined: Sun Jun 22, 2008 7:57 pm
Location: Gossipville , Wisconsin
Top

Postby suckerpunched » Tue Dec 14, 2010 11:33 pm

Beautiful work,,,,,,Will have to try the electricolis thingy on mine or at least a new paint job,,,,,,well done :) :)
TC
If you see my harley on a trailer,,,,call the police cause it's being stolen...
User avatar
suckerpunched
Teardrop Master
 
Posts: 295
Images: 22
Joined: Sun Sep 21, 2008 11:30 pm
Location: ogden Ut
Top

Postby canned o minimum » Tue Dec 21, 2010 9:20 pm

God help this poor man !? He's got the Coleman sickness fo sho !

Great resto job..and I love the decal !!!
canned o minimum
1000 Club
1000 Club
 
Posts: 1266
Joined: Sun Mar 21, 2010 11:54 pm
Location: Riverside,Ca.
Top


Return to Vintage Camping Equipment

Who is online

Users browsing this forum: No registered users and 3 guests