Trolley top mk 2....., Wanda

...ask your questions in the appropriate forums BUT document your build here...preferably in a single thread...dates for updates, are appreciated....

Postby jackdaw » Sat Apr 09, 2011 6:13 pm

It's been a while since I've posted an update...and thinks have been moving along nicely on the build.
I was in two minds as to build the trailer inside, or strip the caravan, and build straight on the chassis. With summer just about here, I decided it would be best to build outside :D :D
It took two days to empty and strip the caravan, to give us the chassis

http://i220.photobucket.com/albums/dd4/ ... p40001.jpg

I've just realised my photos are too large, so until I get chance to resize them......Heres a link to the build photos...

http://s220.photobucket.com/albums/dd4/ ... ?start=all

We've just had a couple of really warm days (for us anyway), with the sun shining It's so nice building on the drive.....progress

8) 8)
User avatar
jackdaw
500 Club
 
Posts: 598
Images: 124
Joined: Fri Feb 22, 2008 2:31 pm
Location: Wltshire, UK

Postby Deryk the Pirate » Mon Apr 11, 2011 7:18 am

Looks Great! Im sure the extra headroom is nice too!
Build Thread lil vardo 1: http://tinyurl.com/baqe6py
Build Thread lil vardo 2: http://tinyurl.com/b3rwffm
User avatar
Deryk the Pirate
500 Club
 
Posts: 809
Images: 158
Joined: Tue Aug 18, 2009 11:03 am
Location: Parlin NJ

Postby jackdaw » Tue Apr 12, 2011 11:15 am

Cheers Deryk :D

I've resized a load of the photos, and as we love photos it must be
time for an update ... Things have moved along with the build, and as summer approaches, I decided it was going to be a much more pleasurable build if i was out in the sun :D

The caravan was emptied, and stripped to a bare chassis in a couple of days.
Image

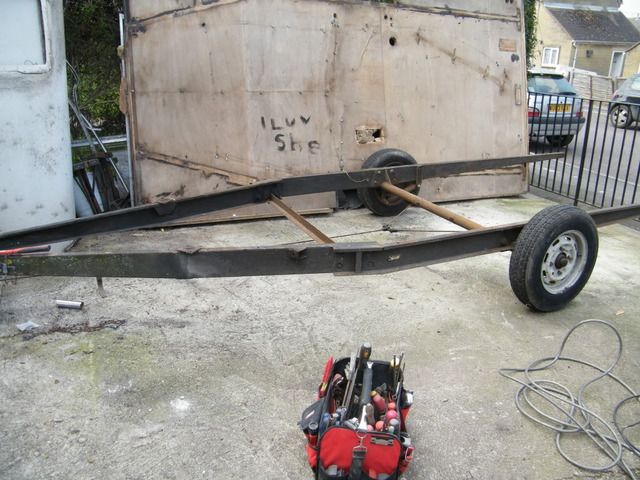
The chasis was shortened by re bolting the tongue closer to the axle, and trimming off the rear end.
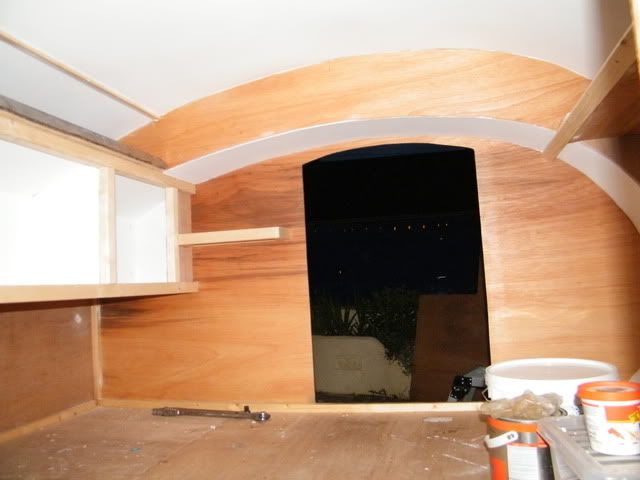
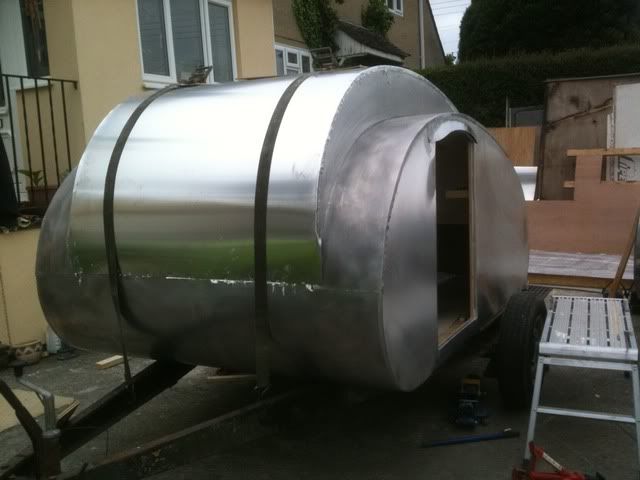
With the sides cut out already, It didn't take long to put the walls and floor together.

Image

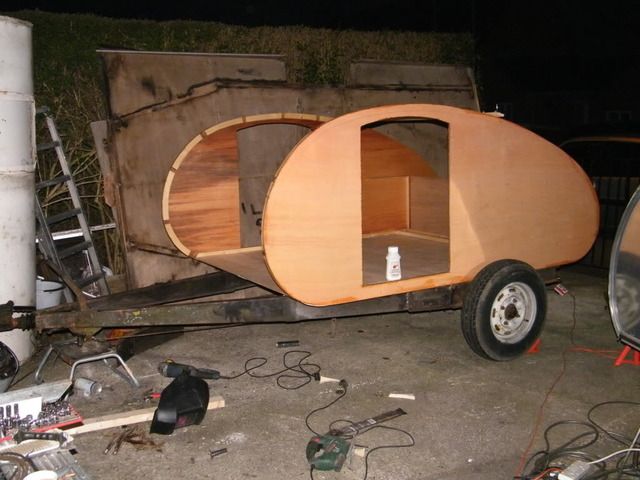
By the end of the next day, the 
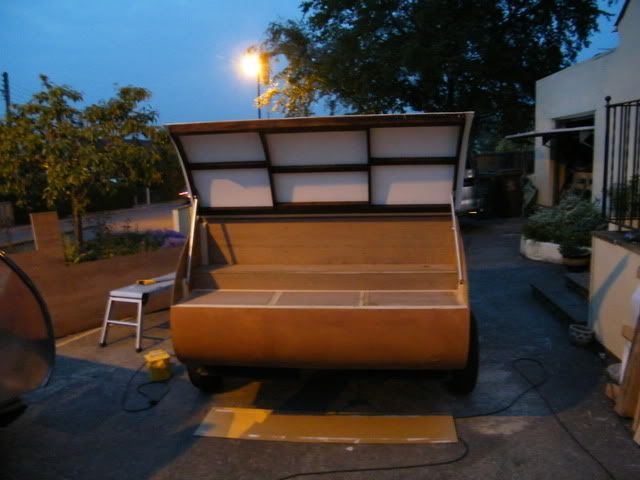
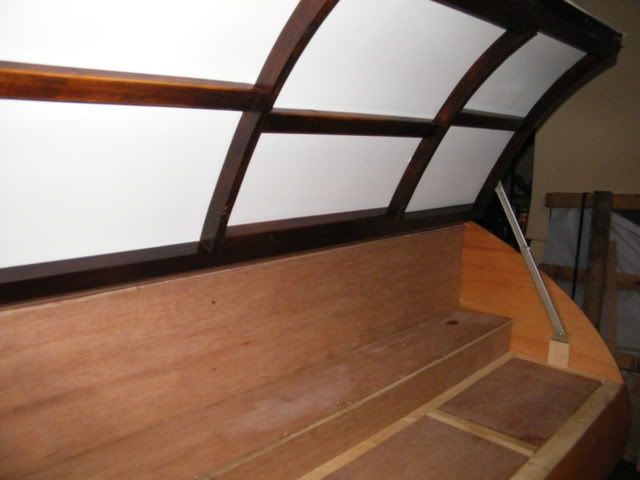
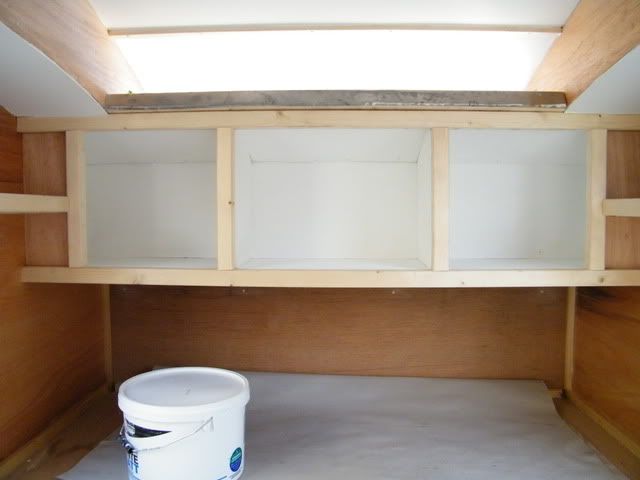
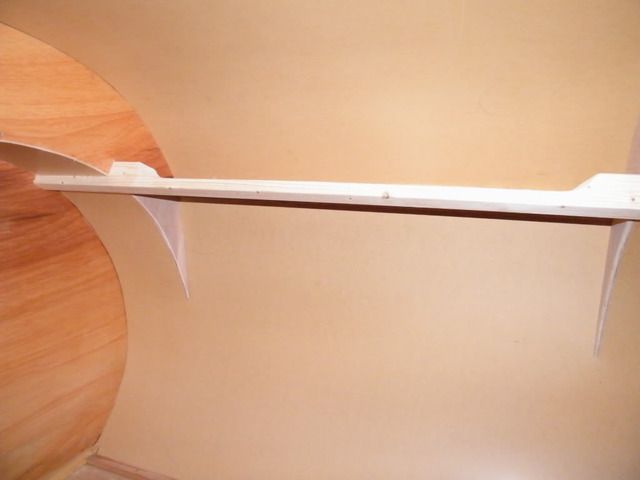
Trolley top was in place, along with most of the internal boards

Image

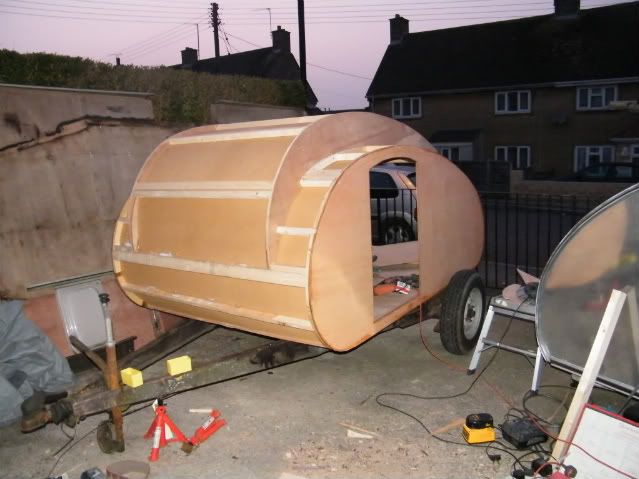
I put the front shelf in, and shaped the timber to give better access,

Image

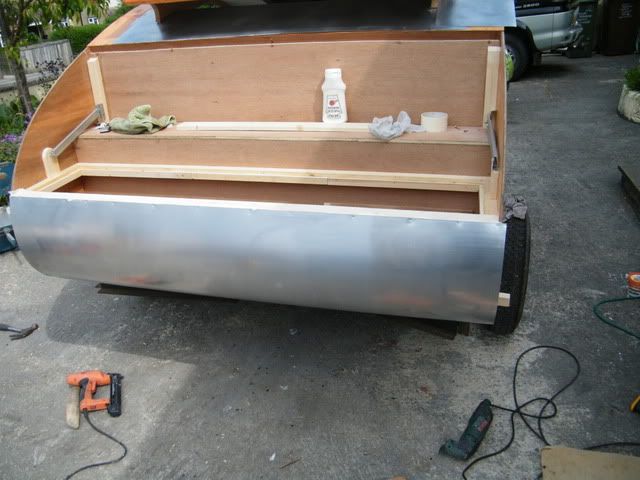
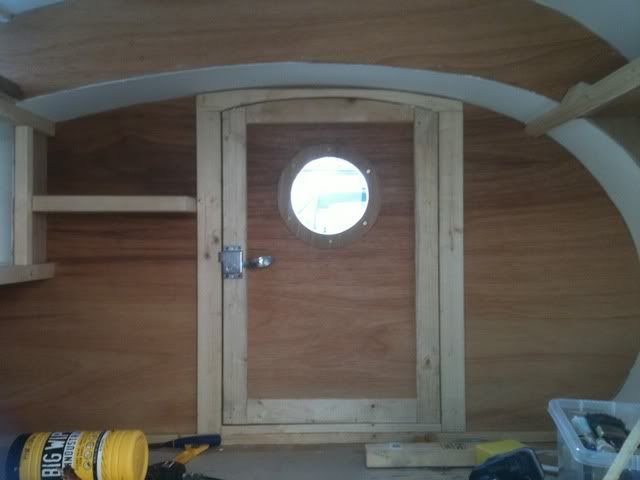
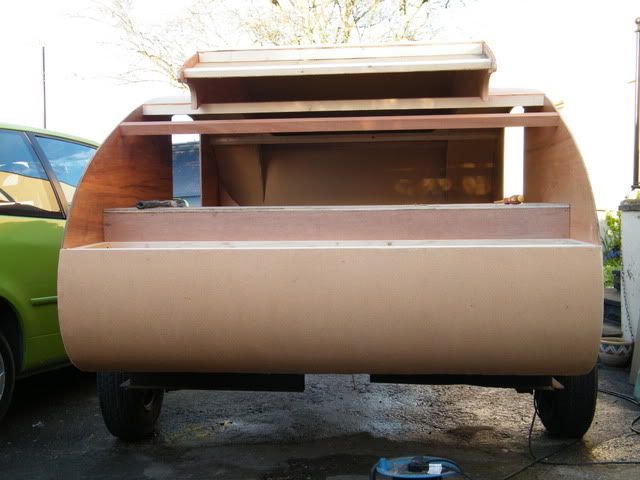
The back end has been skinned with hardboard and the bulkhead's fitted. Also fitted the hardwood cross member to pick up the hatch hinge.

Image

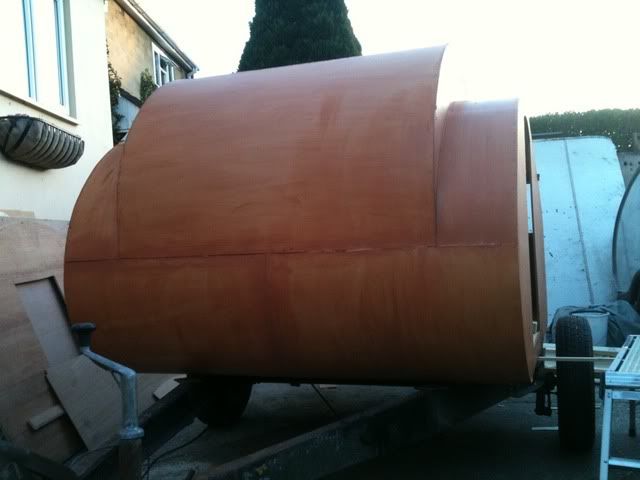
With the insulation finished, the external boards have been fitted and given a couple of coats of water proof stain. Ready for the aluminium :D :D :D
Image

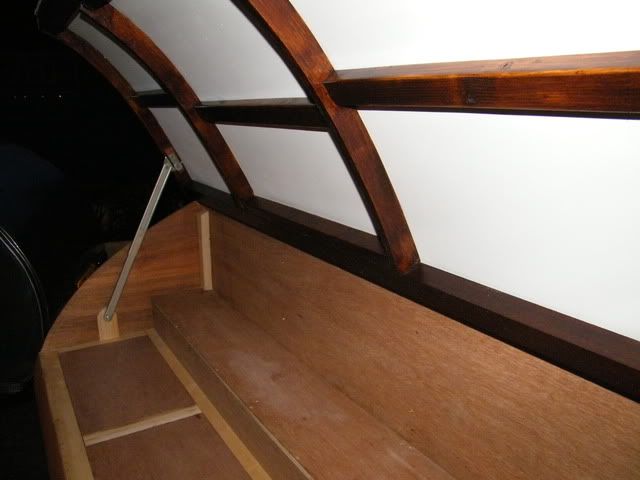
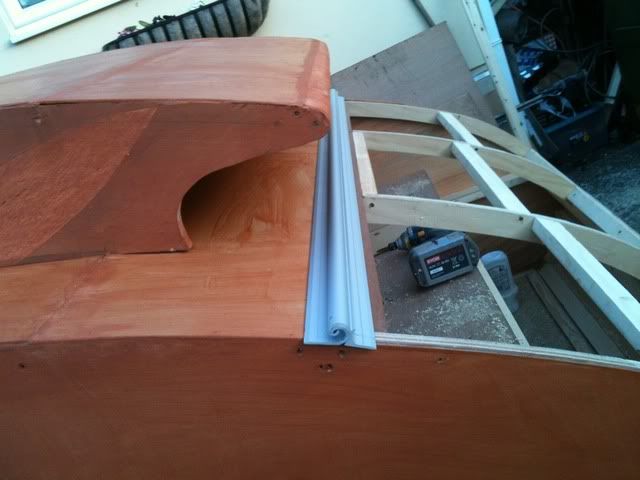
I've shaped the rear trolley top timber, and found somewhere local that supplies hurricane type hinges .......less than £100 for 5m (16ft) :D :D :D

Image

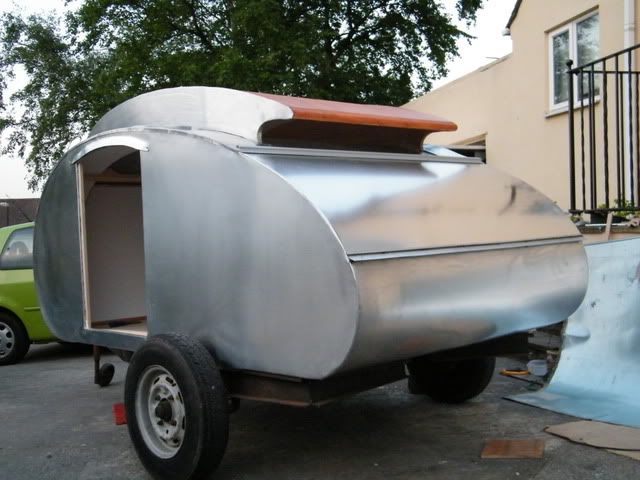
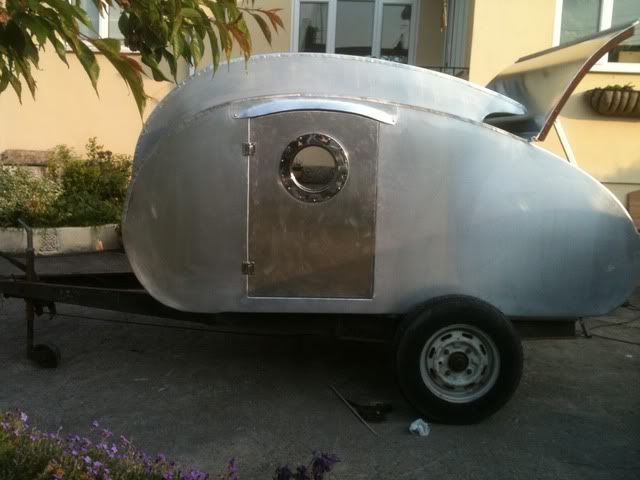
Now we're nearly up to date, I started fitting the aluminium over the weekend.
I had some aluminium left over from the last build, so i thought I'd see what I could do with it.
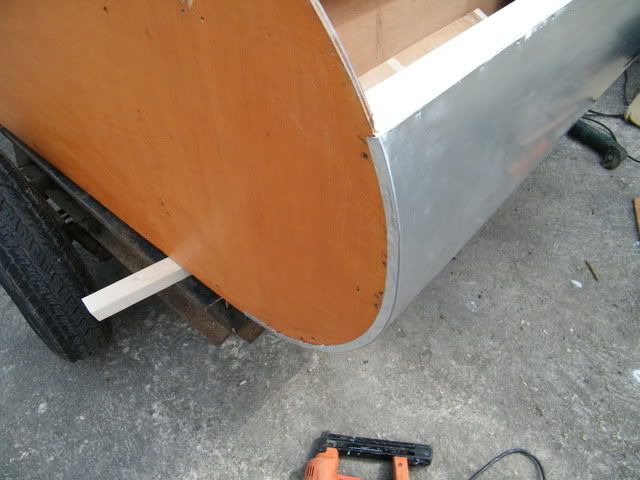
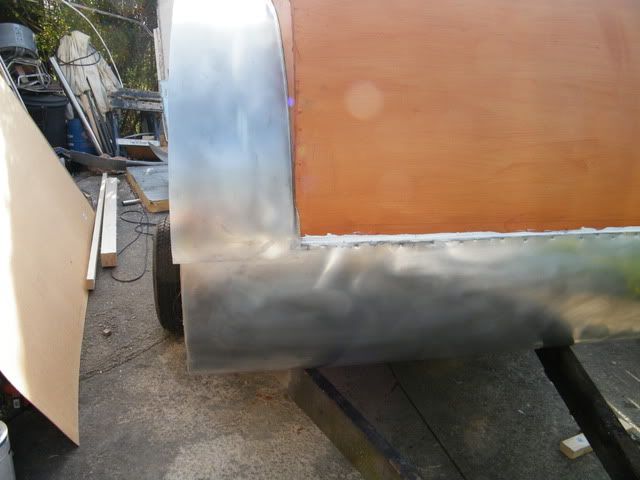
First job was the lower front section... I've used a scotchbright pad on the polisher to remove the mill finish before fitting the sheet. Its a lot easier doing flat sheet than trying to get the polisher around the chassis.
Image

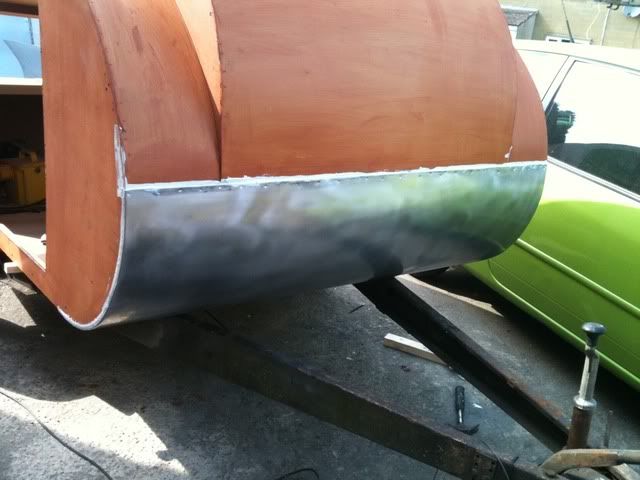
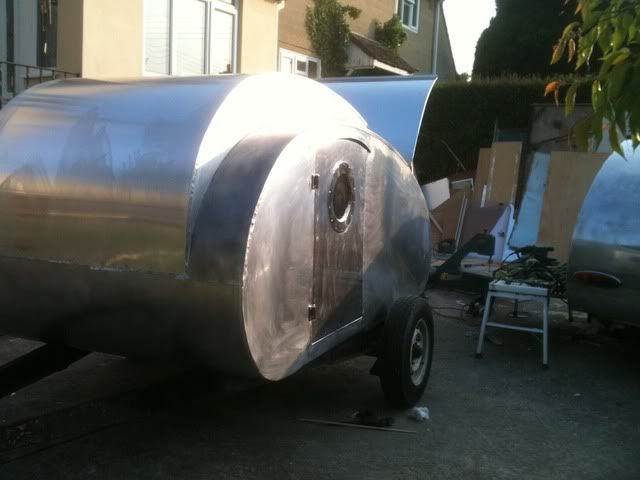
I've used plenty of polyurethane sealer , making sure all the edges are sealed , and then dressed the edges around the sides. Image

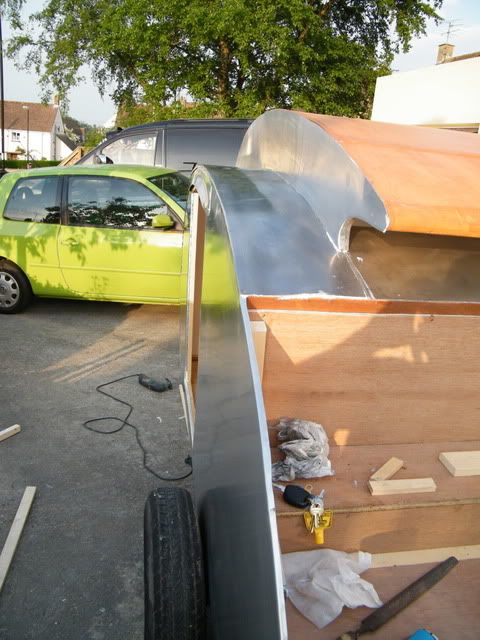
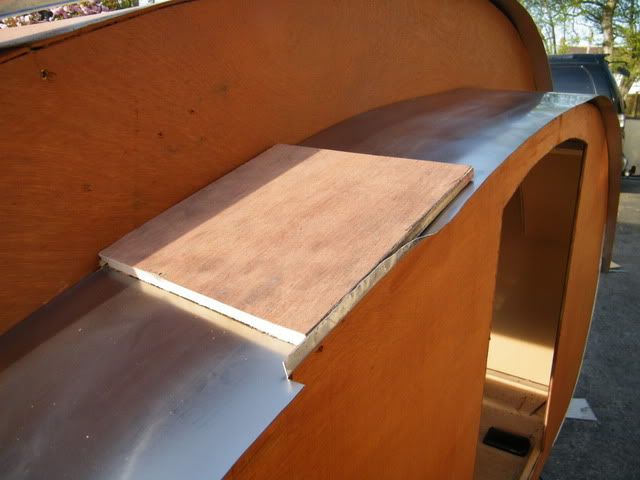
Then onto the either side of the trolleytop. I wanted to create an up stand to ensure we don't get any water in next to the trolleytop. The aluminum sheet was cut an inch wider to alow it to be dressed up on one side and over the lower side on the other.
I used an piece of 1/2" ply to dress the up stand , forming the right hand side on the left, and visa versa.
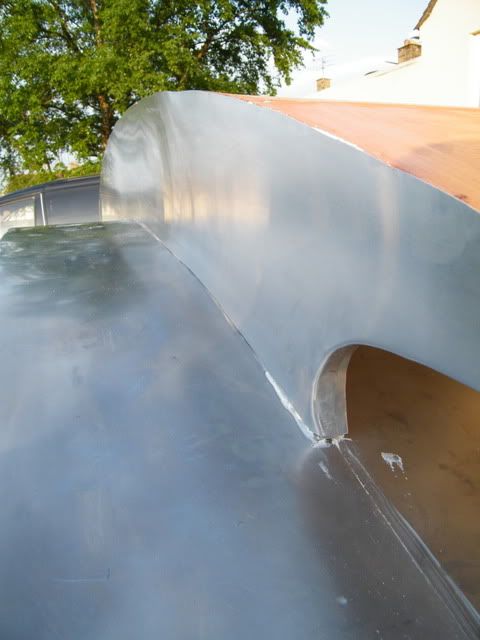
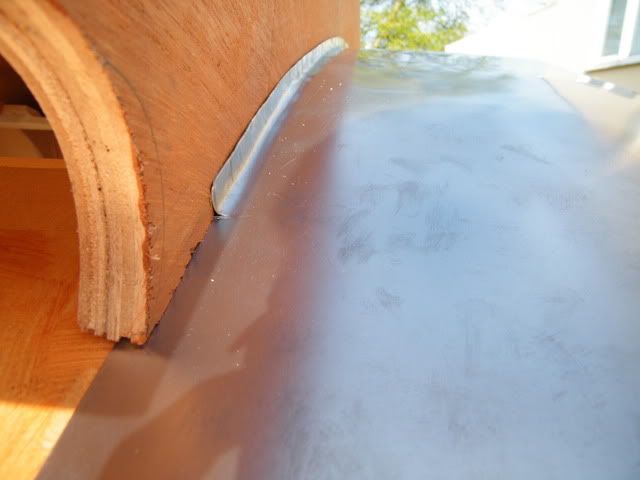
Here's a shot of the left (near side) up-stand being formed on the right hand side of the roof. The small cut is to allow the aluminium at the back to tuck under the rear of the trolleytop.

Image

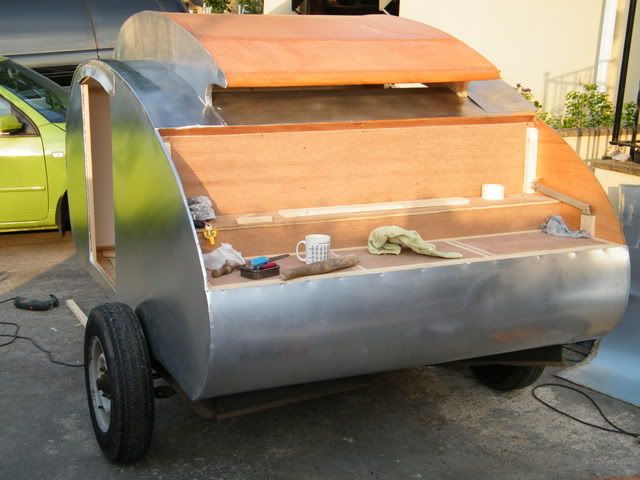
Here's a shot of the rear of the right side. This sheet sits on top of a piece going behind the trolleytop, with a good 4" overlap. I need to have the side on before these pieces can be sealed and fitted proper like.

Image
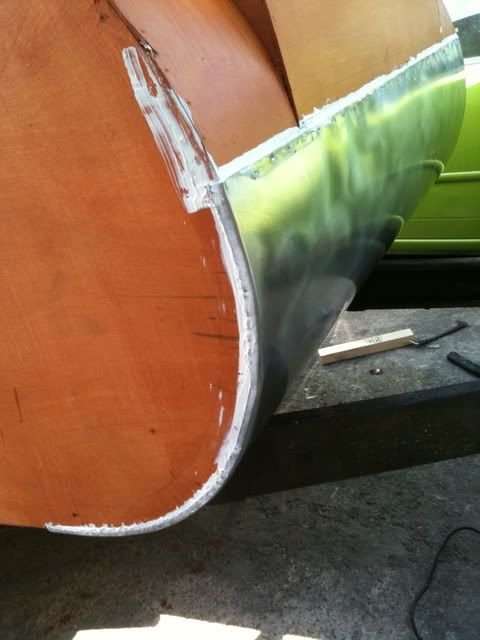
The front finishes over the lower sheet, and will be finished with a cover strip

Image

I'll have to get on and order some ali sheet for the sides.

We're away in the teadrop this coming weekend, but I'll keep you updated on the progress.

Cheers, Dave.
User avatar
jackdaw
500 Club
 
Posts: 598
Images: 124
Joined: Fri Feb 22, 2008 2:31 pm
Location: Wltshire, UK
Top

Postby fromeo » Tue Apr 12, 2011 11:25 am

Looks great Dave. Is this trolley top a little wider than your last? Really like the shape!

- Frank
fromeo
Teardrop Master
 
Posts: 157
Joined: Tue Feb 27, 2007 2:01 pm
Location: Sicklerville, NJ
Top

Postby jackdaw » Tue Apr 12, 2011 3:20 pm

fromeo wrote:Looks great Dave. Is this trolley top a little wider than your last? Really like the shape!

- Frank


Thanks Frank,
This trailer is slightly wider altogether, but the trolley top is probably a good 6"-8" wider than the first one.
The Coppertop is stored at a local farm, as I didn't want to copy it. It'll be interesting to see them side by side when its done. None of the measurements have been copied over, and I even scaled off the drawings again, so there could well be a few diferences.

As I found out about the dis-similar metals reacting after building the Coppertop, I'll be doing all of this one in aluminium. I think we might well paint the trolleytop to give it a bit of contrast.

As it happens the Coppertop is showing no signs of deterioration....just a little patina...so all is good 8) 8)

Dave
User avatar
jackdaw
500 Club
 
Posts: 598
Images: 124
Joined: Fri Feb 22, 2008 2:31 pm
Location: Wltshire, UK
Top

Postby Deryk the Pirate » Tue Apr 12, 2011 8:18 pm

Galvanic corosion? Your moving along pretty quickly. Im kinda curious how the 2 of them will look side by side.

btw Ive never seen a trailer where the rear ends tapered like that... is that common?
Build Thread lil vardo 1: http://tinyurl.com/baqe6py
Build Thread lil vardo 2: http://tinyurl.com/b3rwffm
User avatar
Deryk the Pirate
500 Club
 
Posts: 809
Images: 158
Joined: Tue Aug 18, 2009 11:03 am
Location: Parlin NJ
Top

Postby droid_ca » Wed Apr 13, 2011 11:47 am

thanks again for all the detailed pictures and explanations awesome job keep up the great work
There is a world, just beyond now,
where reality runs a razor thin seam between fact and possibility;

Anywhere I roam where I lay my head is home....
Image
“Fide Canem”
Please check out my build thread
viewtopic.php?f=5&t=52816
User avatar
droid_ca
Donating Member
 
Posts: 1981
Images: 176
Joined: Thu Sep 30, 2010 5:08 am
Location: Prince George BC Canada
Top

Postby jackdaw » Wed Apr 13, 2011 4:13 pm

Deryk the Pirate wrote:Galvanic corosion? Your moving along pretty quickly. Im kinda curious how the 2 of them will look side by side.

btw Ive never seen a trailer where the rear ends tapered like that... is that common?


Cheers Deryk,

Galvanic corosion......I'm sure that the right term :thumbsup: No signs of it so far.....fingers crossed the polish has created enough of a barrier to protect the aluminium.
I'll make sure I get the Coppertop home for a few photos when we're all done, but as I'm building it for a good friend of mine, I'm sure they'll be seen at the same camp sites.....8) 8)


I can't remember seeing another tapered Trolley-top rear end... A lot of the inspiration for the Coppertop came from Doug Hodder's builds, and probably more so the rocketeer
Image

Where the modernistic profile has been shrunk to give us an 8' length, the side of the trailer is only 40" tall at its highest point. So the raised roof space makes the internal space much more useable. :thumbsup:

ATB Dave
User avatar
jackdaw
500 Club
 
Posts: 598
Images: 124
Joined: Fri Feb 22, 2008 2:31 pm
Location: Wltshire, UK
Top

Postby jackdaw » Sun Apr 24, 2011 6:00 pm

We've been back on the build this weekend. Enjoying the sunsine

The Aluminium turned up on Monday, but I need to get all the woodwork out of the way before fitting it. That includes the shelves by the doors, they finish on the cupboard face frame, so the cupboards and the rear bulkhead needed to be finished. I also wanted to get the rear hatch supports fitted , as it would be easier to do before the hatch was skinned . As we decided to stain/varnish the woodwork on the hatch, and paint the board, it would be a better job if it was done before it all went together.
Rosie's been on painting duty, and got a few coats on the ceilings as well as doing the stuff for the hatch and rear cupboards.
I've also made up the lids for the rear storage compartment......
It was dark before i thought of taking any photos today, but here's a few of the progress.

One galley

Image

Left hand stay is an automatic lift and release type
Image

Right hand stay has a safety catch to make sure a gust of wind doesn't lift and drop the hatch.

Image

Inside seems to be taking shape

Image

More tomorrow :thumbsup:
User avatar
jackdaw
500 Club
 
Posts: 598
Images: 124
Joined: Fri Feb 22, 2008 2:31 pm
Location: Wltshire, UK
Top

Postby High Desert » Sun Apr 24, 2011 6:30 pm

Sure do enjoy your builds Dave. They get better and better and always look like you're having a grand time in the process 8)
Shaun

"it's not the years honey, it's the mileage"
High Desert
Platinum Donating Member
 
Posts: 8780
Images: 27
Joined: Wed Apr 08, 2009 1:46 pm
Location: SW Washington state
Top

Postby jackdaw » Mon Apr 25, 2011 6:42 pm

Thanks Shaun. The next best thing to getting out in our trailer has got to be building another one for someone else :)

It's bank holiday Monday, and that means another day on the build, and we're making progress :D :D
Most of the day's been spent working on the aluminium. I started off on the rear lower panel. With sealer/adhesive around the edges,and a bit zig zaged about , it was fixed along the top, then rolled around tight and fixed at the bottom. I left a bit of overhang either side to be dressed around the sides.


Image

Another bead of sealer before dressing around the side. I use a rubber mallet, then a hardwood dressing dolly, then a normal hammer.It's a right messy job, but worth it for peace of mind. It all cleans up nicely

Image

Then more of the same, with the left hand side. The top of the sheet is cut flush with the trailer, around the hatch has 10mm extra, so it can be dressed around the top of the ply. The lower sections have 12-15mm overlap to dress around the front and back of the trailer.There's also 20mm extra at the bottom of the trailer to be dressed underneath.

Dressed around the hatch

Image

You might be able to see where its dressed around the back

Image

When I made the cut out for the door, I allowed enough to dress it around the door opening :D I've also made up a drip/ rain guard for above the door.

Image

With the side done, it was time to move on to the trolley top. Most of it is cut flush, but the rear needed to be dressed around the swishy tail. I've inserted a strip of ali as there was no way I could dress that amount of ali around them swishes

Image

I decided to get the hatch done before calling it a day....

Image

Hopefully we'll get the rest of the Ali sorted tomorrow....I still need to sort out some nice hinges before I can fit the doors.
User avatar
jackdaw
500 Club
 
Posts: 598
Images: 124
Joined: Fri Feb 22, 2008 2:31 pm
Location: Wltshire, UK
Top

Postby jackdaw » Tue Apr 26, 2011 6:22 pm

I've taken this week off to link up the bank holidays...so I could get the trailer waterproof, and although we didn't have the glorious weather today, I did get some more done on the trailer. the right hand side is now skinned, as is the roof :D :D The hinge has been fitted :D :D
Here's a work in progress shot of the top going on....
Image

Doors and windows are next on the list.....
I've got some stainless plates for the portholes in the doors.....and I bought some small round clear marine hatch type windows to go in the trolley top..... but then I found some other little portholes that I think are going to be better.

Image

Image

I'm thinking of may be putting a sliding window in the back of the trolley top....We'll see how it goes.
Image
User avatar
jackdaw
500 Club
 
Posts: 598
Images: 124
Joined: Fri Feb 22, 2008 2:31 pm
Location: Wltshire, UK
Top

Postby StPatron » Tue Apr 26, 2011 11:00 pm

Those portholes are going to look super!

I always enjoy your build threads, thanks for the write-up and the pics.

Beautiful work! :thumbsup:
User avatar
StPatron
Donating Member
 
Posts: 748
Images: 297
Joined: Tue Dec 15, 2009 8:38 pm
Location: OK
Top

Postby Miriam C. » Tue Apr 26, 2011 11:22 pm

Image

Just beautiful Dave! Your friend will be really proud to haul that one around. :thumbsup: Thanks for the details!
“Forgiveness means giving up all hope for a better past.â€
User avatar
Miriam C.
our Aunti M
 
Posts: 19675
Images: 148
Joined: Wed Feb 15, 2006 3:14 pm
Location: Southwest MO
Top

Postby jackdaw » Thu Apr 28, 2011 6:22 pm

Thank you both for your kind comments. They're much appreciated
:thumbsup: :thumbsup:

I've had another day on the build..... Some days you seem to get loads done ....but today wasn't one of them :lol: :lol:
I started the day with a trip the Steadalls to pick up some very nice stainless hinges , not unlike the ones on the first two builds.
I wanted to get the doors finished, and spent all day being busy cutting out the window plates, trimming down the door, cutting the opening for the window in the ply, skinning the door, cutting the window opening in the aluminium, cutting the perspex, fixing strengtheners/ framework around the door and hanging it....fitting the window frame ,perspex and making and fitting the inner frame.
I did get a little distracted towards the end of the day, sorting out another window that might be going in tomorrow......

Here's how we're looking. The door looks shinier than the side as the sheet has the mill finish going the other way. I used the off cut from the sheet I used on the galley and lower back part of the trailer. I'm sure that when it's polished, it will all look the same.
Image

Image

How it looks from the inside
Image

At least it's moving in the right direction :D :D
User avatar
jackdaw
500 Club
 
Posts: 598
Images: 124
Joined: Fri Feb 22, 2008 2:31 pm
Location: Wltshire, UK
Top

PreviousNext

Return to Build Journals

Who is online

Users browsing this forum: Google [Bot] and 9 guests