Colorado_Carter Teardrop Build

...ask your questions in the appropriate forums BUT document your build here...preferably in a single thread...dates for updates, are appreciated....

Re: Colorado_Carter Teardrop Build

Postby Colorado_Carter » Mon Apr 08, 2013 9:28 am

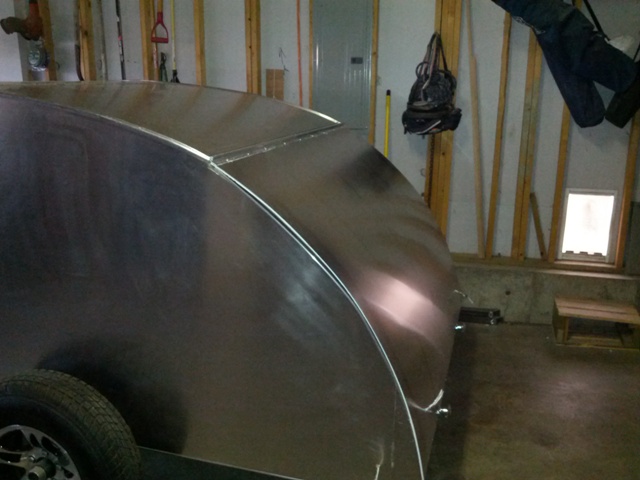
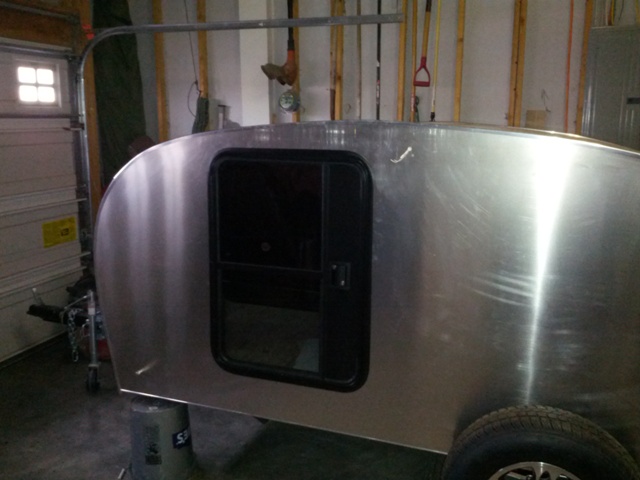
I only had one solid day to work, but I finished skinning the hatch and prepped the window and door seals to install. Then with a litle help on sunday we man handled the hatch into place(for the last time I hope) and installed the window and door.

Getting closer and getting warmer.

Image
Image
User avatar
Colorado_Carter
Teardrop Advisor
 
Posts: 72
Images: 102
Joined: Mon Jun 04, 2012 12:17 pm

Re: Colorado_Carter Teardrop Build

Postby KCStudly » Mon Apr 08, 2013 5:37 pm

Looking good, looking really good! :thumbsup:
KC
My Build: The Poet Creek Express Hybrid Foamie

Poet Creek Or Bust
Engineering the TLAR way - "That Looks About Right"
TnTTT ORIGINAL 200A LANTERN CLUB = "The 200A Gang"
Green Lantern Corpsmen
User avatar
KCStudly
Donating Member
 
Posts: 9640
Images: 8169
Joined: Mon Feb 06, 2012 10:18 pm
Location: Southeastern CT, USA

Re: Colorado_Carter Teardrop Build

Postby Colorado_Carter » Mon Apr 22, 2013 10:00 am

Tick Tock! Finally a warm weekend! I can feel the camping bug calling me, haunting me, more precisely its taunting me. "Doug your not done yet-you'll never be done-no camping for you." I say "OI!"

So this weekend I installed the interior electrical system. I would like to make it a complicated system, but tempis fugit - I need to ignore the possiblitlies and focus on practicality and useability. So with that in mind, I kept it simple a 12V system for lights and 110 for charging the battery (and one recepticle)This included an exterior plug for charging and a charger/tender. I put in a deep cycle battery with a main on/off switch. I installed a on/off switch for the galley lights, and a 12v plug. I completed the installation of a fuse panel and wrapped it all up. I have a gut feeling that placing the battery in the upper shelf is going to be a mistake. There isnt much room left in there-it will be a huge PITA to change a fuse. It might get moved to the bottom at some point. I also installed the exterior lights, and marker lights. The fan I installed last week. I used that butyl tape-one layer wasn't enough so I added two. Now it looks like a chimney. I plan on tearing it out and reinstalling it with the factory foam. Hopefully that will lessen the gap between the skin and the fan.

The short list right now is trim out the galley hatch, put on fenders, license plate and put in a mattress. I think it will be camp ready at that point.

Image
Image
Image
Image
User avatar
Colorado_Carter
Teardrop Advisor
 
Posts: 72
Images: 102
Joined: Mon Jun 04, 2012 12:17 pm
Top

Re: Colorado_Carter Teardrop Build

Postby Colorado_Carter » Mon May 20, 2013 9:41 am

It's been awhile and progress has been painfully slow.

I completed installing all the trim for the hatch and one up front. That was a just time consuming to make it look nice, be strong and be functional. With a little luck the hatch is pretty water tight. All driving lights are installed(and working) the license plate is on. I put a foam mattress in, and hung a couple coat hooks.

I have two big items to work on. The fenders are the big one, to make it road worthy and ready to go. The second is the latch handles, Upon retrospect I may have gone a different style. The big hang up is the latch is at one angle and due to the curve the handle is at another. They don't mesh real well. My plan is to buy a couple 1/4" universal socket drives, then glue/pin/weld one to the end of the bar. I think that will solve the problem, has anyone else tried this?

In addition there is a myriad of little items to tend to: touch up paint in the inside and galley, make a thingy to keep the stove in place, add some bungees to keep the water jug in place, add a bungee to keep stuff in the cabinets in place, cabinet/drawer liner, insurance, needs washed, etc.

Oh yea then start packing everything into it! I am super close-its killing me, maybe by the weekend? I may go sans fenders if necessary-just to get gone.

Image
Image
Image
Image
User avatar
Colorado_Carter
Teardrop Advisor
 
Posts: 72
Images: 102
Joined: Mon Jun 04, 2012 12:17 pm
Top

Re: Colorado_Carter Teardrop Build

Postby Wolfgang92025 » Mon May 20, 2013 9:03 pm

Colorado_Carter wrote: My plan is to buy a couple 1/4" universal socket drives, then glue/pin/weld one to the end of the bar. I think that will solve the problem, has anyone else tried this?


Sounds just like what I did. Got the hardware from Mc Master Carr. One end of the universal joint is glued, the other is a 1/4 - 20 rod and a lock nut.

106867

106866
Wolfgang

Image
User avatar
Wolfgang92025
Lifetime member
 
Posts: 1098
Images: 660
Joined: Fri Apr 18, 2008 10:16 pm
Location: Salt Lake City area, Utah
Top

Re: Colorado_Carter Teardrop Build

Postby DMcCam » Tue May 21, 2013 10:58 am

Looking great there Carter!!! I have about the same arrangement with a 2,000# Flexiride axle on my TD and use the sticky neoprene type shelf liner to keep my stove and such in place. The axle rides so smoothly that nothing moves much.

All the Best,

Dave
User avatar
DMcCam
Gold Donating Member
 
Posts: 883
Joined: Wed Jan 06, 2010 8:30 pm
Location: Reno, Nevada
Top

Re: Colorado_Carter Teardrop Build

Postby Colorado_Carter » Tue May 21, 2013 11:21 am

Thanks for the input! Glad to see I wasn't the first one to give the universal joint a go.

Good Camping
Doug
User avatar
Colorado_Carter
Teardrop Advisor
 
Posts: 72
Images: 102
Joined: Mon Jun 04, 2012 12:17 pm
Top

Re: Colorado_Carter Teardrop Build

Postby bdosborn » Tue May 21, 2013 7:44 pm

Wow, it looks great! Better pick a camping spot, you're almost ready to go...

Bruce
2009 6.5'X11' TTT - Boxcar
All it takes is a speck of faith and a few kilowatts of sweat and grace.
Image
Boxcar Build
aVANger Build
User avatar
bdosborn
Donating Member
 
Posts: 5594
Images: 806
Joined: Wed May 05, 2004 11:10 pm
Location: CO, Littleton
Top

Re: Colorado_Carter Teardrop Build

Postby Colorado_Carter » Wed May 22, 2013 10:15 am

Bruce-I am definitly ready to go. Fenders will be here tonight!
User avatar
Colorado_Carter
Teardrop Advisor
 
Posts: 72
Images: 102
Joined: Mon Jun 04, 2012 12:17 pm
Top

Re: Colorado_Carter Teardrop Build

Postby Colorado_Carter » Wed May 22, 2013 10:20 am

I thought I would post some good picks of the handle fix with the universal joint. It didn't quite close the gap all the way, but its small enough to seal now, and the turn smoothly. So the fix was a success.

Before-I think it was about a 1/4-3/8" gap.
Image

The fix
Image

After-1/8" gap-thats straight and even.
Image
User avatar
Colorado_Carter
Teardrop Advisor
 
Posts: 72
Images: 102
Joined: Mon Jun 04, 2012 12:17 pm
Top

Re: Colorado_Carter Teardrop Build

Postby Colorado_Carter » Thu May 23, 2013 10:10 am

Fenders!

Image
Image
User avatar
Colorado_Carter
Teardrop Advisor
 
Posts: 72
Images: 102
Joined: Mon Jun 04, 2012 12:17 pm
Top

Re: Colorado_Carter Teardrop Build

Postby bdosborn » Thu May 23, 2013 1:13 pm

Hitch up and head over to Lathrop State Park? It looks like you're really ready to go. Have fun.

Bruce
2009 6.5'X11' TTT - Boxcar
All it takes is a speck of faith and a few kilowatts of sweat and grace.
Image
Boxcar Build
aVANger Build
User avatar
bdosborn
Donating Member
 
Posts: 5594
Images: 806
Joined: Wed May 05, 2004 11:10 pm
Location: CO, Littleton
Top

Previous

Return to Build Journals

Who is online

Users browsing this forum: No registered users and 17 guests