Slipstream

...ask your questions in the appropriate forums BUT document your build here...preferably in a single thread...dates for updates, are appreciated....

Re: Slipstream

Postby Wolffarmer » Wed Jun 10, 2015 12:30 am

HOt diggity on the freebie. Where will your door be? Or did I miss that somewhere?
"these guys must be afraid of the dark"
User avatar
Wolffarmer
Donating Member
 
Posts: 4612
Images: 309
Joined: Wed May 02, 2007 1:32 pm
Location: Idaho Rupert

Re: Slipstream

Postby Robot » Wed Jun 10, 2015 2:07 am

uploadfromtaptalk1433919924370.jpg
uploadfromtaptalk1433919924370.jpg (105.46 KiB) Viewed 2790 times

Door is in the middle...going to attempt a hatch type door hinged at the top. Getting close to installing it, I've been working out bugs in the design.
User avatar
Robot
Teardrop Advisor
 
Posts: 78
Joined: Mon Mar 30, 2015 3:06 pm

Re: Slipstream

Postby Wolffarmer » Wed Jun 10, 2015 2:14 am

Thanks, I am a late comer to your thread
"these guys must be afraid of the dark"
User avatar
Wolffarmer
Donating Member
 
Posts: 4612
Images: 309
Joined: Wed May 02, 2007 1:32 pm
Location: Idaho Rupert
Top

Re: Slipstream

Postby KCStudly » Wed Jun 10, 2015 6:52 am

Very interesting and innovative approach to TTT building. :thumbsup:

On the corner pieces, I wonder if it would have been easier and yielded quicker/better results if you had built up the corners out of foam board; either by layering progressively smaller rings (like GPW did for the nose of his FoamStream) or by segmenting and forming mitered strips (like the tapered leaves of a globe laid flat). Just thinking that it might be a little more controlled method that would get you closer faster with less touch up work in the end. I'm just thinking that the molding option was selected based on the premise of a more uniform part that would not require a lot of post mold touch up, but if a lot of hand shaping is going to be required anyway, then maybe the other options deserve a second look.

Granted there is no "easy" way to do what you are doing, so what ever works for you is the best method. :thumbsup:
KC
My Build: The Poet Creek Express Hybrid Foamie

Poet Creek Or Bust
Engineering the TLAR way - "That Looks About Right"
TnTTT ORIGINAL 200A LANTERN CLUB = "The 200A Gang"
Green Lantern Corpsmen
User avatar
KCStudly
Donating Member
 
Posts: 9616
Images: 8169
Joined: Mon Feb 06, 2012 10:18 pm
Location: Southeastern CT, USA
Top

Re: Slipstream

Postby Robot » Wed Jun 10, 2015 7:20 am

I did consider these methods, in fact while trying to repair my crappy mold I did a test piece mitered like a globe. However, once I tried to bend it it immediately snapped. The layered ring method was going to be my fallback.

Ultimately I think the mold method is best, I just did a really bad job on the mold. If I were not under a tight deadline I would back up and make a new mold. I used TB2 and computer paper for the first layer and TB2 and red shop towels for the second layer. This ended up giving me a lumpy surface on the inside of the mold. I think if I were to go back and do the mold with actual paper mache, (flour water & newspaper) that I would get a much smoother surface.

At this point I think it will be quickest to make my last two plugs with the current mold and shape them to fit.
User avatar
Robot
Teardrop Advisor
 
Posts: 78
Joined: Mon Mar 30, 2015 3:06 pm
Top

Re: Slipstream

Postby KCStudly » Wed Jun 10, 2015 8:56 am

Fair enough. I guess I was assuming that you would kerf or steam bend the miter option to prevent it from snapping.

Either way, I look at building these things as a grand experiment, testing our craftsmanship skills and brains as a form of hobby and mental exercise. You are getting yours for sure! :thumbsup:

... and when it is all said and done, even as much as I dislike proverbial "body work", when it gets to the point where you are happy with it, you still have something to be proud of. :D
KC
My Build: The Poet Creek Express Hybrid Foamie

Poet Creek Or Bust
Engineering the TLAR way - "That Looks About Right"
TnTTT ORIGINAL 200A LANTERN CLUB = "The 200A Gang"
Green Lantern Corpsmen
User avatar
KCStudly
Donating Member
 
Posts: 9616
Images: 8169
Joined: Mon Feb 06, 2012 10:18 pm
Location: Southeastern CT, USA
Top

Re: Slipstream

Postby OP827 » Wed Jun 10, 2015 10:48 am

That is one interesting build you do, Robot! :thumbsup:
Last edited by OP827 on Wed Jun 10, 2015 1:55 pm, edited 1 time in total.
User avatar
OP827
Donating Member
 
Posts: 1561
Images: 405
Joined: Fri Apr 25, 2014 7:27 pm
Location: Bruce County Ontario
Top

Re: Slipstream

Postby OP827 » Wed Jun 10, 2015 1:51 pm

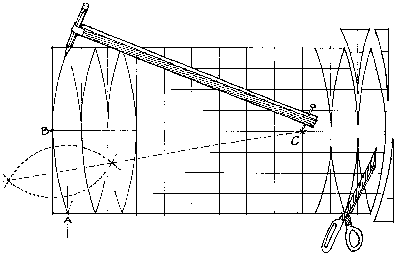
Check this simple non-digital manual method to flatten the sphere into eliptical wedges, called gores - http://octopus.gma.org/surfing/imaging/globe.html
Image

With foam having certain thickness I would first do enough number of kerfs to allow for radial bending, then cut these foam shapes with a jig saw or steak knife from the other foam side with no kerfs for internal circumference surface of the corner.

Then I would tack the shapes together (with kerfs to outside) with something like tooth picks, or nylon strong ties, or short strips of plywood with drywall screws from inside, or other means and then fill the gaps outside with great stuff foam. I would also not bother doing the shapes to a sharp tip, but rather cut the shapes shorter so that will form a hole in the top of the corner that can easily be filled with Great Stuff foam after the shape is installed in place.
I think that would work.. :thinking:

In this case I would also try using the packing scotch tape on the inside to fit the pieces together.. :thinking: Should end up with a good internal surface that way, while external surface can be faired once the GS foam is set.
in boat building they are using thickened epoxy instead of GS foam to fill gaps between foam strips, but that is more expensive and heavier and also not that easy to sand to shape later.
Last edited by OP827 on Wed Jun 10, 2015 3:36 pm, edited 1 time in total.
User avatar
OP827
Donating Member
 
Posts: 1561
Images: 405
Joined: Fri Apr 25, 2014 7:27 pm
Location: Bruce County Ontario
Top

Re: Slipstream

Postby KCStudly » Wed Jun 10, 2015 3:09 pm

If you use the kerfing stickie in the foamie forum you can calculate your kerfs, kerfing your foam on the inside so that both the inside and outside surfaces come pretty close with very little filling or fairing needed. :thumbsup:
KC
My Build: The Poet Creek Express Hybrid Foamie

Poet Creek Or Bust
Engineering the TLAR way - "That Looks About Right"
TnTTT ORIGINAL 200A LANTERN CLUB = "The 200A Gang"
Green Lantern Corpsmen
User avatar
KCStudly
Donating Member
 
Posts: 9616
Images: 8169
Joined: Mon Feb 06, 2012 10:18 pm
Location: Southeastern CT, USA
Top

Re: Slipstream

Postby OP827 » Wed Jun 10, 2015 3:52 pm

KCStudly wrote:If you use the kerfing stickie in the foamie forum you can calculate your kerfs, kerfing your foam on the inside so that both the inside and outside surfaces come pretty close with very little filling or fairing needed. :thumbsup:


It is a good discussion, I was also thinking of it KC, with internal kerfs the eliptical strips will have to be tapered to be wider outside to have no gaps on outside. Angled eliptical line cut is tricker to do, but possible with right equipment.
When I talked about external kerfs I was mostly thinking of a simple method with basic hand tools like shap cardbox cutter for example to cut internal eliptical shape, cause then only the internal surface line needs to be precise. I found that for example internal cylindrical surface is more difficult to sand, than external, I would imagine that spherical internal surface would be even more difficult than cylindrical to sand than external. There still be some glue or foam residual amount to sand or remove with both internal or external kerfing though. Packing scotch tape then! :thumbsup:
User avatar
OP827
Donating Member
 
Posts: 1561
Images: 405
Joined: Fri Apr 25, 2014 7:27 pm
Location: Bruce County Ontario
Top

Re: Slipstream

Postby Robot » Wed Jun 10, 2015 6:10 pm

Thank you for the sphere layout! I freehanded mine. The machinist in me loves the precise math. I guess I hadn't thought of kerfing since I'm only using 1/2 foam and it has bent so readily so far. But I could steam the individual arcs and glue it all together. I do really like the idea of the monolithic block that I get with the expanding foam. I'm going to try to shape the two that are already made and see how it goes.
User avatar
Robot
Teardrop Advisor
 
Posts: 78
Joined: Mon Mar 30, 2015 3:06 pm
Top

Re: Slipstream

Postby KCStudly » Wed Jun 10, 2015 7:22 pm

Yes, like I said, whatever works. I have tried so many different techniques on my build, usually as a result of ideas and discussions shared on the forums here, and they all have worked to some degree or another; and none of them, that I recall, have required no touch up work or fixes after the fact. It is all just part of the process.

It is refreshing that your novel approach has spawned lively, positive discussions. :thumbsup:
KC
My Build: The Poet Creek Express Hybrid Foamie

Poet Creek Or Bust
Engineering the TLAR way - "That Looks About Right"
TnTTT ORIGINAL 200A LANTERN CLUB = "The 200A Gang"
Green Lantern Corpsmen
User avatar
KCStudly
Donating Member
 
Posts: 9616
Images: 8169
Joined: Mon Feb 06, 2012 10:18 pm
Location: Southeastern CT, USA
Top

Re: Slipstream

Postby Fred Trout » Wed Jun 10, 2015 11:59 pm

Can you please supply some detail on the fasteners used to reinforce by screwing into the inside panels & wiley windows !
User avatar
Fred Trout
The 300 Club
 
Posts: 396
Joined: Fri May 08, 2015 4:30 pm
Location: SW Montana
Top

Re: Slipstream

Postby Robot » Thu Jun 11, 2015 2:15 am

uploadfromtaptalk1434002349406.jpg
uploadfromtaptalk1434002349406.jpg (98.44 KiB) Viewed 2651 times


I just used plain construction screws, 1.25 long for the seam brace panels. I also painted a layer of glue on each panel before screwing, so the screws are acting as clamps as much as they are fasteners.

Screwing one in too far will pull it right through the top layer, but just tight enough to countersink the head works real good. Using a ton of small fasteners helps spread out the load as well. I went through 3 boxes of these and only have a handful left, so it's safe to say I have the better part of 700 screws just in my alignment panels.
User avatar
Robot
Teardrop Advisor
 
Posts: 78
Joined: Mon Mar 30, 2015 3:06 pm
Top

Re: Slipstream

Postby Robot » Thu Jun 11, 2015 2:27 am

KC, I like your attitude. If machining has taught me anything, it's that there are at least 5 different ways to do anything, and each will have its pros and cons.

My "good" corner plug and the second plug made from the "good" mold both flattened out after sitting out of the mold for a couple hours. I think there is just so much foam under tension that once it has nothing holding it back it "stress relieves". So much for the mold being the best method .

In a fit of frustration I installed the skeleton frame in the remaining 3 corners, duct taped the corner from the inside, and built up spray foam on the outside. I did not take pictures.
I was going to have to hand shape the corners regardless, and by spraying it directly on the trailer, it will encapsulate the corner skeleton, making a stronger unit.

Hopefully.
User avatar
Robot
Teardrop Advisor
 
Posts: 78
Joined: Mon Mar 30, 2015 3:06 pm
Top

PreviousNext

Return to Build Journals

Who is online

Users browsing this forum: No registered users and 10 guests