Aero Standie Build Log

...ask your questions in the appropriate forums BUT document your build here...preferably in a single thread...dates for updates, are appreciated....

Aero Standie Build Log

Postby rgambord » Mon Feb 09, 2015 12:54 am

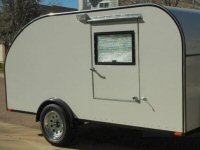
This trailer is a kammback teardrop design, with a 1' radius leading edge. The walls are free-standing with several 1x2 pine stringers glued into slots cut along the roof-line. The roof is FRP panels, attached to the stringers with adhesive, designed to overlap ~2 inches to shed rainwater. The free-standing body will be bolted to the floor, with a rubber gasket. L x W x H = 12' x 6' x 8' 10". Total weight ~ 657 lb.

To do:
  • Door/rear hatch design I'm probably going to just cut a door-shaped hole in the side of the trailer, and add hinges/lock. The hatch will be full-width.
  • Subfloor framing The current scheme is 2x3's, with the floor mostly supported directly by the trailer frame. Because the wheels protrude 1 inch above the bed, and can be reasonably expected to move 1-2 inches under load, there are wheel wells cut into the floor. I'm considering just raising the entire floor onto 2x3's, but I need to determine how much weight/cost it will be.
  • Underfloor storage I'm thinking about adding underfloor storage running the length of the trailer, approx 12 inches deep. I need to decide early on, as I'll have to cut the floor accordingly. the design would be as simple as the door -- cut a hatch(es), and add hinges. The swinging end will simply rest on the subframe. It will also add some insulation to the floor.

Image

Materials List:
Walls:
5x 3/8" OSB or plywood
Area = 144 sq ft
Weight = 180 lb

Roof:
6x 0.09" Fiberglass reinforced plastic sheet
Area = 144 sq ft
Weight = 112.5 lb

Floor:
3x 7/16" OSB sturd-i-floor
Area = 72 sq ft
Weight = 105 lb

Trailer:
Harbor Freight 4x8 1720 lb
Weight = 260 lb

Total Estimated weight: 657.5 lb
Not listed Underfloor framing, roof stringers, door hardware/design.
User avatar
rgambord
Teardrop Builder
 
Posts: 46
Joined: Sun Feb 01, 2015 4:54 am
Location: Iowa

Re: Aero Standie Build Log

Postby rgambord » Wed Feb 11, 2015 10:24 pm

This morning I installed the subfloor and front + back floor sections. The project is on hold until I decide what to do about the wheels. I'm either going to install wheel wells that cover half the wheel, or I will be buying a new axle and extending the wheels outside of the trailer. There are too many gaps and holes in the frame for me to be comfortable without fully enclosing the wheels. I'm also considering buying a 3500 lb axle with trailer brakes for the peace of mind.

Image

Image
User avatar
rgambord
Teardrop Builder
 
Posts: 46
Joined: Sun Feb 01, 2015 4:54 am
Location: Iowa

Re: Aero Standie Build Log

Postby Pmullen503 » Thu Feb 12, 2015 9:39 am

You may want to rethink your floor design. Forgive me if I'm wrong but it looks from the photo that eventually the entire weight of the trailer will be borne by screws into the end grain of the 2x3's. What would happen if those 2x3's were to split?

Since your overhangs are relatively large, its far better to lay full width wood on top the trailer frame and use more cross beams. Like a 1x3" on edge every two feet. Better yet would be to build a torsion box floor to handle those overhangs.

From the photo, it looks like the tongue is a little short. You'll want to be sure you can turn without the trailer hitting your tow vehicle.
Pmullen503
1000 Club
1000 Club
 
Posts: 1182
Images: 67
Joined: Sun Nov 23, 2014 1:33 pm
Location: Fond du Lac, WI
Top

Re: Aero Standie Build Log

Postby rgambord » Thu Feb 12, 2015 2:56 pm

The frame is actually grade 2 2x4's, with 3 inch deck screws holding them together. I decided on x4 because, when aligned with the bottom of the metal frame, they stick up exactly 1/4 of an inch above it, clearing the bolt heads, and allowing me to easily shim the metal frame with 1/4" lath, where it supports the floor. The fore and aft extensions are held to the frame with two 3/8" bolts, with washers, each. The majority of the weight is borne by the frame itself, with the rest held by bolted members. The perimeter framing is just to stiffen things and provide edge support for the walls/roofing, although the walls will add a huge degree of stiffness to the floor. I did measure the tongue and found I can turn an adequate amount (around 50 degree angle). If it ends up being an issue, I will just extend the hitch receiver a few inches. The floor is very solid underfoot. If I feel it is necessary, I will add 2x3's bolted to the underside of the frame, to support the 12' side rails. Thanks for looking!

Image


Here is an example aerodynamic profile that I'm testing out. The roofline is a bezier curve, tangent to the front wall surface (perpendicular to ground) and ends at a 22 degree angle, aft. There are a few dozen different profiles on my desktop right now, and it takes my computer a about an hour to calculate the Cd on each. As you can see, it's still calculating in this image, having only solved for the first 0.05 seconds. I have found that the most effective means to improve the aerodynamic profile of the setup is to attach an air deflector (spoiler) to the roof rack of the tow vehicle, which forces more air over the top. It results in a reduction of Cd from about .60 to about .35-.40
Image
User avatar
rgambord
Teardrop Builder
 
Posts: 46
Joined: Sun Feb 01, 2015 4:54 am
Location: Iowa
Top

Re: Aero Standie Build Log

Postby Pmullen503 » Thu Feb 12, 2015 4:54 pm

I'd add the blocking for sure. Those 12' long 2x4's take very little force to flex. At that point you are relying on the side walls to stiffen the structure. If you attach the side walls to the sides of the 2x4's with screws and glue, that will stiffen it up. Your drawing shows the sides sitting on top. The floor will do little to support those long sides.

The problem with your construction details are that you are relying entirely on fasteners in wood. Any failure of the water proofing (and eventually there will be some) and the wood gets wet. Wet wood doesn't hold fasteners well.
Pmullen503
1000 Club
1000 Club
 
Posts: 1182
Images: 67
Joined: Sun Nov 23, 2014 1:33 pm
Location: Fond du Lac, WI
Top

Re: Aero Standie Build Log

Postby Bluebunny » Thu Feb 12, 2015 9:12 pm

Hey rgambord,

Thanks for throwing your ideas out here! It can be painful to get feedback, but we are all common in our desire for your success with a triumphant design and build! Listen to these folks, consider what they have to say, then make your own decisions. I for one love the flow analysis you've done.

How did you choose 7/16" OSB for the floor of your standie? Do you have a floor plan? Could internal bulkheads or furniture, properly secured to wall and floor, help to bridge the forces from the walls to the trailer?

Them's some big overhangs!

Kind Regards,
Butch
off topic Stitch-and-Glue ply kayak build... https://www.facebook.com/media/set/?set ... 254&type=3
Bluebunny
Teardrop Master
 
Posts: 101
Images: 44
Joined: Fri Jan 30, 2015 4:21 pm
Location: northern illinois
Top

Re: Aero Standie Build Log

Postby rgambord » Thu Feb 12, 2015 9:38 pm

Glue and screw is a good point. I've got a huge bottle of poly glue laying around. Don't know why I forgot to use it. I had planned to use 7/16 because sturd-i-floor was available, and is rated for 24 inch spans, but when I returned to the store, it was square edge sheathing, which is much weaker. I ended up getting 19/32 OSB. I'm a little concerned about the spans, but it really does seem very sturdy. I value everyone's input. Humility is a small price to pay when it comes to a 1500 pound shack hurtling down the highway at 50 mph.
User avatar
rgambord
Teardrop Builder
 
Posts: 46
Joined: Sun Feb 01, 2015 4:54 am
Location: Iowa
Top

Re: Aero Standie Build Log

Postby alaska teardrop » Sun Feb 15, 2015 5:29 pm

Here is an example aerodynamic profile that I'm testing out. The roofline is a bezier curve, tangent to the front wall surface (perpendicular to ground) and ends at a 22 degree angle, aft. There are a few dozen different profiles on my desktop right now, and it takes my computer a about an hour to calculate the Cd on each. As you can see, it's still calculating in this image, having only solved for the first 0.05 seconds. I have found that the most effective means to improve the aerodynamic profile of the setup is to attach an air deflector (spoiler) to the roof rack of the tow vehicle, which forces more air over the top. It results in a reduction of Cd from about .60 to about .35-.40
Image

Aerodynamics are often a discussion here. So, it's interesting to see a member actually using a program like yours. Can you tell us more about it & is it available for others to use?

How did you choose the waypoints for the curve? Frankly, the front seems blunt & the rear slope too severe. As you can see in your model, the boundary layer releases on a slope more than 15 degrees & creates added drag. IMO.

:thumbsup: Fred
Northern Lite Traveler design: viewtopic.php?f=27&t=51991
Minimalist torsion axle frame: viewtopic.php?f=35&t=12220
Alaska Teardrop photo gallery: http://tnttt.com/gallery/album.php?album_id=2014
Glampette photo gallery; gallery/album.php?album_id=2983&sk=t&sd=d&st=0
User avatar
alaska teardrop
Platinum Donating Member
 
Posts: 1113
Images: 177
Joined: Wed Aug 24, 2005 1:41 pm
Location: Greenville, Michigan
Top

Re: Aero Standie Build Log

Postby rgambord » Sun Feb 15, 2015 6:37 pm

Sure thing. I'm using a program called Autodesk Flow Design. It's free, as a student. I didn't have to prove I was a student (although I am). It allows you to import autodesk/autocad files and test them in a virtual wind tunnel. It's pretty basic, essentially what you see in the screenshot. The installation was a total nightmare, so if anyone has trouble, I might be able to help out.

As for the curve, I don't know if you're familiar with bezier curves, but I'm using a quadratic bezier, which is defined by two line segments, which share a point:

Image

A nice feature is that the start point of the curve is tangent to the first line segment, and the end point is tangent to the second line segment. This allows me to model a perfectly smooth transition from the 90 degree front wall, to a 22 degree roof slope at the terminus. 22 degrees is widely cited in ecomodder as the "maximum" angle that maintains laminar airflow. From looking at my computer model, that does not appear to be accurate, so I'm playing around with values as I see fit.

Here's the construction of the curve (I use a plugin that automates this, but you can do it by hand):

Image

You can see that most of the front has full head room.
User avatar
rgambord
Teardrop Builder
 
Posts: 46
Joined: Sun Feb 01, 2015 4:54 am
Location: Iowa
Top

Re: Aero Standie Build Log

Postby rgambord » Sun Feb 15, 2015 6:51 pm

It turns out, I've found a much more aerodynamic design.

Image

The reasoning behind the previous design was that, according to the "gurus" on ecomodder, having a tapered rear end reduces the size of the trailing wake (which is true), but it's pretty clear to me that you can't maintain laminar flow with a 22 degree decline, though they all claim that you can! On this design, the slight incline keeps the air moving over the top from becoming turbulent until it clears the trailer. The wake is muchhh larger, but the drag is much lower.

As an added bonus, this design has 48 more cubic feet internal space, compared to the previous design, while gaining 36% decrease in cD. It is, however, 5% taller.
User avatar
rgambord
Teardrop Builder
 
Posts: 46
Joined: Sun Feb 01, 2015 4:54 am
Location: Iowa
Top

Re: Aero Standie Build Log

Postby MtnDon » Sun Feb 15, 2015 7:14 pm

I have not looked at this thread until today. :(

I too have reservations about the floor, in particular the screws into end grain. For two reasons. One, a fastener into the end grain of a 2x is virtually totally dependent upon the wood fibers of that end piece not splitting apart where the fastener penetrates. It may not be a problem right now; but after some miles of being dragged around, maybe bounced around, that may change. Glue on end grain is next to useless so that is not an answer. Two, the omnipresent gold zinc plated deck screws are not suitable for shear loads. Those screws are hardened to resist tool bit tear out when installing the screws. That makes them susceptible to snapping under a sideways load. They are good for deck planks and for uses where a fastener failure can not have catastrophic results. There are screws that are rated for structural loads but even then the end grain issue would remain.
Last edited by MtnDon on Sun Feb 15, 2015 10:44 pm, edited 1 time in total.
Our 6x12 deep vee nose cargo trailer camper conversion... viewtopic.php?f=42&t=58336

We have a small off grid cabin we built ourselves in the NM mountains; small PV solar system; 624 watts PV, Outback CC & inverter/charger ... http://countryplans.com/smf/index.php?topic=2335.0
User avatar
MtnDon
2000 Club
2000 Club
 
Posts: 2200
Images: 24
Joined: Sun Aug 19, 2012 10:57 pm
Location: New Mexico
Top

Re: Aero Standie Build Log

Postby Bluebunny » Sun Feb 15, 2015 7:58 pm

rgambord says:"...according to the "gurus" on ecomodder, having a tapered rear end reduces the size of the trailing wake (which is true), but it's pretty clear to me that you can't maintain laminar flow with a 22 degree decline, though they all claim that you can!"
I agree, 22 degrees is pretty aggressive. Much aero truck testing shows that about 15 degrees is near the maximum. 11 degree is pretty conservative, 12 is sweet. Your flow model seems to agree. You could take a tangent 33% to 50% downstream of the vertical wall and slope it 11 to 15 degrees, and probably gain some improvement over the size the drag shadow of your latest shape - or go simple and simply go flat?... WIsh I could model my aero design on computer, but don't have the time or patience to run it, and don't have a lot of confidence in it either. I'll simply go with the basics, be conservative, and maybe tuft test and mileage test after building.
King Regards
Butch
aero design thread http://tnttt.com/viewtopic.php?f=40&t=62369
off topic Stitch-and-Glue ply kayak build... https://www.facebook.com/media/set/?set ... 254&type=3
Bluebunny
Teardrop Master
 
Posts: 101
Images: 44
Joined: Fri Jan 30, 2015 4:21 pm
Location: northern illinois
Top

Re: Aero Standie Build Log

Postby rgambord » Sun Feb 15, 2015 9:27 pm

Here's a 12 degree taper. cD = 0.54. I'm not sure why the teardrops aren't doing as well... By the way, a simple 4' tall box has a cD of .79.

As to the screws in end grain, I'll think about it some more. I'm using polyurethane glue, which bonds pretty well to end grain vs common PVA glue. I could also use some epoxy. Another thing to consider is it's got a 19/32 osb screwed to the top, which really is what's holding the joint together. The 2x4s along the perimeter just keep the OSB from flexing, they don't really support any weight. I'm also going to go back and coat the whole thing in UV stabilized polyurethane varnish/stain (wanted to do glue joints before I put varnish down). For what it's worth, I built a smaller utility trailer last year using similar techniques, and it's hauled a ton of stuff and sat out in all kinds of horrible midwestern weather, and there's not a sign of rot anywhere. Also, #8 deck screws have a shear strength of 1,500 lb...


Image
User avatar
rgambord
Teardrop Builder
 
Posts: 46
Joined: Sun Feb 01, 2015 4:54 am
Location: Iowa
Top

Re: Aero Standie Build Log

Postby MtnDon » Sun Feb 15, 2015 11:02 pm

OK. I am just trying to be helpful.

I can easily break any glue joint where end grain meets long grain. End grain sucks the glue up the fibers like a straw. That removes glue from where it is needed. Epoxy may be a little better than PVA glue. Polyurethane glue is actually worse than PVA. Polyurethane is basically what rigid foam is made of. How strong is a piece of foam? Fine Woodworking did some glue tests a few years back. Titebond 2 and 3 PVA , 2 types of hide glue, polyurethane and epoxy. PVA was strongest. Polyurethane the worst. Of course they were building furniture not a trailer.


Where did you find that shear strength of 1500# for a number 8 deck screw? I'd believe up to maybe 150 pounds for a common #8. It is the brittleness of common deck screws that concerns me. As in impact loads as in hitting a bump or pothole sort of thing. I have dismantled many things that were deck screwed together. It is never surprising to me to find deck screws snapped off, usually where the shank meets the threads. The tested and approved structural screws have a soft ductile core with the shank case hardened. Most deck screws are imported and come with no testing legacy and are hardened completely through. But let's leave the shear strength of the screws out of the picture. You are still stuck with the strength of the joint depending on the end grain wood piece remaining whole, never splitting while the trailer jounces down the road.


I agree the OSB is helping to hold the structure together. The weight on the side member area is still being transmitted through the screws to the crossmembers though. OSB is good stuff as long as it never gets wet. That's a lot of faith to place on some polyurethane varnish.

I am not trying to belittle your project. I am trying to save some possible grief down the road. Literally. I'll leave you to your own devices and decisions now. G/L
Our 6x12 deep vee nose cargo trailer camper conversion... viewtopic.php?f=42&t=58336

We have a small off grid cabin we built ourselves in the NM mountains; small PV solar system; 624 watts PV, Outback CC & inverter/charger ... http://countryplans.com/smf/index.php?topic=2335.0
User avatar
MtnDon
2000 Club
2000 Club
 
Posts: 2200
Images: 24
Joined: Sun Aug 19, 2012 10:57 pm
Location: New Mexico
Top

Re: Aero Standie Build Log

Postby rgambord » Mon Feb 16, 2015 12:16 am

Hey, no problem! I do welcome the help and advice very much. I wouldn't have thought twice about the screws until you guys pointed it out.

You are right that polu glue is weaker than pva in side-grain joints, but it is stronger than pva in end-grain. That said, end-grain joints are never very strong, no matter the glue used. The rigid foam you're thinking of is probably polystyrene. Polyurethane foam is spongy, and it's that yellow looking stuff you pull out of cheap couch cushions. You're sort of comparing apples to oranges though. That's like saying "how can wood be strong, when paper is so weak? Polyurethane is a type of thermoset plastic, which means you've got crosslinked polymer chains. The longer the chains are, and the better the crosslinking, the better it is; there are different grades for different purposes. Forklift wheels, bedliner, automotive paints, high temp paints, and many other heavy duty things are made from polyurethane. Also, if you've ever tried to tear off a chunk of that foam, you might be surprised just how strong it is.

You're right that a common #8 is rated for 150 pounds, but that's because the safety factor is 10. You are right that cheap deck screws are usually through-hardened. I tried to destructively test the screw with a sledge hammer, but it ripped out of the block of wood it was in. I think the strength of the screw is much higher than the wood.

What type of attachment do you suggest, though? It is a lot of shear load. I'm not worried about the front and back pieces, but the sides will hold a lot of weight. I will be bolting 2x3's to the bottom of the frame, which will support the 12' pieces without relying on fasteners. You think that's enough, or maybe I should also put some corner brackets in or something? I'm just not really sure how I can make this stronger.
User avatar
rgambord
Teardrop Builder
 
Posts: 46
Joined: Sun Feb 01, 2015 4:54 am
Location: Iowa
Top

Next

Return to Build Journals

Who is online

Users browsing this forum: No registered users and 3 guests