Doug & Angie's 5x10 Benroy Build

...ask your questions in the appropriate forums BUT document your build here...preferably in a single thread...dates for updates, are appreciated....

Doug & Angie's 5x10 Benroy Build

Postby DougN » Wed Apr 01, 2015 9:57 pm

Well, our build has begun! I should have a lot of time over the next couple of months, and most of the parts are now on hand, so it's time to start building.

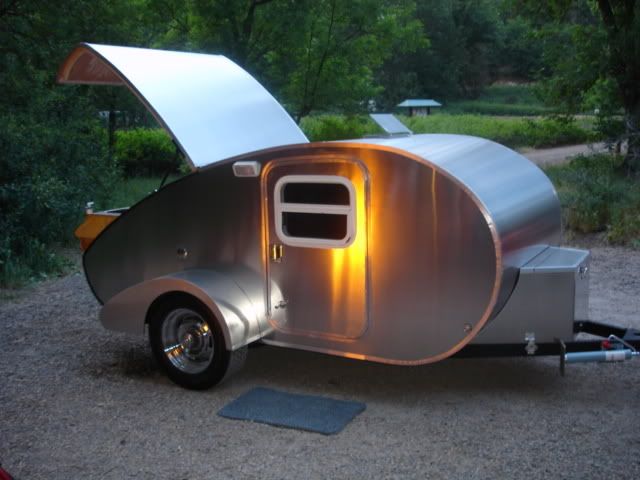
Here's the vision....
130118

Our trailer has arrived...
130119

And I've put together the floor....
130120

I decided to go with just 3/4 marine ply (not framed) as the floor since our trailer has lots of support rails and sits pretty high up already (didn't want to add height). Initially I thought I could just use Titebond III and plenty of screws to join the plywood sheets, but wasn't comfortable with how titebond filled the exposed portion of the joint, so I sanded the gaps and used fiberglass cloth and epoxy to cover the exposed seems.
130121

It's ready now for painting. After reading lots ideas on bottom finishing, I decided to go with oil based primer and a marine enamel, which is what I plan to use for all the external surfaces. I suppose it's not too late to epoxy the whole bottom, but I kind of wanted to stay away from the epoxy approach.

The entire teardrop will be held down to the trailer with 6 bolts, and I'll use rubber "washers" to slightly lift the floor off the frame. I think this should give good drying between the rails/frame and the painted wood surface while preventing the paint from sticking/rubbing on the frame.

Also had to deal with bolts on top of the side beams that hold the leaf springs. Was a bit disappointed the custom trailer builder didn't find a way to keep the top clear, but there they are...
130128

Drilled 1/2" through the 3/4" ply to leave plenty of room around the bolt head and avoid contact/rubbing.
130126

That's where she's at tonight. More to follow...
DougN
Teardrop Inspector
 
Posts: 22
Images: 26
Joined: Mon Mar 02, 2015 6:18 pm

Re: Doug & Angie's 5x10 Benroy Build

Postby KCStudly » Thu Apr 02, 2015 8:16 am

Nice start! :thumbsup:

I wouldn't use rubber for the washers under your floor. They will flex and compress over time potentially resulting in loose fasteners and/or wallowed out holes. Someone may argue that automotive body mounts are rubber, but they do the same thing (eventually) and were designed by a team of engineers with multimillion dollar R&D facilities backing them up.

By using spacer washers you will create point loads, rather than a unit structure. Most people either use a sealant bedding or nothing at all, relying on the floor treatment. Can't recall anyone ever complaining that their floor or chassis rotted out (at least not a well built home build).

If you prefer to stick with your washer plan, you might consider something harder, like polyurethane, Delrin or PTFE (Teflon).
KC
My Build: The Poet Creek Express Hybrid Foamie

Poet Creek Or Bust
Engineering the TLAR way - "That Looks About Right"
TnTTT ORIGINAL 200A LANTERN CLUB = "The 200A Gang"
Green Lantern Corpsmen
User avatar
KCStudly
Donating Member
 
Posts: 9640
Images: 8169
Joined: Mon Feb 06, 2012 10:18 pm
Location: Southeastern CT, USA

Re: Doug & Angie's 5x10 Benroy Build

Postby DougN » Thu Apr 02, 2015 1:41 pm

KCStudly wrote:Nice start! :thumbsup:

I wouldn't use rubber for the washers under your floor. They will flex and compress over time potentially resulting in loose fasteners and/or wallowed out holes. Someone may argue that automotive body mounts are rubber, but they do the same thing (eventually) and were designed by a team of engineers with multimillion dollar R&D facilities backing them up.

By using spacer washers you will create point loads, rather than a unit structure. Most people either use a sealant bedding or nothing at all, relying on the floor treatment. Can't recall anyone ever complaining that their floor or chassis rotted out (at least not a well built home build).

If you prefer to stick with your washer plan, you might consider something harder, like polyurethane, Delrin or PTFE (Teflon).


I hadn't thought of that. I will use a more solid material. I think there is a tiny bit of a hump towards the the middle, so maybe just teflon tape or something down the center with a bit thicker on the sides. Just don't want the paint to stick to the frame (or rub) in case I need to remove it some day. Thanks for the input!
DougN
Teardrop Inspector
 
Posts: 22
Images: 26
Joined: Mon Mar 02, 2015 6:18 pm
Top

Re: Doug & Angie's 5x10 Benroy Build

Postby daveesl77 » Thu Apr 02, 2015 3:47 pm

I built on the HF frame, which is a bolt up. I also welded all intersections, but left the bolts. On the cross members, they are about 1/8" below the side rails, so I installed some aluminum bar I had laying around, which makes all mating surfaces equal. My floor (way overbuilt) is 1/2 ply, 1" frame wood/foam, 1/2 ply. The entire base and floor sides are covered with the TB2/canvas/roof seal. For my trailer frame bolt tops, I did bolt reliefs in the bottom layer of ply. I sliced the canvas over these relief holes, but filled the holes with rubberized caulk. The floor is then through-bolted to the frame in 8 locations, with each bolt hole fully filled with caulking. I have no shock mounting for the floor to the frame, as I wanted as solid a drawdown as possible to reduce the chance for hole wobbling. The floor bolt tops are epoxied into their relief holes, so I can remove the nuts and the camper if the need ever arises (which I hope it doesn't)

dave
*******
Dave and Regina - Enjoying old age, a LOT!

Build Journal - http://www.tnttt.com/viewtopic.php?f=50&t=62386
User avatar
daveesl77
Donating Member
 
Posts: 871
Images: 273
Joined: Tue Jan 27, 2015 4:33 pm
Location: Pocahontas County, West Virginia
Top

Re: Doug & Angie's 5x10 Benroy Build

Postby DougN » Thu Apr 09, 2015 1:51 pm

Some progress! Drilled the 6 bolt down holes and painted the bottom with 2 coats of oil based primer and 2 coats of oil based Marine Enamel. For the holes, I taped the bottom side and filled with TiteBond III, then drained out the rest of the glue after 20 minutes, re-drilled the hole to clean them out, and repeated with primer and paint, so hopefully that soaked in enough to offer some protection. Will also add some sealant when bolted and the hard spacers discussed to prevent damage to the protective paint layer.

Time to flip it over and begin the *real* build...

130465
DougN
Teardrop Inspector
 
Posts: 22
Images: 26
Joined: Mon Mar 02, 2015 6:18 pm
Top

Re: Doug & Angie's 5x10 Benroy Build

Postby DougN » Thu Apr 16, 2015 10:56 am

Lots of planning the past week. Did my first router radius cut. I first made a template on 3/8 MDF that was a combination of jigsaw and router, then sandwiched the two outside Okoume 3/8 plywood sheets with the template and did the *real* cut with the flush trim bit.
130748

After lots of review and borrowing ideas I decided on a double-seal hatch design. It's wet in Victoria and I want to be sure to keep the water out! I'm using scrap 3/8 ply to double the thickness of both outer an inner walls to allow a 5/8 D neoprene seal to attach.
130749 130751

...and with the hatch closed...
130750 130752
DougN
Teardrop Inspector
 
Posts: 22
Images: 26
Joined: Mon Mar 02, 2015 6:18 pm
Top

Re: Doug & Angie's 5x10 Benroy Build

Postby KCStudly » Thu Apr 16, 2015 3:20 pm

Nice! :thumbsup:
KC
My Build: The Poet Creek Express Hybrid Foamie

Poet Creek Or Bust
Engineering the TLAR way - "That Looks About Right"
TnTTT ORIGINAL 200A LANTERN CLUB = "The 200A Gang"
Green Lantern Corpsmen
User avatar
KCStudly
Donating Member
 
Posts: 9640
Images: 8169
Joined: Mon Feb 06, 2012 10:18 pm
Location: Southeastern CT, USA
Top

Re: Doug & Angie's 5x10 Benroy Build

Postby DougN » Sun Apr 19, 2015 6:17 pm

Here's my poor-man's radius jig. Just a length of 1x4 bolted as shown. I then measured out from the cutting part of the bit for the radius I needed and drilled a 1/8" hole. On the MDF I'm using to create the template I drilled a 1/8" hole at the pivot point and then used the drill bit itself (minus the drill) as the pivot pin. Might not be reusable but has worked perfectly so far for me! Once the mdf template was complete I used a flush bit on the router to cut the plywood.

130797
DougN
Teardrop Inspector
 
Posts: 22
Images: 26
Joined: Mon Mar 02, 2015 6:18 pm
Top

Re: Doug & Angie's 5x10 Benroy Build

Postby noseoil » Mon Apr 20, 2015 7:50 am

Hatch design looks to be a winner, no leaks & it should seal with the "D" gasket. Are you planning on a piano hinge, or is that just for the drawing? If so, some type of gasket material might be in order to keep the water out. A bicycle inner tube would work well enough screwed under the hinge, but the hinge lobes will leak at each joint otherwise in a storm.
Build log: viewtopic.php?f=50&t=60248
The time you spend planning is more important than the time you spend building.........

137905
User avatar
noseoil
1000 Club
1000 Club
 
Posts: 1822
Images: 670
Joined: Sun Apr 27, 2014 8:46 am
Location: Raton, New Mexico, living the good life!
Top

Re: Doug & Angie's 5x10 Benroy Build

Postby KCStudly » Mon Apr 20, 2015 8:48 am

Putting the rubber over the hinge with trim and a separate set of screws (so that the hinge is secured down with its own screws and doesn't squirm) will keep water and debris out of the hinge.
KC
My Build: The Poet Creek Express Hybrid Foamie

Poet Creek Or Bust
Engineering the TLAR way - "That Looks About Right"
TnTTT ORIGINAL 200A LANTERN CLUB = "The 200A Gang"
Green Lantern Corpsmen
User avatar
KCStudly
Donating Member
 
Posts: 9640
Images: 8169
Joined: Mon Feb 06, 2012 10:18 pm
Location: Southeastern CT, USA
Top

Re: Doug & Angie's 5x10 Benroy Build

Postby DougN » Mon Apr 20, 2015 8:54 am

noseoil wrote:Hatch design looks to be a winner, no leaks & it should seal with the "D" gasket. Are you planning on a piano hinge, or is that just for the drawing? If so, some type of gasket material might be in order to keep the water out. A bicycle inner tube would work well enough screwed under the hinge, but the hinge lobes will leak at each joint otherwise in a storm.


Thanks for the feedback on the design. It took several iterations, my goal being a continuous seal that would drain out below floor level and with curves gentle enough for the D gasket not to bunch up. I did decide on a stainless steal piano hinge and will be using the inner tube seal method under the hinge. I think it should interface nicely with the tops of the D seals.
DougN
Teardrop Inspector
 
Posts: 22
Images: 26
Joined: Mon Mar 02, 2015 6:18 pm
Top

Re: Doug & Angie's 5x10 Benroy Build

Postby DougN » Fri Apr 24, 2015 7:09 pm

Some
KCStudly wrote:Putting the rubber over the hinge with trim and a separate set of screws (so that the hinge is secured down with its own screws and doesn't squirm) will keep water and debris out of the hinge.


Hadn't thought of "squirming", but can see this could be an issue. At least the least, checking the screw tightness regularly. Thanks for the tip!
DougN
Teardrop Inspector
 
Posts: 22
Images: 26
Joined: Mon Mar 02, 2015 6:18 pm
Top

Re: Doug & Angie's 5x10 Benroy Build

Postby DougN » Fri Apr 24, 2015 7:21 pm

Lots of progress, and a question...

Here's where we are at...
130973

The question: Our design has a 3/8" outer wall, 3/4" core slats, and 1/8 inner wall. For various reasons I decided to mount the walls on top of the floor. Some designs I think bolt the walls to the frame or to a subfloor and are therefore very well attached. As the pictures below show, I currently have 2" screws going down from the top of through the 1"x2" core slats (3/4" x 1 1/2" actual) into the 3/4" marine ply floor. The screws are every 6" or so, including across the bulkheads, and the joints will also be epoxied. But is this strong enough? I wanted to avoid through bolts and/or screwing up from the bottom, but maybe some 1/4" bolts through the floor are in order? Or maybe that just moves the potential point of failure and doesn't really help. Your thoughts are appreciated.

130974

130973
DougN
Teardrop Inspector
 
Posts: 22
Images: 26
Joined: Mon Mar 02, 2015 6:18 pm
Top

Re: Doug & Angie's 5x10 Benroy Build

Postby tony.latham » Fri Apr 24, 2015 8:56 pm

It's looking good. :thumbsup:

I wanted to avoid ... screwing up from the bottom,


Are you tying to avoid that because of the ergonomics? (An angle drill attachement would solve that problem.)

T
User avatar
tony.latham
Gold Donating Member
 
Posts: 7073
Images: 17
Joined: Mon Jul 08, 2013 4:03 pm
Location: Middle of Idaho on the edge of nowhere
Top

Re: Doug & Angie's 5x10 Benroy Build

Postby KCStudly » Fri Apr 24, 2015 10:04 pm

I screwed up thru the bottom and used PL. Once you get it glued with the spars, roof and inner panels on you will be impressed how stiff everything gets.
KC
My Build: The Poet Creek Express Hybrid Foamie

Poet Creek Or Bust
Engineering the TLAR way - "That Looks About Right"
TnTTT ORIGINAL 200A LANTERN CLUB = "The 200A Gang"
Green Lantern Corpsmen
User avatar
KCStudly
Donating Member
 
Posts: 9640
Images: 8169
Joined: Mon Feb 06, 2012 10:18 pm
Location: Southeastern CT, USA
Top

Next

Return to Build Journals

Who is online

Users browsing this forum: No registered users and 4 guests